This practical codelab is part of Unit 4: User experience in Mobile Development module. You will get the most value out of this course if you work through the codelabs in sequence:
For the complete list of codelabs in the course, see Blackboard.
For links to all the concept chapters, apps, and slides, see Android Developer Fundamentals (Version 2).
Introduction
Letting the user display, scroll, and manipulate a list of similar data items is a common app feature. Examples of scrollable lists include contact lists, playlists, saved games, photo directories, dictionaries, shopping lists, and indexes of documents.
In the practical on scrolling views, you use ScrollView to scroll a View or ViewGroup. ScrollView is easy to use, but it's not recommended for long, scrollable lists.
RecyclerView is a subclass of ViewGroup and is a more resource-efficient way to display scrollable lists. Instead of creating a View for each item that may or may not be visible on the screen, RecyclerView creates a limited number of list items and reuses them for visible content.
In this practical you do the following:
- Use
RecyclerViewto display a scrollable list. - Add a click handler to each list item.
- Add items to the list using a floating action button (FAB), the pink button in the screenshot in the app overview section. Use a FAB for the primary action that you want the user to take.
What you should already know
You should be able to:
- Create and run apps in Android Studio.
- Create and edit UI elements using the layout editor, entering XML code directly, and accessing elements from your Java code.
- Create and use string resources.
- Convert the text in a
Viewto a string usinggetText(). - Add an
onClick()handler to aView. - Display a
Toastmessage.
What you'll learn
- How to use the
RecyclerViewclass to display items in a scrollable list. - How to dynamically add items to the
RecyclerViewas they become visible through scrolling. - How to perform an action when the user taps a specific item.
- How to show a FAB and perform an action when the user taps it.
What you'll do
- Create a new app that uses a
RecyclerViewto display a list of items as a scrollable list and associate click behavior with the list items. - Use a FAB to let the user add items to the
RecyclerView.
The RecyclerView app demonstrates how to use a RecyclerView to display a long scrollable list of people. You create the dataset (the people), the RecyclerView itself, and the actions the user can take:
- Tapping an entry marks it clicked.
- Tapping the floating action button (FAB) adds a new person.
Before you can display a RecyclerView, you need data to display. In this task, you will create a new project for the app and a dataset. In a more sophisticated app, your data might come from internal storage (a file, SQLite database, saved preferences), from another app (Contacts, Photos), or from the internet (cloud storage, Google Sheets, or any data source with an API). Storing and retrieving data is a topic of its own covered in the data storage chapter. For this exercise, you will simulate data by creating it in a class called DataSource.
1.1. Create the project and layout
- Start Android Studio.
- Create a new project with the name RecyclerViews, select the Basic Activity template.
- The Basic Activity template, introduced in the chapter on using clickable images, provides a floating action button (FAB) and app bar in the Activity layout (
activity_main.xml), and a layout for the Activity content (content_main.xml). This layout contains a NavHostfragment and there are two fragments calledFirstFragmentandSecondFragment. - Run your app. You should see the RecyclerViews app title and "Hello first fragment" on the screen together with a button entitled Next which takes you to the second fragment. The second fragment contains only a button entitled Previous which takes you back to the first fragment. If you encounter Gradle-related errors, sync your project as described in the practical on installing Android Studio and running Hello World.
1.2. Add code to create data
In this step you create a LinkedList of 20 Person objects which have been generated at random. A useful source for generating random data, which I have used here, is https://github.com/mdeanda/lorem.
- Create a new package in your project called model.
- Create a new Java class in the
modelpackage called Person and enter the following code:
Each Person has apublic class Person { String firstName; String lastName; String phone; String email; int clickCount; public Person(String f, String l, String p, String e) { this.firstName = f; this.lastName = l; this.phone = p; this.email = e; clickCount = 0; } public String getFirstName() { return firstName; } public void setFirstName(String firstName) { this.firstName = firstName; } public String getLastName() { return lastName; } public void setLastName(String lastName) { this.lastName = lastName; } public String getPhone() { return phone; } public void setPhone(String phone) { this.phone = phone; } public String getEmail() { return email; } public void setEmail(String email) { this.email = email; } public void incrementClickCount() { this.clickCount++; } public String simpleDisplay() { String clickMsg = ""; if (clickCount > 0) { clickMsg = ". Clicked: " + clickCount + " times"; } return firstName + " " + lastName + clickMsg; } }firstName,lastName,phoneandemailproperty. - Create a new Java class in the
modelpackage called DataSource and enter the following code:import java.util.LinkedList; public class DataSource { // testData is a stock of data items to add private LinkedList<Person> testData; // data will contain the list of data items displayed by the app private LinkedList<Person> data; private int testDataIndex = 0; private static DataSource _instance; private DataSource() { data = new LinkedList<>(); testData = new LinkedList<>(); testData.add(new Person("Andre", "Snow", "(549) 413-0834", "andre.snow@example.com")); testData.add(new Person("Maynard", "Shields", "(457) 311-9060", "maynard.shields@example.com")); testData.add(new Person("Sherry", "Ellison", "(916) 926-6098", "sherry.ellison@example.com")); testData.add(new Person("Lester", "Buckley", "(699) 228-0885", "lester.buckley@example.com")); testData.add(new Person("Heriberto", "Pena", "(504) 512-6981", "heriberto.pena@example.com")); testData.add(new Person("Hugh", "Coffey", "(446) 273-9747", "hugh.coffey@example.com")); testData.add(new Person("Delmar", "Roach", "(730) 122-4126", "delmar.roach@example.com")); testData.add(new Person("Ivy", "Bishop", "(765) 253-6871", "ivy.bishop@example.com")); testData.add(new Person("Otis", "Estes", "(460) 524-2120", "otis.estes@example.com")); testData.add(new Person("Clayton", "Good", "(349) 700-9200", "clayton.good@example.com")); testData.add(new Person("Zachary", "Johns", "(775) 689-1912", "zachary.johns@example.com")); testData.add(new Person("Dionne", "Wolf", "(137) 269-4844", "dionne.wolf@example.com")); testData.add(new Person("Gena", "Barton", "(524) 729-4493", "gena.barton@example.com")); testData.add(new Person("Wade", "Johnson", "(711) 885-7832", "wade.johnson@example.com")); testData.add(new Person("Glenda", "Briggs", "(984) 407-9968", "glenda.briggs@example.com")); testData.add(new Person("Mercedes", "Joseph", "(551) 170-0298", "mercedes.joseph@example.com")); testData.add(new Person("Catherine", "Calderon", "(831) 428-5718", "catherine.calderon@example.com")); testData.add(new Person("Adan", "Rodriquez", "(519) 708-9057", "adan.rodriquez@example.com")); testData.add(new Person("Pierre", "Lindsay", "(905) 407-3679", "pierre.lindsay@example.com")); testData.add(new Person("Brandon", "Morris", "(110) 702-1306", "brandon.morris@example.com")); for (int i = 0; i< 5; i++) { addPerson(); } } public static DataSource getInstance() { if (_instance == null) { _instance = new DataSource(); } return _instance; } public void addPerson() { // copy a Person from testData to data data.add(testData.get(testDataIndex)); // update to the next index, reset to 0 if at the end of the list // some Person objects may be added twice if you add a lot of data testDataIndex = (testDataIndex + 1) % testData.size(); } public LinkedList<Person> getData() { return data; } }
This class follows the singleton design pattern and has a method that will return a LinkedList<Person> of data. Our DataSource keeps a stock of data in a LinkedList called testData and will copy items from that list into the LinkedList called data which will contain the actual data displayed by the app. Adding a new data item will simply copy the next Person from testdata into data. Our testData acts as a mock source of real data.
- Add the data to FirstFragment. Open FirstFragment and add the following member variable and constructor:
private final LinkedListmPersonList;
public FirstFragment() {
super();
mPersonList = DataSource.getInstance().getData();
}
1.3. Change the FAB icon
For this practical, you will use a FAB to generate a new Person to insert into the list. The Basic Activity template provides a FAB, but you may want to change its icon. As you learned in another lesson, you can choose an icon from the set of icons in Android Studio for the FAB. Follow these steps:
- Expand res in the Project > Android pane, and right-click (or Control-click) the drawable folder.
- Choose New > Image Asset. The Configure Image Asset dialog appears.
- Choose Action Bar and Tab Items in the drop-down menu at the top of the dialog.
- Change ic_action_name in the Name field to ic_add_for_fab.
- Click the clip art image (the Android logo next to Clipart:) to select a clip art image as the icon. A page of icons appears. Click the icon you want to use for the FAB, such as the plus (+) sign or the add person sign.
- Choose HOLO_DARK from the Theme drop-down menu. This sets the icon to be white against a dark-colored (or black) background. Click Next.
- Click Finish in the Confirm Icon Path dialog.
In this practical, you display data in a RecyclerView. You need the following:
- Data to display: Use the
DataSource. - A
RecyclerViewfor the scrolling list that contains the list items. - Layout for one item of data. All list items look the same.
- A layout manager. RecyclerView.LayoutManager handles the hierarchy and layout of
Viewelements.RecyclerViewrequires an explicit layout manager to manage the arrangement of list items contained within it. This layout could be vertical, horizontal, or a grid. You will use a vertical LinearLayoutManager. - An adapter. RecyclerView.Adapter connects your data to the
RecyclerView. It prepares the data in a RecyclerView.ViewHolder. You will create an adapter that inserts into and updates your generated data in your views. - A ViewHolder. Inside your adapter, you will create a
ViewHolderthat contains theViewinformation for displaying one item from the item's layout.
The diagram below shows the relationship between the data, the adapter, the ViewHolder, and the layout manager. 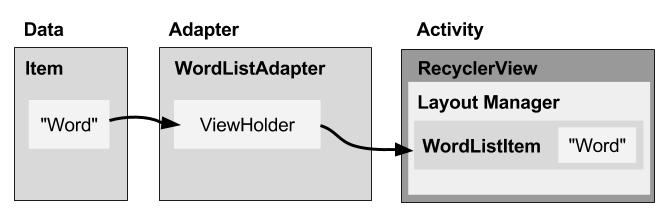
To implement these pieces, you will need to:
- Add a
RecyclerViewelement to theFirstFragmentXML content layout (fragment_first.xml) for the RecyclerViews app. - Create an XML layout file (
personlist_item.xml) for one list item, which is aPersonListItem. - Create an adapter (
PersonListAdapter) with aViewHolder(PersonViewHolder). Implement the method that takes the data, places it in theViewHolder, and lets the layout manager know to display it. - In the
onViewCreated()method ofFirstFragment, create aRecyclerViewand initialize it with the adapter and a standard layout manager.
Let's do these one at a time.
2.1. Modify the layout in content_main.xml
To add a RecyclerView element to the XML layout, follow these steps:
- Open fragment_first.xml in your RecyclerViews app. It shows a "Hello first fragment" TextView and a
Buttonat the center of aConstraintLayout. - Click the Code tab to show the XML code.
- Replace the entire
TextViewandButtonelements with the following:
You need to specify the full path (androidx.recyclerview.widget.RecyclerView), because<androidx.recyclerview.widget.RecyclerView android:id="@+id/recyclerview" android:layout_width="match_parent" android:layout_height="match_parent" />RecyclerViewis part of the Androidx Library.
2.2. Create the layout for one list item
The adapter needs the layout for one item in the list. All the items use the same layout. You need to specify that list item layout in a separate layout resource file, because it is used by the adapter, separately from the RecyclerView.
Create a simple Person item layout using a vertical LinearLayout with a TextView:
- Right-click the app > res > layout folder and choose New > Layout resource file.
- Name the file personlist_item and click OK.
- In the new layout file, click the Code tab to show the XML code.
- Replace the
ConstraintLayoutthat was created with the file with aLinearLayoutusing the following code:<LinearLayout xmlns:android="http://schemas.android.com/apk/res/android" android:layout_width="match_parent" android:layout_height="wrap_content" android:orientation="vertical" android:padding="6dp"> </LinearLayout> - Add a TextView, which we will use to display the person's name, to the LinearLayout. Use the following code:
<TextView
        android:id="@+id/person"
        android:layout_width="match_parent"
        android:layout_height="wrap_content"
        android:textSize="24sp"
        android:textStyle="bold"/>
2.3 Create a style from the TextView attributes
You can use styles to allow elements to share groups of display attributes. An easy way to create a style is to extract the style of a UI element that you already created. To extract the style information for the word TextView in personlist_item.xml:
- Open personlist_item.xml if it is not already open and click the Design tab.
- Right-click (or Control-click) the TextView you just created in personlist_item.xml, and choose Refactor > Extract > Style. The Extract Android Style dialog appears.
- Name your style person_title and leave all other options selected. Select the Launch ‘Use Style Where Possible' option. Then click OK.
- When prompted, apply the style to the Whole Project.
- Find and examine the word_title style in values > styles.xml.
- Reopen personlist_item.xml if it is not already open. The TextView now uses the style in place of individual styling properties, as shown below:
<LinearLayout
    xmlns:android="http://schemas.android.com/apk/res/android"
    android:layout_width="match_parent"
    android:layout_height="wrap_content"
    android:orientation="vertical"
    android:padding="6dp">


    <TextView
        android:id="@+id/person"
        style="@style/person_title" />
</LinearLayout>
2.4. Create an adapter
Android uses adapters (from the Adapter class) to connect data with View items in a list. There are many different kinds of adapters available, and you can also write custom adapters. In this task you will create an adapter that associates your list of words with word list View items.
To connect data with View items, the adapter needs to know about the View items. The adapter uses a ViewHolder that describes a View item and its position within the RecyclerView.
First, you will build an adapter that bridges the gap between the data in your person list and the RecyclerView that displays it:
- Right-click your main package name, mine is called java/uk.aston.recyclerviews and select New > Java Class.
- Name the class PersonListAdapter.
- Give
PersonListAdapterthe following signature:public class PersonListAdapter extends RecyclerView.Adapter<PersonListAdapter.PersonViewHolder> { }PersonListAdapterextends a generic adapter forRecyclerViewto use aViewholder that is specific for your app and defined insidePersonListAdapter.PersonViewHoldershows an error, because you have not yet defined it. - Click the class declaration (PersonListAdapter), then click the red light bulb on the left side of the pane. Choose Implement methods.
- A dialog appears that asks you to choose which methods to implement. Choose all three methods and click
OK.
Android Studio creates empty placeholders for all the methods. Note how onCreateViewHolder and onBindViewHolder both reference the PersonViewHolder, which hasn't been implemented yet.
2.5 Create the ViewHolder for the adapter
To create the ViewHolder, follow these steps:
- Inside the
PersonListAdapterclass, add a newWordViewHolderinner class with this signature:
You will see an error about a missing default constructor. You can see details about the errors by hovering your mouse cursor over the red-underlined code or over any red horizontal line on the right margin of the editor pane.class PersonViewHolder extends RecyclerView.ViewHolder {} - Add variables to the
PersonViewHolderinner class for theTextViewand the adapter:public final TextView personItemView; final PersonListAdapter mAdapter; - In the inner class
WordViewHolder, add a constructor that initializes theViewHolderTextViewfrom thepersonXML resource, and sets its adapter:public PersonViewHolder(View itemView, PersonListAdapter adapter) { super(itemView); personItemView = itemView.findViewById(R.id.person); this.mAdapter = adapter; } - Before you can run your app, you will need to delete some code from
FirstFragment.java. Open FirstFragment.java and edit the onViewCreated method to delete the code after the call to the super method. After you have done that, the method should look like this:public void onViewCreated(@NonNull View view, Bundle savedInstanceState) { super.onViewCreated(view, savedInstanceState); } - Run your app to make sure that you have no errors. Your will still see only a blank view.
- Click the Logcat tab to see the Logcat pane, and note the E/RecyclerView: No adapter attached; skipping layout warning. You will attach the adapter to the RecyclerView in another step.
2.6 Storing your data in the adapter
You need to hold your data in the adapter, and PersonListAdapter needs a constructor that initializes the word list from the data. Follow these steps:
- To hold your data in the adapter, create a private linked list of Person in PersonListAdapter and call it mPersonList.
private LinkedList<Person> mPersonList; - Look for the template for the method getItemCount() and make it return the size of mPersonList:
@Override public int getItemCount() { return mPersonList.size(); } PersonListAdapterneeds a constructor that initializes the person list from the data. To create aViewfor a list item, thePersonListAdapterneeds to inflate the XML for a list item. You use a layout inflator for that job.LayoutInflatorreads a layout XML description and converts it into the correspondingViewitems. Start by creating a member variable for the inflater inPersonListAdapter:private LayoutInflater mInflater;- Implement the constructor for
PersonListAdapter. The constructor needs to have a context parameter, and a linked list ofPersonwith the app's data. The method needs to instantiate aLayoutInflatorformInflaterand setmPersonListto the passed in data:public PersonListAdapter(Context context, LinkedList<Person> personList) { mInflater = LayoutInflater.from(context); this.mPersonList = personList; } - Look for the template for the
onCreateViewHolder()method and complete it with this code:
The@Override public PersonListAdapter.PersonViewHolder onCreateViewHolder(@NonNull ViewGroup parent, int viewType) { View mItemView = mInflater.inflate(R.layout.personlist_item, parent, false); return new PersonViewHolder(mItemView, this); }onCreateViewHolder()method is similar to theonCreate()method. It inflates the item layout, and returns aViewHolderwith the layout and the adapter. - Look for the template for the
onBindViewHolder()method and complete it with the code below:
The@Override public void onBindViewHolder(@NonNull PersonListAdapter.PersonViewHolder holder, int position) { Person person = mPersonList.get(position); String mCurrent = person.simpleDisplay(); holder.personItemView.setText(mCurrent); }onBindViewHolder()method connects your data to the view holder. - Run your app to make sure that there are no errors.
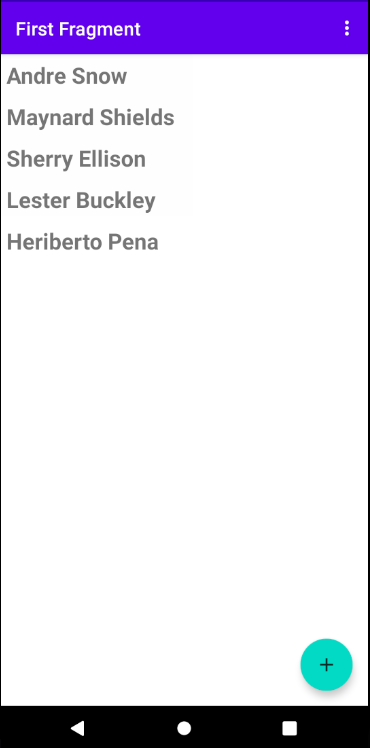
2.7. Create the RecyclerView in the FirstFragment
Now that you have an adapter with a ViewHolder, you can finally create a RecyclerView and connect all the pieces to display your data.
- Open FirstFragment.
- Add member variables for the RecyclerView and the adapter.
private RecyclerView mRecyclerView; private PersonListAdapter mAdapter; - In the
onViewCreated()method ofFirstFragment, add the following code (after the call tosuper.onViewCreated) that creates theRecyclerViewand connects it with an adapter and the data. The comments explain each line.// Get a handle to the RecyclerView. mRecyclerView = view.findViewById(R.id.recyclerview); // Create an adapter and supply the data to be displayed. mAdapter = new PersonListAdapter(getContext(), mPersonList); // Connect the adapter with the RecyclerView. mRecyclerView.setAdapter(mAdapter); // Give the RecyclerView a default layout manager. mRecyclerView.setLayoutManager(new LinearLayoutManager(getContext())); - Run your app. You should see something like this:
Looking at lists of items is interesting, but it's a lot more fun and useful if your user can interact with them. To see how the RecyclerView can respond to user input, you will attach a click handler to each item. When the item is tapped, the click handler is executed, and the full contact details of that person will be displayed in the second fragment.
The list of items that a RecyclerView displays can also be modified dynamically—it doesn't have to be a static list. There are several ways to add additional behaviors. One is to use the floating action button (FAB). For example, in Gmail, the FAB is used to compose a new email. For this practical, you will generate a new contact to insert into the list.
3.1. Make items respond to clicks
- Open PersonListAdapter.
- Change the PersonViewHolder class signature to implement View.onClickListener:
class PersonViewHolder extends RecyclerView.ViewHolder implements View.OnClickListener { - Click the class header and on the red light bulb to implement stubs for the required methods, which in this case is just the
onClick()method. - Add the following code to the body of the onClick() method.
// Get the position of the item that was clicked. int mPosition = getLayoutPosition(); // Use that to access the affected item in mPersonList. Person p = mPersonList.get(mPosition); // Register the click on the person p.incrementClickCount(); // Notify the adapter, that the data has changed so it can // update the RecyclerView to display the data. mAdapter.notifyDataSetChanged(); - Connect the
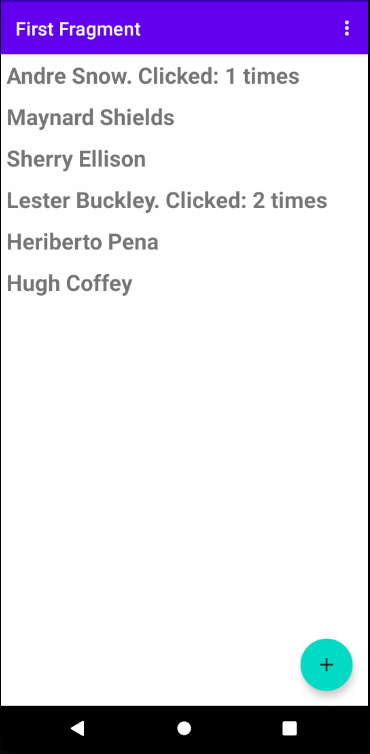
onClickListenerwith theView. Add this code to thePersonViewHolderconstructor (below thethis.mAdapter = adapterline):itemView.setOnClickListener(this); - Run your app and click on some of the contacts.
3.2. Add behaviour to the FAB
In this task you will implement an action for the FAB to:
- Add a word to the end of the list of words.
- Notify the adapter that the data has changed.
- Scroll to the inserted item.
Follow these steps:
- Open FirstFragment.java. We need to be able to access the FAB which is actually in the layout of the
MainActivity. We can get access to the FAB once this fragment has started. Add the followingonStartlifecycle method to yourFirstFragment:
This method will gain a reference to the FAB from the@Override public void onStart() { super.onStart(); getActivity().findViewById(R.id.fab).setOnClickListener(new View.OnClickListener() { @Override public void onClick(View view) { DataSource.getInstance().addPerson(); mAdapter.notifyDataSetChanged(); } }); }MainActivityand add anOnClickListener. The listener has a single method calledonClickwhich will tell ourDataSourceto add aPersonto the list and then notify our adapter that its data set has changed. The call tonotifyDataSetChangedis important because otherwise the view will not be updated and the newly added data will not be seen. - Run the app.
- Scroll the list of words and click items.
- Add items by clicking the FAB.
Challenge 1: Change the options menu to show only one option: Reset. This option should return the list of people to its original state of five people, with nothing clicked and no extra people.
Challenge 2: Creating a click listener for each item in the list is easy, but it can hurt the performance of your app if you have a lot of data. Research how you could implement this more efficiently. This is an advanced challenge. Start by thinking about it conceptually, and then search for an implementation example
- RecyclerView is a resource-efficient way to display a scrollable list of items.
- To create a
Viewfor each list item, the adapter inflates an XML layout resource for a list item using LayoutInflator. - LinearLayoutManager is a
RecyclerViewlayout manager that shows items in a vertical or horizontal scrolling list. - GridLayoutManager is a
RecyclerViewlayout manager that shows items in a grid - StaggeredGridLayoutManager is a
RecyclerViewlayout manager that shows items in a staggered grid. - Use RecyclerView.Adapter to connect your data to the
RecyclerView. It prepares the data in a RecyclerView.ViewHolder that describes aViewitem and its position within theRecyclerView. - Implement View.onClickListener to detect mouse clicks in a RecyclerView.
The related concept documentation is 4.5: RecyclerView.
Android Studio documentation:
Android developer documentation:
- RecyclerView
- LayoutInflator
- RecyclerView.LayoutManager
- LinearLayoutManager
- GridLayoutManager
- StaggeredGridLayoutManager
- CoordinatorLayout
- ConstraintLayout
- RecyclerView.Adapter
- RecyclerView.ViewHolder
- View.onClickListener
- Create a list with RecyclerView Video:
RecyclerView Animations and Behind the Scenes (Android Dev Summit 2015)