This practical codelab is part of Unit 4: User Interaction in the DC3040/CS3040 module.
For the complete list of codelabs in the course, see Mobile Development Codelabs.
Introduction
The user interface (UI) that appears on a screen of an Android-powered device consists of a hierarchy of objects called views. Every element of the screen is a View.
The View class represents the basic building block for all UI components. View is the base class for classes that provide interactive UI components, such as Button elements. A Button is a UI element the user can tap or click to perform an action.
You can turn any View, such as an ImageView, into a UI element that can be tapped or clicked. You must store the image for the ImageView in the drawables folder of your project.
In this practical, you learn how to use images as elements that the user can tap or click.
What you should already know
You should be able to:
- Create an Android Studio project from a template and generate the main layout.
- Run apps on the emulator or a connected device.
- Create and edit UI elements using the layout editor and XML code.
- Access UI elements from your code using findViewById().
- Handle a Button click.
- Display a Toast message.
- Add images to a project's
drawablefolder. - How the Jetpack Navigation works
What you'll learn
- How to use an image as an interactive element to perform an action.
- How to set attributes for
ImageViewelements in the layout editor. - How to add an
onClick()method to display aToastmessage.
What you'll do
- Create a new Android Studio project for a mock dessert-ordering app that uses images as interactive elements.
- Set
onClick()handlers for the images to display differentToastmessages. - Change the floating action button supplied by the template so that it shows a different icon and navigates to another
Fragment.
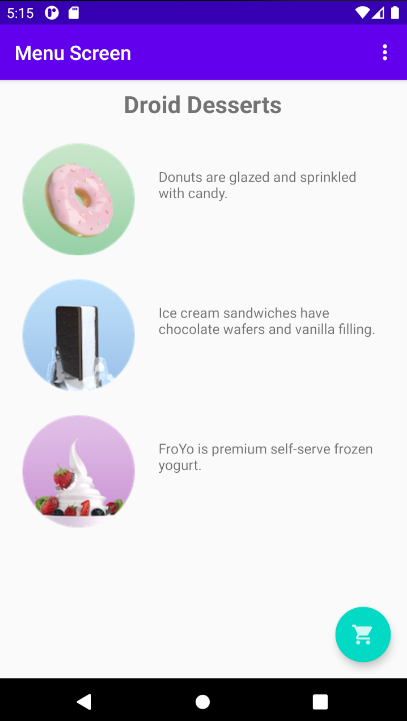
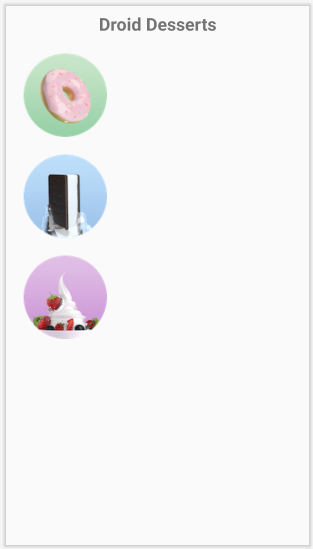
In this practical, you create and build a new app starting with the Basic Activity template that imitates a dessert-ordering app. The user can tap an image to perform an action—in this case display a Toast message—as shown in the figure below. The user can also tap a shopping-cart button to proceed to the next Activity.
You can make a view clickable, as a button, by adding the android:onClick attribute in the XML layout. For example, you can make an image act like a button by adding android:onClick to the ImageView.
In this task you create a prototype of an app for ordering desserts from a café. After starting a new project based on the Basic Activity template, you modify the "Hello World" TextView with appropriate text, and add images that the user can tap.
1.1 Start the new project
- Start a new Android Studio project and choose the Basic Activity template
- Give your app the name Droid Cafe, ensure that Java is the selected language and the Minimum SDK is API 18: Android 4.3 (Jelly Bean)
- Click Finish.
The project opens showing the MainActivity and you will see that there are two fragments called FirstFragment and SecondFragment.
There are four layouts in the res > layout folder:activity_main.xmlfor the app bar and floating action button (which you don't change in this task), andcontent_main.xmlwhich contains aConstraintLayoutcontaining aNavHostFragment(see the JetPack Navigation Codelab). The layout called fragment_first.xml contains the layour for FirstFragment and fragment_second.xml contains the layout for SecondFragment. - Open
fragment_first.xmland click the Design tab (if it is not already selected) to show the layout editor. - Click to select the
TextViewshowing"Hello first fragment"in the layout and open the Attributes pane. - Change the attributes as follows:
Attribute | Value |
|
|
|
|
| Select |
|
|
This replaces the original android:id attribute for the TextView with the new id value textintro, changes the text, makes the text bold, and sets a larger text size of 24sp. All references to the previous id will have been updated so at this point but the app would NOT run because there is an onClick listener added to the Button in FirstFragment. We will fix this later.
- Delete the constraint that stretches from the bottom of the
textintroTextViewto the top of the "Next"Buttonand als delete thatButton., so that theTextViewsnaps to the top of the layout, and choose 8 (8dp) for the top margin as shown below.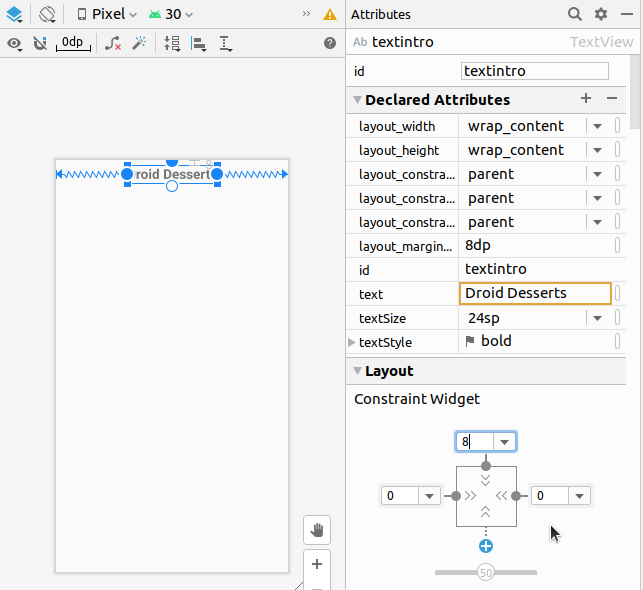
- In a previous lesson you learned how to extract a string resource from a literal text string. Click the Code tab to switch to XML code, and extract the
"Droid Desserts"string in theTextViewand enterintro_textas the string resource name.
1.2 Add the images
Three images (donut_circle.png, froyo_circle.png, and icecream_circle.png) are provided for this example, which you can download from Blackboard. As an alternative, you can substitute your own images as PNG files, but they must be sized at about 113 x 113 pixels to use in this example.
This step also introduces a new technique in the layout editor: using the Fix button in warning messages to extract string resources.
- To copy the images to your project, first close the project.
- Copy the image files into your project's drawable folder. Find the drawable folder in a project by using this path from the project's location on your computer: DroidCafe > app > src > main > res > drawable.
- Reopen your project.
- Open
fragment_first.xmlfile, and click the Design tab (if it is not already selected). - Drag an ImageView to the layout, choose the donut_circle image for it, and constrain it to the top TextView and to the left side of the layout with a margin of 24 (24dp) for both constraints, as shown in the animated figure below.
- In the Attributes pane, enter the following values for the attributes:
Attribute
Value
iddonutcontentDescriptionDonuts are glazed and sprinkled with candy.
(You can copy/paste the text into the field.) - Drag a second
ImageViewto the layout, choose theicecream_circleimage for it, and constrain it to the bottom of the firstImageViewand to the left side of the layout with a margin of 24 (24dp) for both constraints.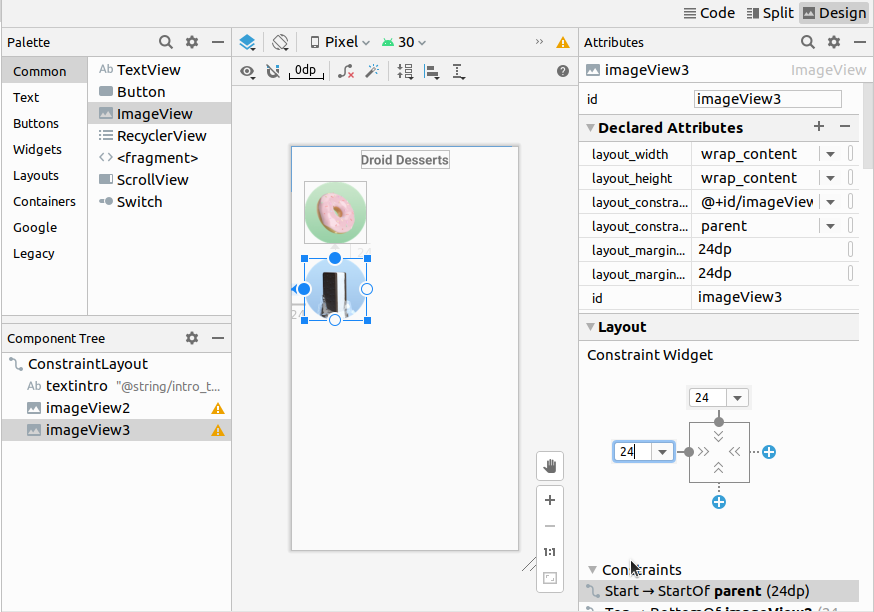
- In the Attributes pane, enter the following values for the attributes:
Attribute
Value
idice_creamcontentDescriptionIce cream sandwiches have chocolate wafers and vanilla filling.
(You can copy/paste the text into the field.) - Drag a third
ImageViewto the layout, choose thefroyo_circleimage for it, and constrain it to the bottom of the secondImageViewand to the left side of the layout with a margin of 24 (24dp) for both constraints.
In the Attributes pane, enter the following values for the attributes:Attribute
Value
idfroyocontentDescriptionFroYo is premium self-serve frozen yogurt.
(You can copy/paste the text into the field.) - Click the warning icon which should display warnings about hardcoded text:
 , Warning icon in the upper right corner of the design panel (above the layout image) to open the warning pane, which should display warnings about hardcoded text:
- Expand each Hardcoded text warning, scroll to the bottom of the warning message, and click the Fix button as shown below:
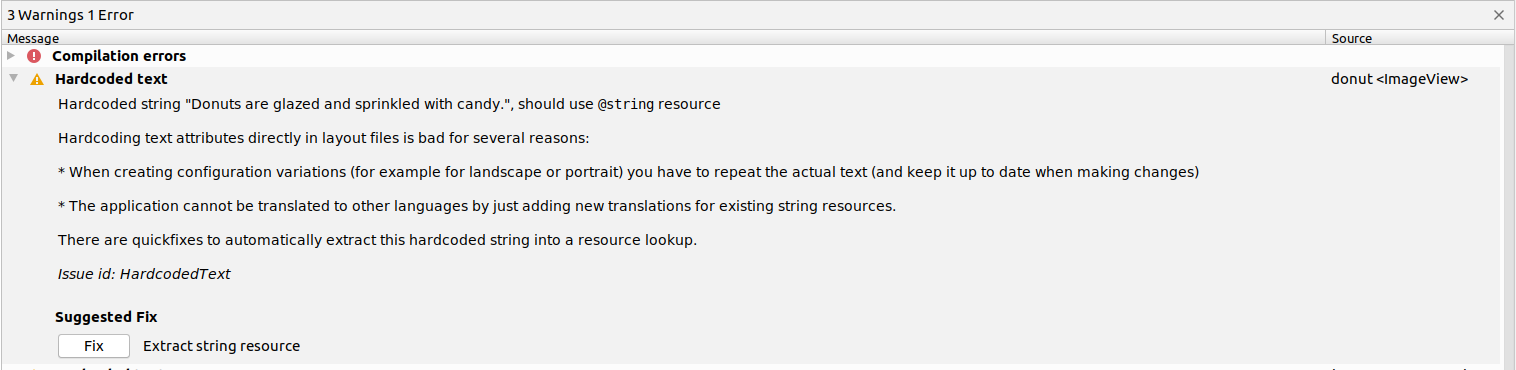
The fix for each hardcoded text warning extracts the string resource for the string. The Extract Resource dialog appears, and you can enter the name for the string resource. Enter the following names for the string resources:
String | Enter the following name: |
|
|
|
|
|
|
The layout of fragment_first.xml should now look like the figure below.
1.3 Add the text descriptions
In this step you add a text description (TextView) for each dessert. Because you have already extracted string resources for the contentDescription fields for the ImageView elements, you can use the same string resources for each description TextView.
- Drag a
TextViewelement to the layout. - Constrain the element's left side to the right side of the donut
ImageViewand its top to the top of the donutImageView, both with a margin of 24 (24dp). - Constrain the element's right side to the right side of the layout, and use the same margin of 24 (
24dp). Enter donut_description for the ID field in the Attributes pane. The newTextViewshould appear next to the donut image as shown in the figure below.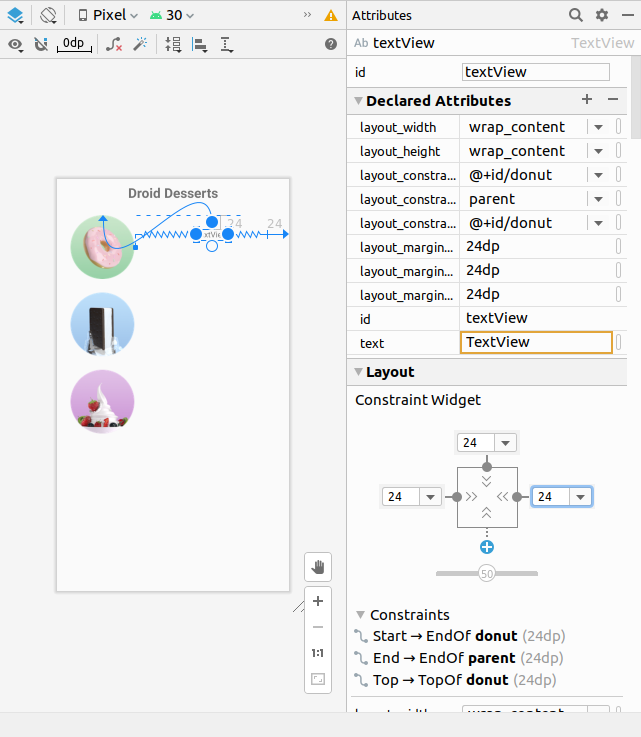
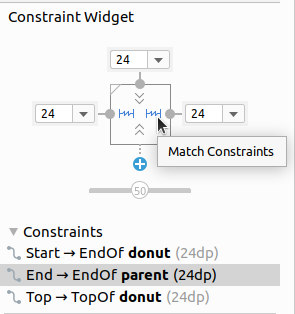
- In the Attributes pane change the width in the inspector pane to Match Constraints:
- In the Attributes pane, begin entering the string resource for the
textfield by prefacing it with the @ symbol: @d. Click the string resource name (@string/donuts) which appears as a suggestion: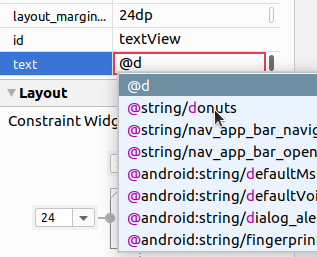
- Repeat the steps above to add a second
TextViewthat is constrained to the right side and top of theice_creamImageView, and its right side to the right side of the layout. Enter the following in the Attributes pane:Attribute field
Enter the following:
idice_cream_descriptionLeft, right, and top margins24layout_widthmatch_constrainttext@string/ice_cream_sandwiches - Repeat the steps above to add a third
TextViewthat is constrained to the right side and top of thefroyoImageView, and its right side to the right side of the layout. Enter the following in the Attributes pane:Attribute field
Enter the following:
idfroyo_descriptionLeft, right, and top margins24layout_widthmatch_constrainttext@string/froyo
The layout should now look like the following:

Task 1 solution code
The XML layout for the content.xml file is shown below.
<?xml version="1.0" encoding="utf-8"?>
<androidx.constraintlayout.widget.ConstraintLayout
    xmlns:android="http://schemas.android.com/apk/res/android"
	xmlns:app="http://schemas.android.com/apk/res-auto"
	xmlns:tools="http://schemas.android.com/tools"
	android:layout_width="match_parent"
	android:layout_height="match_parent"
	tools:context=".FirstFragment">

	<TextView
		android:id="@+id/textintro"
		android:layout_width="wrap_content"
		android:layout_height="wrap_content"
		android:layout_marginTop="8dp"
		android:text="@string/intro_text"
		android:textSize="24sp"
		android:textStyle="bold"
		app:layout_constraintEnd_toEndOf="parent"
		app:layout_constraintStart_toStartOf="parent"
		app:layout_constraintTop_toTopOf="parent" />

	<ImageView
		android:id="@+id/donut"
		android:layout_width="wrap_content"
		android:layout_height="wrap_content"
		android:layout_marginStart="24dp"
		android:layout_marginTop="24dp"
		android:contentDescription="@string/donuts"
		android:src="@drawable/donut_circle"
		app:layout_constraintStart_toStartOf="parent"
		app:layout_constraintTop_toBottomOf="@+id/textintro" />

	<ImageView
		android:id="@+id/ice_cream"
		android:layout_width="wrap_content"
		android:layout_height="wrap_content"
		android:layout_marginStart="24dp"
		android:layout_marginTop="24dp"
		android:contentDescription="@string/ice_cream_sandwiches"
		android:src="@drawable/icecream_circle"
		app:layout_constraintStart_toStartOf="parent"
		app:layout_constraintTop_toBottomOf="@+id/donut" />

	<ImageView
		android:id="@+id/froyo"
		android:layout_width="wrap_content"
		android:layout_height="wrap_content"
		android:layout_marginStart="24dp"
		android:layout_marginTop="24dp"
		android:contentDescription="@string/froyo"
		android:src="@drawable/froyo_circle"
		app:layout_constraintStart_toStartOf="parent"
		app:layout_constraintTop_toBottomOf="@+id/ice_cream" />

	<TextView
		android:id="@+id/textView"
		android:layout_width="0dp"
		android:layout_height="wrap_content"
		android:layout_marginStart="24dp"
		android:layout_marginTop="24dp"
		android:layout_marginEnd="24dp"
		android:text="@string/donuts"
		app:layout_constraintEnd_toEndOf="parent"
		app:layout_constraintStart_toEndOf="@+id/donut"
		app:layout_constraintTop_toTopOf="@+id/donut" />

	<TextView
		android:id="@+id/textView2"
		android:layout_width="0dp"
		android:layout_height="wrap_content"
		android:layout_marginStart="24dp"
		android:layout_marginTop="24dp"
		android:layout_marginEnd="24dp"
		android:text="@string/ice_cream_sandwiches"
		app:layout_constraintEnd_toEndOf="parent"
		app:layout_constraintStart_toEndOf="@+id/ice_cream"
		app:layout_constraintTop_toTopOf="@+id/ice_cream" />

	<TextView
		android:id="@+id/textView3"
		android:layout_width="0dp"
		android:layout_height="wrap_content"
		android:layout_marginStart="24dp"
		android:layout_marginTop="24dp"
		android:layout_marginEnd="24dp"
		android:text="@string/froyo"
		app:layout_constraintEnd_toEndOf="parent"
		app:layout_constraintStart_toEndOf="@+id/froyo"
		app:layout_constraintTop_toTopOf="@+id/froyo" />

</androidx.constraintlayout.widget.ConstraintLayout>
To make a View clickable so that users can tap (or click) it, add the android:onClick attribute in the XML layout and specify the click handler. For example, you can make an ImageView act like a simple Button by adding android:onClick to the ImageView. In this task you make the images in your layout clickable.
2.1 Create a Toast method
In this task you add each method for the android:onClick attribute to call when each image is clicked. In this task, these methods simply display a Toast message showing which image was tapped. (In another chapter you modify these methods to display another Fragment.)
- To use string resources in Java code, you should first add them to the
strings.xmlfile. Expand res > values in the Project > Android pane, and open strings.xml. Add the following string resources for the strings to be shown in theToastmessage:<string name="donut_order_message">You ordered a donut.</string> <string name="ice_cream_order_message">You ordered an ice cream sandwich.</string> <string name="froyo_order_message">You ordered a FroYo.</string> - Open MainActivity, and add the following
displayToast()method to the end of MainActivity (before the closing bracket):
Although you could have added this method in any position within MainActivity, it is best practice to put your own methods below the methods already provided in MainActivity by the template.public void displayToast(String message) { Toast.makeText(getApplicationContext(), message, Toast.LENGTH_SHORT).show(); }
2.2 Create click handlers
Each clickable image needs a click handler-a method for the android:onClick attribute to call. The click handler, if called from the android:onClick attribute, must be public, return void, and define a View as its only parameter. Follow these steps to add the click handlers:
- Add the following
showDonutOrder()method to MainActivity. For this task, use the previously createddisplayToast()method to display aToastmessage:
The first three lines are a comment in the Javadoc format, which makes the code easier to understand and also helps generate documentation for your code. It is a best practice to add such a comment to every new method you create. For more information about how to write comments, see How to Write Doc Comments for the Javadoc Tool./** * Shows a message that the donut image was clicked. */ public void showDonutOrder(View view) { displayToast(getString(R.string.donut_order_message)); } - Add more methods to the end of MainActivity for each dessert:
/** * Shows a message that the ice cream sandwich image was clicked. */ public void showIceCreamOrder(View view) { displayToast(getString(R.string.ice_cream_order_message)); } /** * Shows a message that the froyo image was clicked. */ public void showFroyoOrder(View view) { displayToast(getString(R.string.froyo_order_message)); } - (Optional) Choose Code > Reformat Code to reformat the code you added in MainActivity to conform to standards and make it easier to read.
- At this point we will delete what is now an error in
FirstFragment.java. In theonViewCreatedmethod, there is a reference toR.id.button_first. We deleted that button earlier when we changed the layout infragment_first.xml. Look for the following code (lines 23 to 27) and delete it.view.findViewById(R.id.button_first).setOnClickListener(new View.OnClickListener() { @Override public void onClick(View view) { NavHostFragment.findNavController(FirstFragment.this) .navigate(R.id.action_FirstFragment_to_SecondFragment); } });
2.3 Add the onClick attribute
In this step you add android:onClick to each of the ImageView elements in the fragment_first.xml layout. The android:onClick attribute calls the click handler for each element.
- Open the fragment_first.xml file, and click the Code tab in the layout editor to show the XML code.
- Add the
android:onClickattribute todonutImageView. As you enter it, suggestions appear showing the click handlers. Select theshowDonutOrderclick handler as shown below: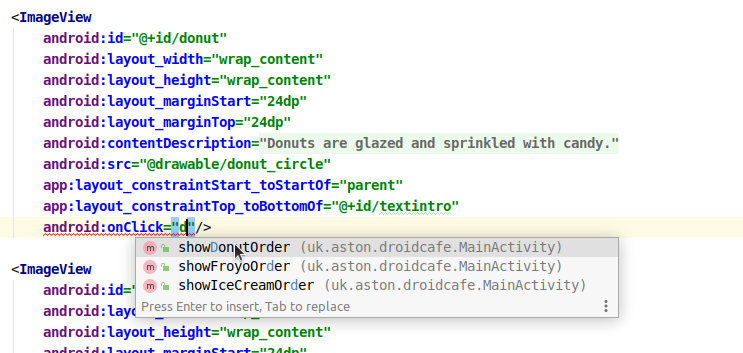
The code should now look as follows:<ImageView android:id="@+id/donut" android:layout_width="wrap_content" android:layout_height="wrap_content" android:layout_marginStart="24dp" android:layout_marginTop="24dp" android:contentDescription="@string/donuts" android:src="@drawable/donut_circle" app:layout_constraintStart_toStartOf="parent" app:layout_constraintTop_toBottomOf="@+id/textintro" android:onClick="showDonutOrder"/>
The last line (android:onClick="showDonutOrder") assigns the click handler (showDonutOrder) to the ImageView.
- (Optional) Choose Code > Reformat Code to reformat the XML code you added in
fragment_first.xmlto conform to standards and make it easier to read. Android Studio automatically moves theandroid:onClickattribute up a few lines to combine them with the other attributes that haveandroid:as the preface. - Follow the same procedure to add the
android:onClickattribute to theice_creamandfroyoImageViewelements. Select theshowIceCreamOrderandshowFroyoOrderclick handlers. You can optionally choose Code > Reformat Code to reformat the XML code. The code should now look as follows:<ImageView android:id="@+id/froyo" android:layout_width="wrap_content" android:layout_height="wrap_content" android:layout_marginStart="24dp" android:layout_marginTop="24dp" android:contentDescription="@string/froyo" android:onClick="showFroyoOrder" android:src="@drawable/froyo_circle" app:layout_constraintStart_toStartOf="parent" app:layout_constraintTop_toBottomOf="@+id/ice_cream" /> <TextView android:id="@+id/textView" android:layout_width="0dp" android:layout_height="wrap_content" android:layout_marginStart="24dp" android:layout_marginTop="24dp" android:layout_marginEnd="24dp" android:text="@string/donuts" app:layout_constraintEnd_toEndOf="parent" app:layout_constraintStart_toEndOf="@+id/donut" app:layout_constraintTop_toTopOf="@+id/donut" />
Note that the attribute android:layout_marginStart in each ImageView is set to 24dp, which means we have that margin size repeated throughout the file. This attribute determines the "start" margin for the ImageView, which is on the left side for most languages but on the right side for languages that read right-to-left (RTL).
- Open the file res then values then dimens.xml and add the following new dimension:
<dimen name="margin_wide">24dp</dimen> - Change all of the
24dpvalues for the variousandroid:layout_attributes and replace them with the reference to the new dimension that you created above. When you type the@, the editor should pop up some suggestions and you should select@dimen/margin_wideas shown below: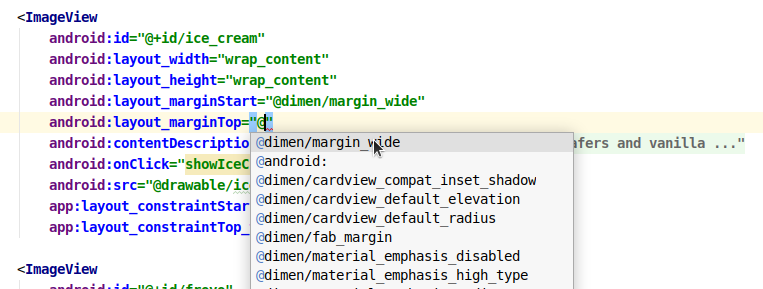
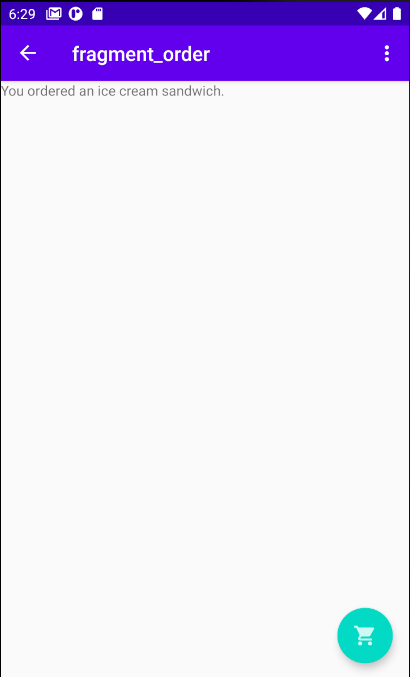
- Run the app.
Clicking the donut, ice cream sandwich, or froyo image displays a Toast message about the order, as shown in the figure below.

Task 2 solution code
The solution code for this task can be found on Blackboard as solution
1 for DroidCafe.
Dealing with Cohesion issues
If you implement your button onClick handlers by adding an onClick attribute to the Button tag in the XML, your Activity class must implement the handler method. This can get unmanageable if you have many screens and all of the click handler methods are in the Activity rather than the Fragment whose layout contains the button. It is much more cohesive to have each Fragment class implement its own onClick handlers.
We will now modify the first solution and move the onClick handlers for the clickable images into the FirstFragment class whose layout contains the clickable images.
- Open FirstFragment.java
- Add the following
displayToastto theFirstFragmentclass:
The difference to the similar method you created earlier in theprivate void displayToast(String message) { Toast.makeText(getActivity().getApplicationContext(), message, Toast.LENGTH_SHORT).show(); }MainActivityclass is that theFragmentsubclass does not have access to thegetApplicationContextmethod, so we must callgetActivityfirst. - Find the
onViewCreatedmethod inFirstFragmentand add the following code to the end of the method:
In this code, we use theImageView donutImage = view.findViewById(R.id.donut); donutImage.setOnClickListener(new View.OnClickListener() { @Override public void onClick(View v) { displayToast("Fragment Donut Button Handler"); } });findViewByIdmethod to find the Java object representing the donut button in the layout. Then we add a newOnClickListenerto the button programmatically which requires us to implement theonClickmethod. For now, we just provide aToastmethod to indictate that theButtonwas clicked. - Open res > layout > fragment_first.xml, click the Code tab and find the
ImageViewcode with theidvalue@+id/donut. - Delete the
android:onClickattribute and its value from thedonutImageView. - run the code, to ensure the donut button still generates a Toast message when it is clicked.
- Repeat steps 3 and 4 for each of the other two buttons, using view.findViewById to find the ImageView and setOnClickListener.
All of theandroid:onClick attributes should be deleted fromfragment_first.xml. - Clean up the code by copying the
Toaststrings fromMainActivityto your newonClickmethods inFirstFragmentand delete the methodsshowFroyoOrder,showDonutOrderandshowIceCreamOrder. - The code in FirstFragment should look like this:
ImageView donutImage = view.findViewById(R.id.donut); donutImage.setOnClickListener(new View.OnClickListener() { @Override public void onClick(View v) { displayToast("You ordered a Donut"); } }); ImageView iceCreamImage = view.findViewById(R.id.ice_cream); iceCreamImage.setOnClickListener(new View.OnClickListener() { @Override public void onClick(View v) { displayToast("You ordered an Ice Cream Sandwich"); } }); ImageView froyoImage = view.findViewById(R.id.froyo); froyoImage.setOnClickListener(new View.OnClickListener() { @Override public void onClick(View v) { displayToast("You ordered a Frozen Yogurt"); } }); - Run your app. The behaviour should be identical to the earlier solution.
When you click the floating action button with the email icon that appears at the bottom of the screen, the code in MainActivity displays a brief message in a drawer that opens from the bottom of the screen on a smartphone, or from the lower left corner on larger devices, and then closes after a few seconds. This is called a snackbar. It is used to provide feedback about an operation. For more information, see Snackbar.
Look at how other apps implement the floating action button. For example, the Gmail app provides a floating action button to create a new email message, and the Contacts app provides one to create a new contact. For more information about floating action buttons, see FloatingActionButton.
For this task you change the icon for the FloatingActionButton to a shopping cart and change the action for the FloatingActionButton to launch a new Activity.  , Shopping cart icon for the floating action button, and change the action for the
 FloatingActionButton to launch a new Fragment.
3.1 Add a new icon
As you learned in another lesson, you can choose an icon from the set of icons in Android Studio. Follow these steps:
- Expand res in the Project > Android pane, and right-click (or Control-click) the drawable folder.
- Choose New > Image Asset. The Configure Image Asset dialog appears.
- Choose Action Bar and Tab Icons in the drop-down menu at the top of the dialog. (Note that the action bar is the same thing as the app bar.)
- Change ic_action_name in the Name field to ic_shopping_cart.
- Click the clip art image (the Android logo next to Clipart:) to select a clip art image as the icon. A page of icons appears. Click the icon you want to use for the floating action button, such as the shopping cart icon.
- Choose HOLO_DARK from the Theme drop-down menu. This sets the icon to be white against a dark-colored (or black) background. Click Next.
- Click Finish in the Confirm Icon Path dialog.
3.2 Add a new destination.
As you learned in a previous lesson, an Fragment represents a screen layout in your app in which can be loaded into view. You already have two fragments, FirstFragment.java and Secondragment.java. Now you add another Fragment called OrderFragment.java.
- Expand res > navigation and double click to open nav_graph.xml.
- Click the
new destination iconand in the dialog window click Create new destination. - Choose Fragment (Blank) and click Next.
- Give your fragment the name OrderFragment and click Finish.
- Open the newly OrderFragment.java and delete everything except the onCreate and onCreateView methods. The class should look like this after deleting the code:
public class OrderFragment extends Fragment {

    @Override
    public void onCreate(Bundle savedInstanceState) {
        super.onCreate(savedInstanceState);
    }

    @Override
    public View onCreateView(LayoutInflater inflater, ViewGroup container,
                             Bundle savedInstanceState) {
        // Inflate the layout for this fragment
        return inflater.inflate(R.layout.fragment_order, container, false);
    }
}
Delete SecondFragment
We will now delete SecondFragment.java and its layout fragment_second.xml from the project as we will not be using it.
- In nav_graph.xml from the Design view, right click and delete the link between
FirstFragmentandSecondFragmentand then right click and deleteSecondFragmentfrom the graph too. - Right click on
fragment_second.xmland choose Refactor > Safe Delete.... Click OK in the Safe Delete dialog and then click Delete Anyway in the Usages Detected dialog. The usages are inSecondFragment.javawhich we are also about to delete. If you aren't sure where the file you are delting is referenced you can click View Usages to check. - Right click on
SecondFragment.javaand choose Refactor > Safe Delete.... Click OK in the Safe Delete dialog. There should not be any further references to this file.
3.3 Change the action
In this step you change the action for the FloatingActionButton to display the new Fragment.
- Open MainActivity.
- For the purposes of cohesion, we want
FirstFragmentto control the use of theFloatingActionButton. Therefore we will copy the code the finds theFloatingActionbuttonand sets itsOnClickListenerfrom MainActivity and paste that same code into the end of theonViewCreatedmethod inFirstFragment. - Modify the line to add a call to
getActivitybeforefindViewById:FloatingActionButton fab = getActivity().findViewById(R.id.fab); - Delete the original code for the
FloatingActionButtoninMainActivity. - Run the app. The
FloatingActionButtonshould still pop up the snack bar message, only now it is controlled from inside theFirstFragment.
Now we will implement the action for the FloatingActionButton as controlled by the Firstfragment to navigate to the OrderFragment.
- Open fragment_order.xml, click the
TextViewand set itsidto order_text and itstextto This is the Order Fragment. - Open nav_graph.xml in Design mode and drag a link from
FirstFragmenttoOrderFragment. Click the Code tab and you will see that the following action has been added:<action android:id="@+id/action_FirstFragment_to_orderFragment" app:destination="@id/orderFragment" /> - In FirstFragment, add the following code to the
onClickfor theFloatingActionButtonwhich will implement the navigation action fromFirstFragmenttoOrderFragment:NavHostFragment.findNavController(FirstFragment.this) .navigate(R.id.action_FirstFragment_to_orderFragment, null); - Run the app and ensure that clicking on the
FloatingActionButtontakes you to theOrderFragmentand the back button takes you back to theFirstfragment.
We will now change the Icon for the FloatingActionButton (FAB) to be the shopping cart icon that we added to the drawable folder earlier. The initial icon for the FAB is set in activity_main.xml. If you open that file you will see the following code to define the FAB:
<com.google.android.material.floatingactionbutton.FloatingActionButton
	android:id="@+id/fab"
	android:layout_width="wrap_content"
	android:layout_height="wrap_content"
	android:layout_gravity="bottom|end"
	android:layout_margin="@dimen/fab_margin"
	app:srcCompat="@android:drawable/ic_dialog_email" />
The last line contains a link to the drawable resource for the email icon. As our FirstFragment now has control of the FAB, we will make that fragment change the icon.
- Open FirstFragment.java
- Add the following line immediately after the line that initialises the variable
fab:fab.setImageResource(R.drawable.ic_shopping_cart); - Run the app. The floating action button now uses a shopping cart icon and, when clicked, navigates to the
OrderFragment.
Task 3 solution code
The solution code for this task is included in the code and layout for Android Studio project DroidCafe.
Challenge: The DroidCafe app's FirstFragment links to a second Fragment called OrderFragment. You learned in another lesson (Codelab 2.4: Jetpack navigation - step 8 Safe Args) how to send data from a Fragment to another Fragment. Change the app to send the order message for the selected dessert in FirstFragment to a new TextView at the top of the OrderFragment layout.
Set up the Navigation including supporting the UP navigation
- Add a member variable called appBarConfiguration to the
MainActivityprivate AppBarConfiguration appBarConfiguration; - In the onCreate of your MainActivity, set up the Navigation host and the AppBar navigation:
NavHostFragment host = (NavHostFragment) getSupportFragmentManager().findFragmentById(R.id.nav_host_fragment); NavController navController = host.getNavController(); appBarConfiguration = new AppBarConfiguration.Builder(navController.getGraph()).build(); NavigationUI.setupActionBarWithNavController(this, navController, appBarConfiguration); - Override onSupportNavigateUp in MainActivity:
@Override public boolean onSupportNavigateUp() { return NavigationUI.navigateUp(Navigation.findNavController(this, R.id.nav_host_fragment), appBarConfiguration) || super.onSupportNavigateUp(); } - Add the Navigation to the project's build.gradle dependencies:
dependencies { classpath 'com.android.tools.build:gradle:4.0.2' def nav_version = "2.3.0" classpath "androidx.navigation:navigation-safe-args-gradle-plugin:$nav_version" } - Add the safe args plugin to the app module's build.gradle:
apply plugin: 'com.android.application' apply plugin: "androidx.navigation.safeargs" - Select Build > Clean Project and then Build > Rebuild Project and check that you now see a
Java (Generated)folder with two sub-folders, one containing theFirstFragmentDirections
Implement the navigation to the OrderFragment
- Create a member variable (
mOrderMessage) inFirstFragmentfor the order message that appears in theToast. - Initialise
mOrderMessageto be an emptyStringin theonCreateViewofFirstFragment. - Change the
showDonutOrder(),showIceCreamOrder(),andshowFroyoOrder()click handlers to assign the message stringmOrderMessagebefore displaying the Toast. For example, the following assigns thedonut_order_messagestring to mOrderMessage and displays the Toast:mOrderMessage = getString(R.string.donut_order_message); displayToast(mOrderMessage); - Open nav_graph.xml in Design view, click on
OrderFragmentand then click the + symbol next to Arguments in the Attributes panel - In the Add Argument dialog, set the Name of the argument to be
order_text, the Type to beString, and the Default Value to beNo selection made. - Click on the action link that links
FirstFragmenttoOrderFragmentand change its id to place_order. - Choose Build > Rebuild Project and ensure that
java (Generated)contains a new class calledOrderFragmentArgs. - Change the
onClick()method of the FAB inFirstFragmentto set the parameter value before navigating toOrderFragment: - In OrderFragment, add a member variable called receivedOrderMessage:
private String receivedOrderMessage; - Edit the onCreateView() method to find the TextView in the layout and replace the text in the TextView with the
receivedOrderMessage:View v = inflater.inflate(R.layout.fragment_order, container, false); TextView textView = v.findViewById(R.id.order_text); textView.setText(receivedOrderMessage); return v; - Run the app. Click the FAB BEFORE clicking any of the images and check the the OrderFragment displays the text "No SelectionYet". Click the UP button and check that your app navigates back to the FirstFragment. Finally click one of the images and then click the FAB. Check that the OrderFragment display the correct order message.
Challenge solution code
The challenge solution code can be found on Blackboard.
- To use an image in a project, copy the image into the project's drawable folder ( project_name > app > src > main > res > drawable).
- Define an
ImageViewto use it by dragging anImageViewto the layout and choosing the image for it. - To handle all of the OnClick events in the MainActivity: Add the
android:onClickattribute to make anImageViewclickable like a button. Specify the name of the click handler and in the MainActivity, create a click handler in the Activity to perform the action. - To handle onClick events in the appropriate Fragment (preferred): add code in the
Fragment'sonViewCreatedmethod to useview.findViewByIdto return theImageViewobject and then use thesetOnclickListenerto add a listener for the click events. - Choose an icon: Expand res in the Project > Android pane, right-click (or Control-click) the drawable folder, and choose New > Image Asset. Choose Action Bar and Tab Icons in the drop-down menu, and click the clip art image (the Android logo next to Clipart:) to select a clip art image as the icon.
- Add another
Fragmentdestination: In res > navigation > nav_graph.xml, click the Add Destination icon - Before implementing the navigation, set up the Navigation settings for the project, including setting up the Gradle Dependencies and the Gradle Safe Args Plugin.
- Display a
Toastmessage from aFragment:
Toast.makeText(getActivity().getApplicationContext(), message,
                Toast.LENGTH_SHORT).show();
The related concept documentation is in 4.1: Buttons and clickable images.