The Navigation Architecture Component simplifies implementing navigation, while also helping you visualize your app's navigation flow. The library provides a number of benefits, including:
- Automatic handling of fragment transactions
- Correctly handling up and back by default
- Default behaviors for animations and transitions
- Deep linking as a first class operation
- Implementing navigation UI patterns (like navigation drawers and bottom nav) with little additional work
- Type safety when passing information while navigating
- Android Studio tooling for visualizing and editing the navigation flow of an app
What you'll build
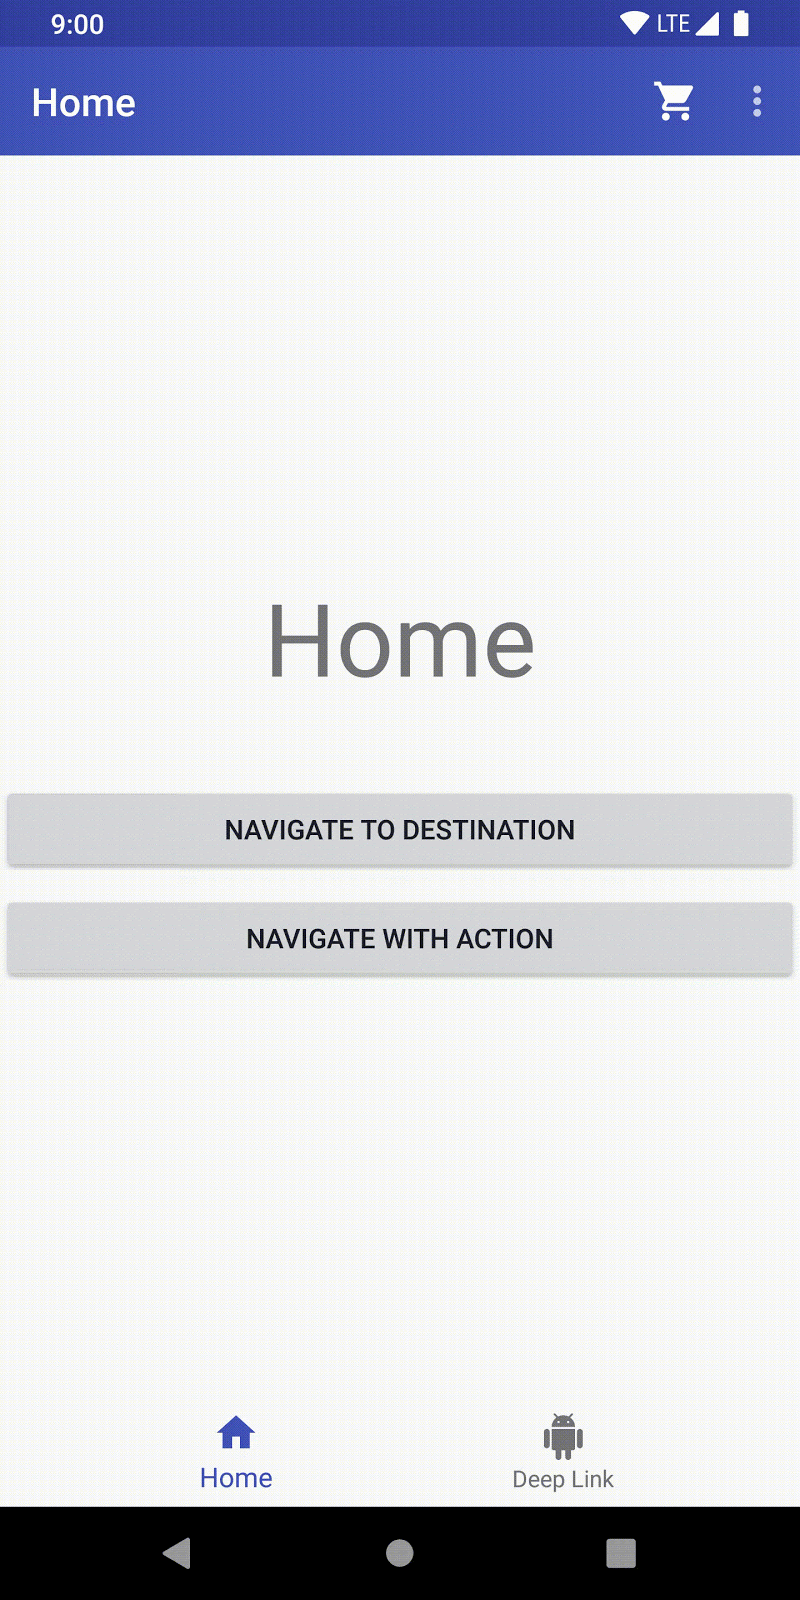
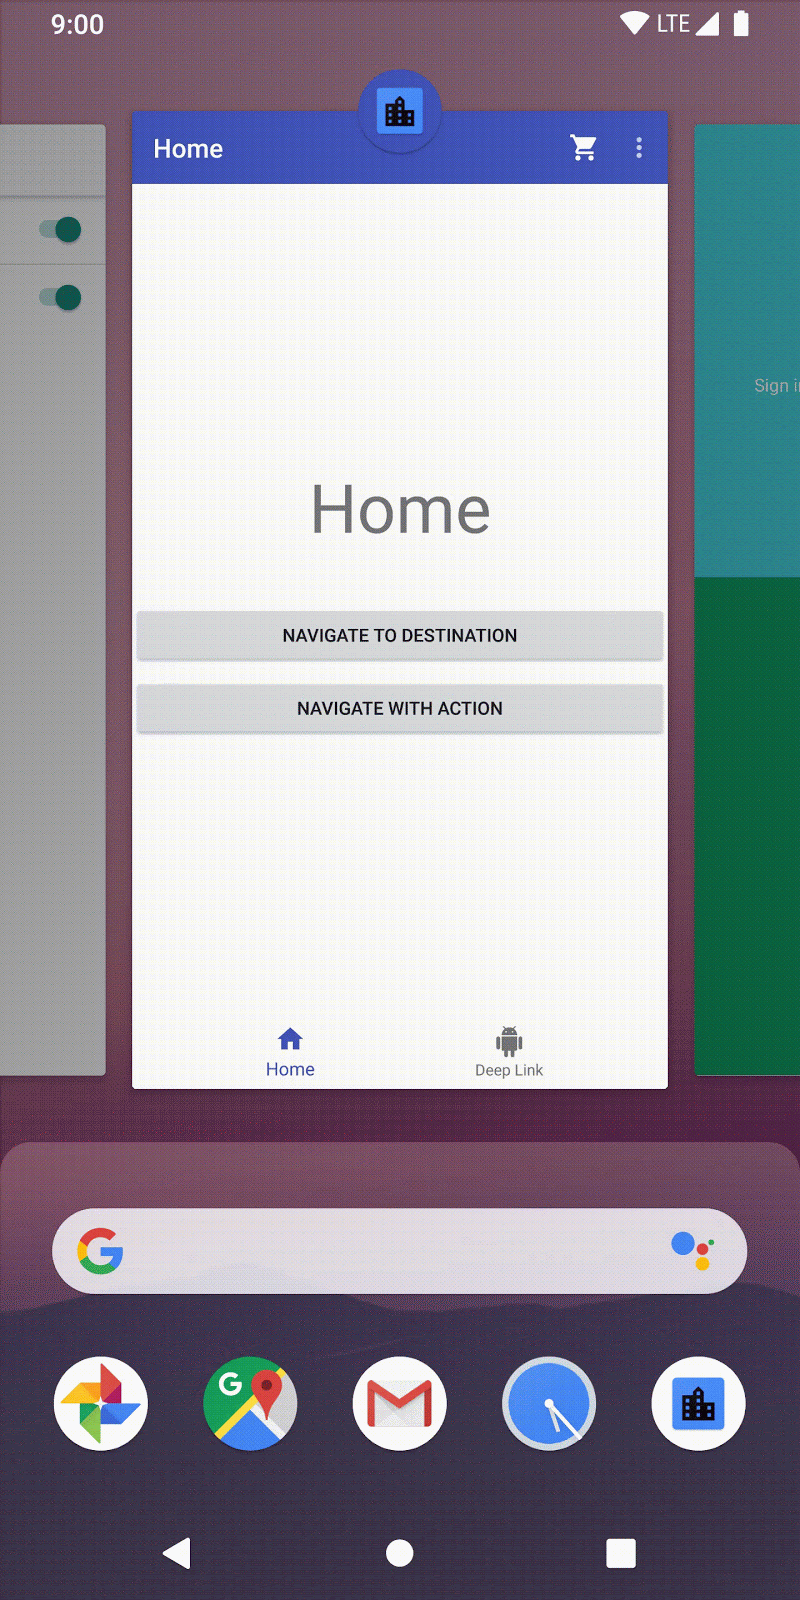
In this codelab, you will work with the sample app seen below (you may need to right click this image and choose "Open image in new tab" otherwise it may be too large to view):
All the activities and fragments have already been created for you. You will use the Navigation Component to connect them and in doing so, implement the following:
- Visual navigation graph
- Navigation by destination and action
- Transition animations
- Menu navigation, bottom navigation, and menu drawer navigation
- Type safe argument passing
- Deep links
Prerequisites
- Basic Java knowledge (this codelab is in Java)
- Android Studio 3.2 or higher
- Emulator or device running API 14+
Get the Code
You should download the project as a Zip file from Blackboard.
Get Android Studio 3.3 or higher
Make sure you are using Android Studio 3.3 or higher. This is required for the Android Studio navigation tooling.
If you need to download a recent version of Android Studio, you can do so here.
Overview of Navigation
The Navigation Component consists of three key parts, working together in harmony. They are:
- Navigation Graph (New XML resource) - This is a resource that contains all navigation-related information in one centralized location. This includes all the places in your app, known as destinations, and possible paths a user could take through your app.
- NavHostFragment (Layout XML view) - This is a special widget you add to your layout. It displays different destinations from your Navigation Graph.
- NavController (Kotlin/Java object) - This is an object that keeps track of the current position within the navigation graph. It orchestrates swapping destination content in the
NavHostFragmentas you move through a navigation graph.
When you navigate, you'll use theNavControllerobject, telling it where you want to go or what path you want to take in your Navigation Graph. TheNavControllerwill then show the appropriate destination in theNavHostFragment.
That's the basic idea. Let's see what this looks like in practice, starting with the new Navigation Graph resource.
Destinations
The Navigation Component introduces the concept of a destination. A destination is any place you can navigate to in your app, usually a fragment or an activity. These are supported out of the box, but you can also make your own custom destination types if needed.
Navigation Graph
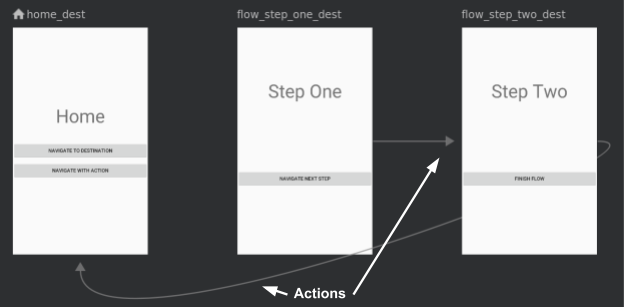
A navigation graph is a new resource type that defines all the possible paths a user can take through an app. It shows visually all the destinations that can be reached from a given destination. Android Studio displays the graph in its Navigation Editor. Here's part of the starting navigation graph you'll create for your app:
Exploring the Navigation Editor
- Open
res/navigation/mobile_navigation.xml - Click the Design tab at the top right hand corner to go into Design mode. You should see the following:
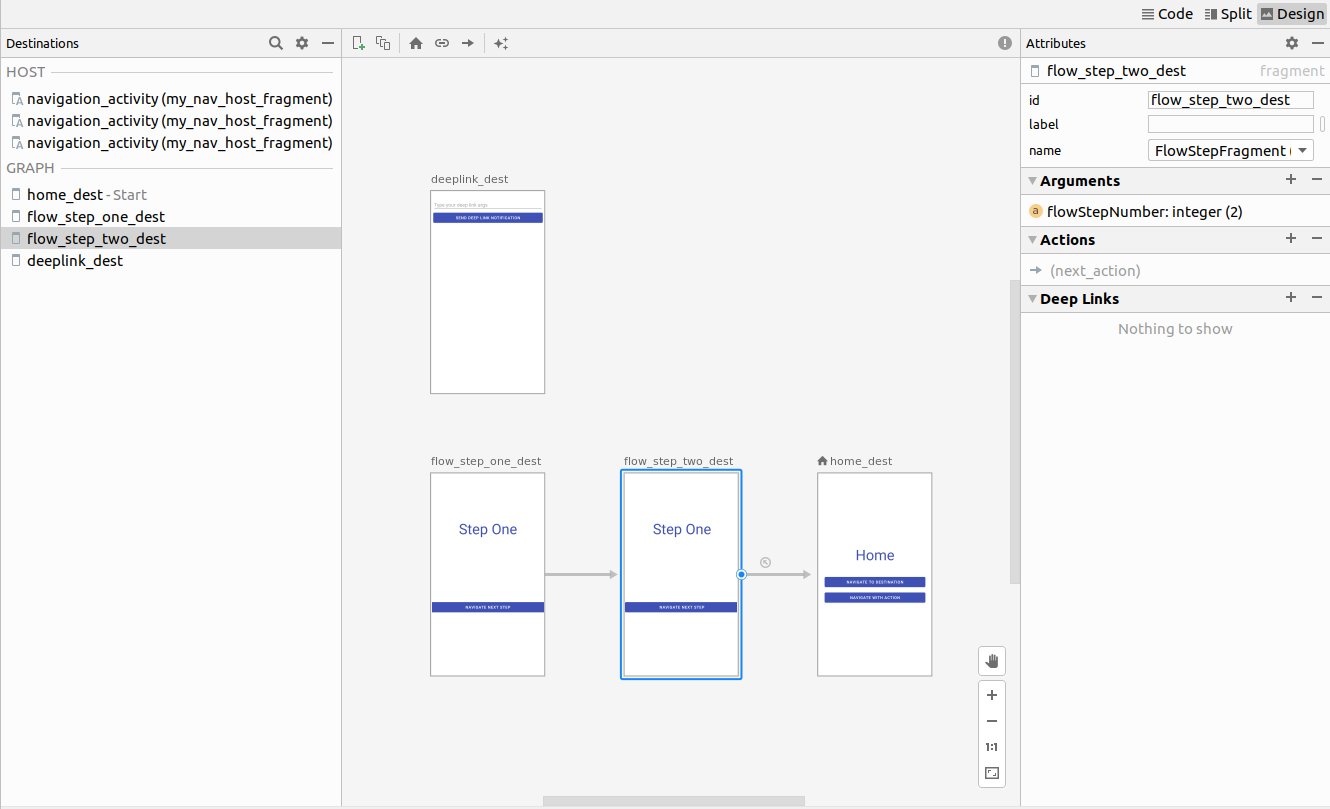
The navigation graph shows the available destinations. The arrows between the destinations are called actions. You'll learn more about actions later. - Click on a destination to see its attributes.
- Click on any action, represented by an arrow, to see its attributes.
Anatomy of a navigation XML file
All of the changes you make in the graphical Navigation Editor change the underlying XML file, similar to the way the Layout Editor modifies the layout XML.
Click the Code tab and you will see the XML source of the file: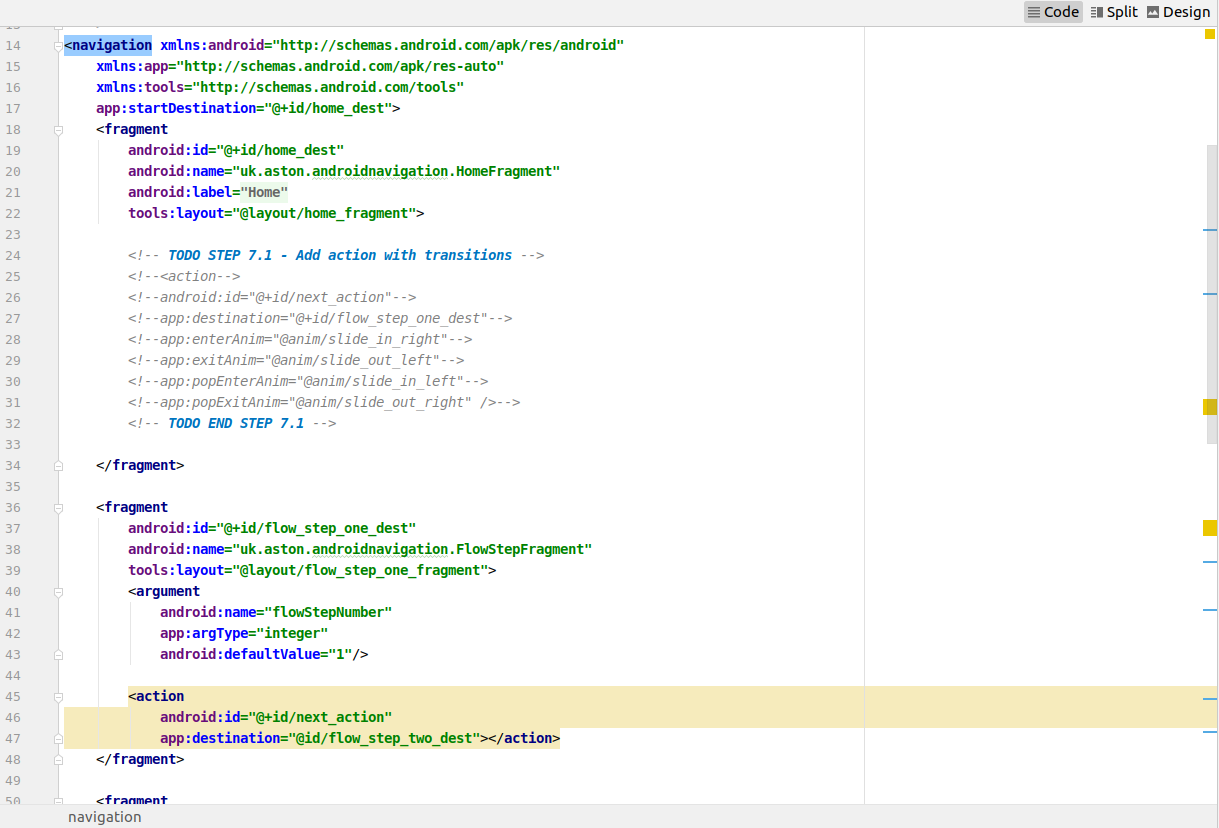
Notice:
<navigation>is the root node of every navigation graph.<navigation>contains one or more destinations, represented by<activity>or<fragment>elements.app:startDestinationis an attribute that specifies the destination that is launched by default when the user first opens the app.
Let's take a look at a fragment destination:
    <fragment
		android:id="@+id/flow_step_one_dest"
		android:name="uk.aston.androidnavigation.FlowStepFragment"
		tools:layout="@layout/flow_step_one_fragment">
        <argument
            .../>

        <action
            android:id="@+id/next_action"
            app:destination="@id/flow_step_two_dest"></action>
    </fragment>
Notice:
android:iddefines an ID for the fragment that you can use to reference the destination elsewhere in this XML and your code.android:namedeclares the fully qualified class name of the fragment to instantiate when you navigate to that destination.tools:layoutspecifies what layout should be shown in the graphical editor.
Some<fragment>tags also contain<action>,<argument>, and<deepLink>, all of which we'll cover later.
The sample app starts with a few destinations in the graph. In this step, you'll add a brand new destination! You must add a destination to the navigation graph before you can navigate to it.
You should compare the code you write to the included commented-out code.
- Open
res/navigation/mobile_navigation.xml, and click the Design tab. - Click the New Destination icon, and select "settings_fragment"
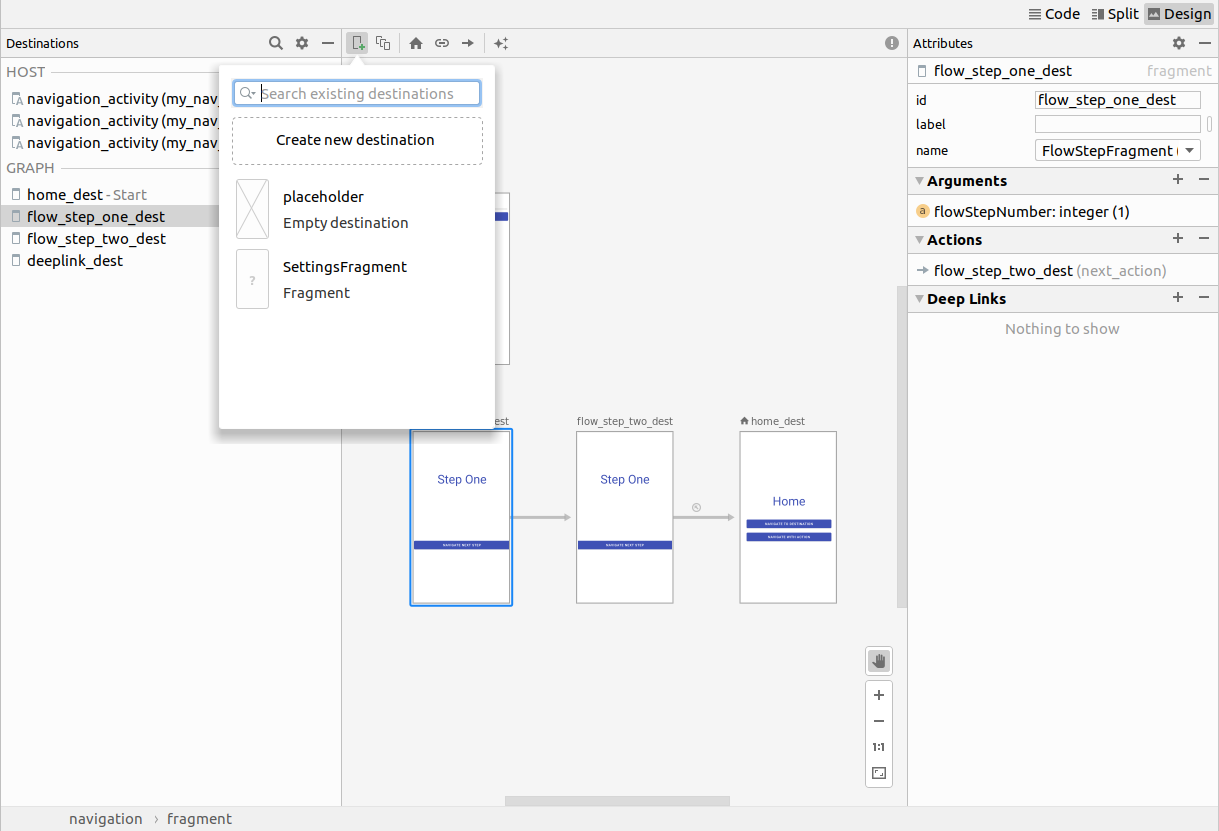
The result is a new destination, which renders a preview of the fragment's layout in the design view.
Note that you can also edit the XML file directly to add destinations. The action you just did above to create a new destination added the following<fragment>element to yourmobile_navigation.xsml<fragment android:id="@+id/settings_dest" android:name="com.example.android.codelabs.navigation.SettingsFragment" android:label="settings_fragment" tools:layout="@layout/settings_fragment" />
Right now you have this awesome navigation graph, but you're not actually using it to navigate.
Activities and Navigation
The Navigation component follows the guidance outlined in the Principles of Navigation. The Principles of Navigation recommend you use activities as entry points for your app. Activities will also contain global navigation, such as the bottom nav,
In comparison, fragments will be the actual destination-specific layouts.
To get this all to work, you need to modify your activity layouts to contain a special widget called a NavHostFragment. A NavHostFragment swaps different fragment destinations in and out as you navigate through the navigation graph.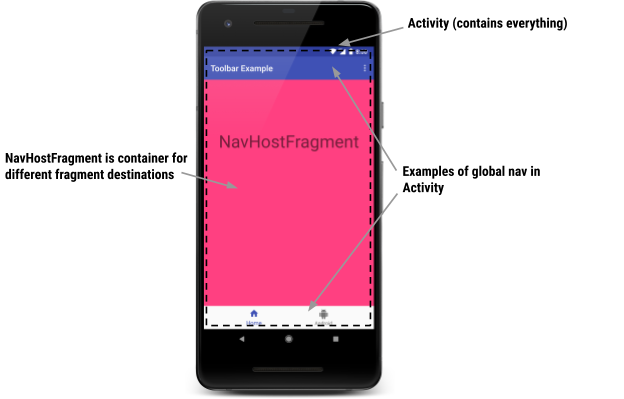
A simple layout supporting navigation similar to the picture above looks like this. An example of this code can be found in res/layout-470dp/navigation_activity.xml:
<?xml version="1.0" encoding="utf-8"?>
<LinearLayout
    xmlns:android="http://schemas.android.com/apk/res/android"
    xmlns:app="http://schemas.android.com/apk/res-auto"
    xmlns:tools="http://schemas.android.com/tools"
    android:layout_width="match_parent"
    android:layout_height="match_parent"
    android:orientation="vertical"
    tools:context="uk.aston.androidnavigation.MainActivity">

    <androidx.appcompat.widget.Toolbar
        ... />

    <fragment
        android:id="@+id/my_nav_host_fragment"
        android:name="androidx.navigation.fragment.NavHostFragment"
        android:layout_width="match_parent"
        android:layout_height="0dp"
        android:layout_weight="1"
        app:defaultNavHost="true"
        app:navGraph="@navigation/mobile_navigation" />

    <com.google.android.material.bottomnavigation.BottomNavigationView
        ... />
</LinearLayout>
Notice:
- This is a layout for an activity. It contains the global navigation, including a bottom nav and a toolbar
android:name="androidx.navigation.fragment.NavHostFragment"andapp:defaultNavHost="true"connect the system back button to theNavHostFragmentapp:navGraph="@navigation/mobile_navigation"associates theNavHostFragmentwith a navigation graph. This navigation graph specifies all the destinations the user can navigate to, in thisNavHostFragment.
NavController
Finally, when a user does something like clicking a button, you need to trigger a navigate command. A special class called the NavController is what triggers the fragment swaps in the NavHostFragment.
// Command to navigate to flow_step_one_dest
NavHostFragment.findNavController(HomeFragment.this)
	.navigate(R.id.flow_step_one_dest, null);
Note that you pass in either a destination or action ID to navigate. These are the IDs defined in the navigation graph XML. This is an example of passing in a destination ID.
NavController is powerful because when you call methods like navigate() or popBackStack(), it translates these commands into the appropriate framework operations based on the type of destination you are navigating to or from. For example, when you call navigate() with an activity destination, the NavController calls startActivity() on your behalf.
There are a few ways to get a NavController object associated with your NavHostFragment. In Java, it's recommended you use one of the following methods to retrieve a NavController:
- NavHostFragment.findNavController(Fragment)
- Navigation.findNavController(Activity, @IdRes int viewId)
- Navigation.findNavController(View)
Navigate to a Destination with NavController
It's your turn to navigate using NavController. You'll hook up the Navigate To Destination button to navigate to the flow_step_one_dest destination (which is a destination that is a FlowStepFragment):
- Open HomeFragment.java
- Hook up the
navigate_destination_buttoninonViewCreated()
HomeFragment.java
Button button = view.findViewById(R.id.navigate_destination_button);
button.setOnClickListener(new View.OnClickListener() {
	@Override
		public void onClick(View view) {
			NavHostFragment.findNavController(HomeFragment.this)
				.navigate(R.id.flow_step_one_dest, null);
		}
	});
- Run the app and click the Navigate To Destination button. Note that the button navigates to the
flow_step_one_destdestination.
Each navigate() call has a not very exciting default transition associated with it, as seen below (right click and open in a new tab if this appears too large):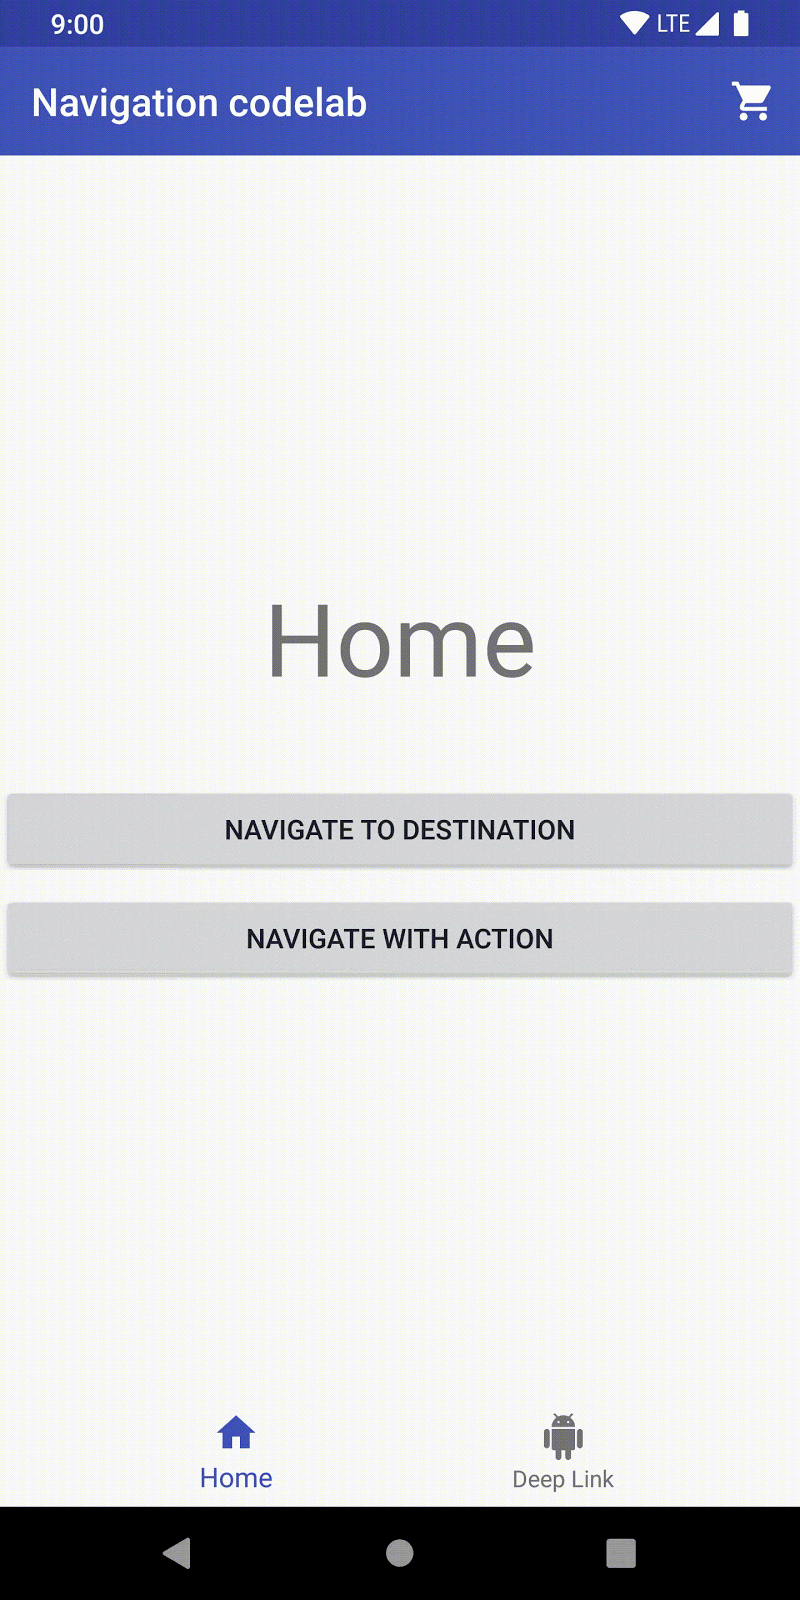
The default transition, as well as other attributes associated with the call, can be overridden by including a set of NavOptions. NavOptions uses a Builder pattern which allows you to override and set only the options you need.
For animated transitions, you can define XML animation resources in the anim resource folder and then use those animations for transitions. Some examples are included in the app code: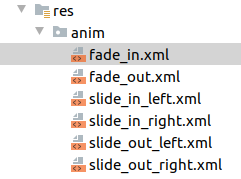
Add a Custom Transition
Update the code so that pressing the Navigate To Destination button shows a custom transition animation.
- Open HomeFragment.java
- Use the NavOptions.Builder to create a
NavOptionsand pass it into thenavigate()call tonavigate_destination_buttonfinal NavOptions options = new NavOptions.Builder() .setEnterAnim(R.anim.slide_in_right) .setExitAnim(R.anim.slide_out_left) .setPopEnterAnim(R.anim.slide_in_left) .setPopExitAnim(R.anim.slide_out_right) .build(); Button button = view.findViewById(R.id.navigate_destination_button); button.setOnClickListener(new View.OnClickListener() { @Override public void onClick(View view) { NavHostFragment.findNavController(HomeFragment.this) .navigate(R.id.flow_step_one_dest, null, options); } }); - Remove or comment out the code added in step 5, if it's still there
- Verify that tapping the Navigate To Destination button causes the fragment to slide onto the screen and that pressing back causes it to slide off the screen

Actions
The navigation system also allows you to navigate via actions. As previously mentioned, the lines shown in the navigation graph are visual representations of actions.
Navigation by actions has the following benefits over navigation by destination:
- You can visualize the navigation paths through your app
- Actions can contain additional associated attributes you can set, such as a transition animation, arguments values, and backstack behavior
- You can use the plugin safe args to navigate, which you'll see shortly
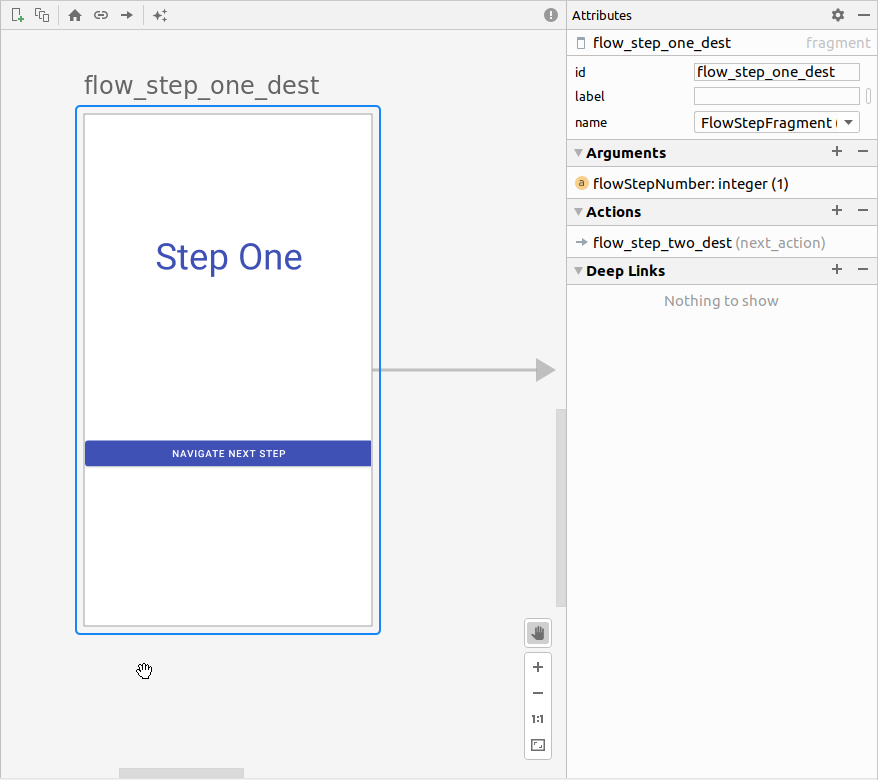
Here's the visual and XML for the action that connectsflow_step_one_destandflow_step_two_dest: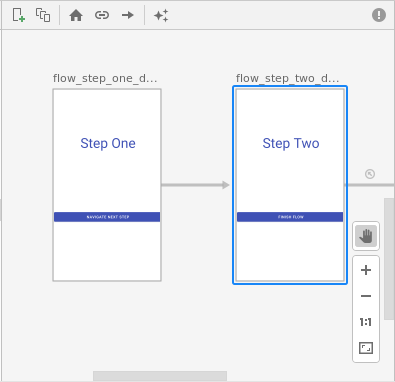
<fragment
	android:id="@+id/flow_step_one_dest"
	android:name="uk.aston.androidnavigation.FlowStepFragment"
	tools:layout="@layout/flow_step_one_fragment">
	<argument
		.../>

	<action
		android:id="@+id/next_action"
		app:destination="@id/flow_step_two_dest"></action>
</fragment>

<fragment
	android:id="@+id/flow_step_two_dest"
	android:name="uk.aston.androidnavigation.FlowStepFragment"
	tools:layout="@layout/flow_step_two_fragment">
	<!-- ...removed for simplicity --->
</fragment>
Notice:
- The actions are nested within the destination - this is the destination you will navigate from
- The action includes a destination argument referring to flow_step_two_dest; this is the ID of where you will navigate to
- The ID for the action is
"next_action"
Here is another example, of the action connectingflow_step_two_desttohome_dest: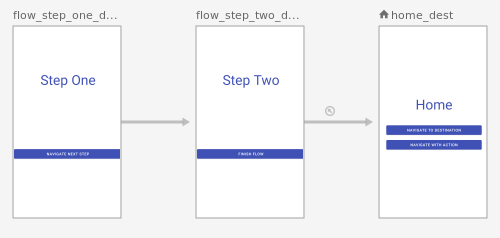
<fragment
	android:id="@+id/home_dest"
	android:name="uk.aston.androidnavigation.HomeFragment"
	android:label="@string/home"
	tools:layout="@layout/home_fragment">
</fragment>

<fragment
	android:id="@+id/flow_step_two_dest"
	android:name="uk.aston.androidnavigation.FlowStepFragment"
	tools:layout="@layout/flow_step_two_fragment">
	<argument
		.../>

	<action
		android:id="@+id/next_action"
		app:popUpTo="@id/home_dest"></action>
</fragment>
Notice:
- The same ID next_action is used for the action connecting
flow_step_two_desttohome_dest. You can navigate using thenext_actionid from eitherflow_step_one_destorflow_step_two_dest. This is an example of how actions can provide a level of abstraction and can navigate you somewhere different depending on context. - The
popUpToattribute is used - this action will pop fragments off of the back-stack until you reachhome_dest
Navigate with an Action
Time to hook up the Navigate with Action button so that it lives up to its name!
- Open the
mobile_navigation.xmlfile in Design mode - Drag an arrow from
home_desttoflow_step_one_dest: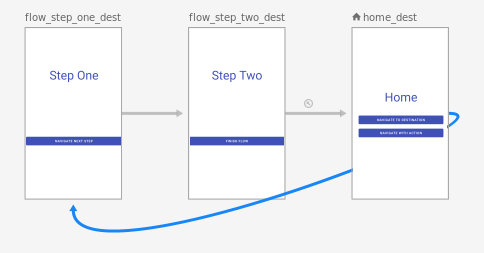
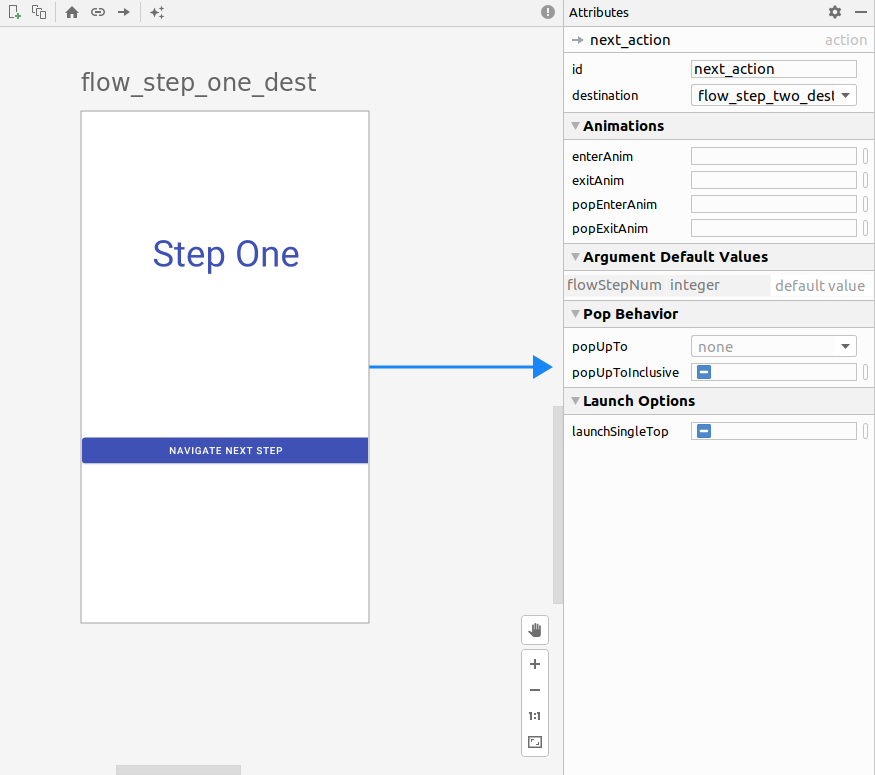
- With the action arrow selected (blue) change the properties of the action so that:
- ID = next_action
- Transition for Enter = slide_in_right
- Transition for Exit = slide_out_left
- Transitions for Pop Enter = slide_in_left
- Transitions for Pop Exit = slide_out_right
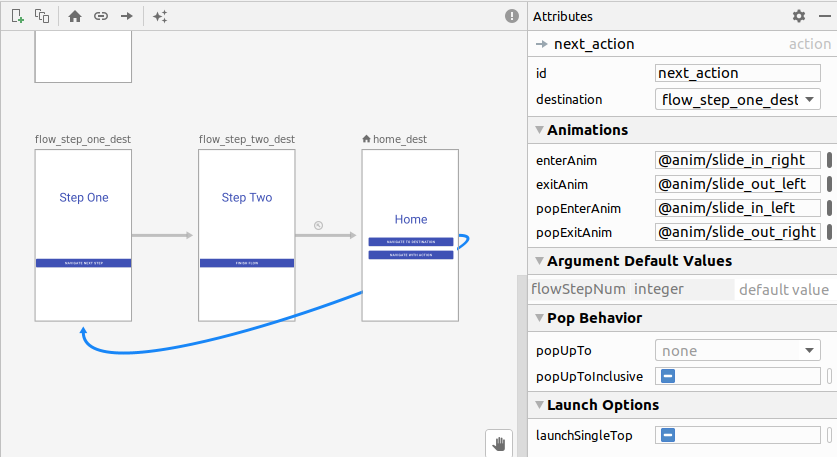
- Click the Code tab
Note the newly addednext_actionaction under thehome_destdestination:<fragment android:id="@+id/home_dest" android:name="uk.aston.androidnavigation.HomeFragment" android:label="@string/home" tools:layout="@layout/home_fragment"> <action android:id="@+id/next_action" app:destination="@id/flow_step_one_dest" app:enterAnim="@anim/slide_in_right" app:exitAnim="@anim/slide_out_left" app:popEnterAnim="@anim/slide_in_left" app:popExitAnim="@anim/slide_out_right" /> </fragment> - Open
HomeFragment.java - Add a click listener to the
navigate_action_buttonHomeFragment.javaButton navActionButton = view.findViewById(R.id.navigate_action_button); navActionButton.setOnClickListener( Navigation.createNavigateOnClickListener(R.id.next_action, null) ); - Verify that tapping the Navigate To Action now navigates to the next screen.
Safe Args
The navigation component has a Gradle plugin, called safe args, that generates simple object and builder classes for type-safe access to arguments specified for destinations and actions.
Safe args allows you to get rid of code like this when passing values between destinations:
String username = getArguments().getString("usernameKey");
And, instead, replace it with code that has generated setters and getters.
String username = args.getUsername();
Pass a value using safe args
- Open the Project build.gradle file and edit it to add the safe args plugin:
build.gradledependencies { classpath "com.android.tools.build:gradle:4.0.1" def nav_version = "2.3.0" classpath "androidx.navigation:navigation-safe-args-gradle-plugin:$nav_version" // NOTE: Do not place your application dependencies here; they belong // in the individual module build.gradle files } - Open the
app/build.gradlefile and edit it to apply the plugin (add the second line below):apply plugin: 'com.android.application' apply plugin: "androidx.navigation.safeargs" android { ... } - Open
mobile_navigation.xml, and notice how arguments are defined in theflow_step_one_destdestination.
mobile_navigation.xml<fragment android:id="@+id/flow_step_one_dest" android:name="uk.aston.androidnavigation.FlowStepFragment" tools:layout="@layout/flow_step_one_fragment"> <argument android:name="flowStepNumber" app:argType="integer" android:defaultValue="1"/> <action ...></action> </fragment>
Using the tag, safeargs generates a class called FlowStepFragmentArgs which you will find in the java (generated) folder.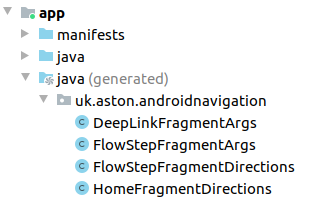
Since the XML includes an argument called flowStepNumber, specified by android:name="flowStepNumber", the generated class FlowStepFragmentArgs will maintain a flowStepNumber whose value can be accessed with getters and setters called getFlowStepNumber() and setFlowStepNumber(int flowStepNumber).
- Open FlowStepFragment.java
- Comment out the line of code shown below:
FlowStepFragment.java
This old-style code is not type-safe. It's better to use safe args.int flowStepNumber = getArguments().getInt("flowStepNumber"); - Update
FlowStepFragmentto use the code generated classFlowStepFragmentArgs. This will get theFlowStepFragmentarguments in a type-safe manner:FlowStepFragmentArgs args = FlowStepFragmentArgs.fromBundle(getArguments()); int flowStepNumber = args.getFlowStepNumber();
Safe Args Direction classes
You can also use safe args to navigate in a type safe way, with or without adding arguments. You do this using the generated Directions classes.
Directions classes are generated for every distinct destination with actions. The Directions class includes methods for every action a destination has.
For example, the navigate_action_button click listener in HomeFragment.java could be changed to:
HomeFragment.java
Button actionButton = view.findViewById(R.id.navigate_action_button);
actionButton.setOnClickListener(new View.OnClickListener() {
	@Override
	public void onClick(View view) {
		int flowStepNumberArg = 1;
		HomeFragmentDirections.NextAction action =
        	HomeFragmentDirections.nextAction()
				.setFlowStepNumber(flowStepNumberArg);
		NavHostFragment.findNavController(HomeFragment.this)
				.navigate(action);
	}
});
NavigationUI and navigation-ui-ktx
The Navigation Components include a NavigationUI class and the navigation-ui-ktx kotlin extensions. NavigationUI has static methods that associate menu items with navigation destinations, and navigation-ui-ktx is a set of extension functions that do the same. If NavigationUI finds a menu item with the same ID as a destination on the current graph, it configures the menu item to navigate to that destination.
Using NavigationUI with an Options menu
One of the easiest ways to use NavigationUI is to have it simplify option menu setup. In particular, NavigationUI simplifies handling the onOptionsItemSelected callback.
- Open
MainActivity.java
Notice how you already have the code for inflating the menuoverflow_menuinonCreateOptionsMenu - Open
res/menu/overflow_menu.xml - Update your overflow menu to include the
settings_destoverflow_menu.xml<item android:id="@+id/settings_dest" android:icon="@drawable/ic_settings" android:menuCategory="secondary" android:title="@string/settings" /> - Open MainActivity.java
- Have
NavigationUIhandleonOptionsItemSelectedwith theonNavDestinationSelectedhelper method. We need to pass theMenuItemand theNavControlleras parameters. If the menu item is not meant to navigate, handle withsuper.onOptionsItemSelected. Here is the code:
The above example shows how to find the@Override public boolean onOptionsItemSelected(MenuItem item) { return NavigationUI.onNavDestinationSelected(item, Navigation.findNavController(this, R.id.my_nav_host_fragment)) || super.onOptionsItemSelected(item); }NavControllerfrom within anActivity. - Run your app. You should have a functional
ActionBarmenu that navigates to theSettingsFragment.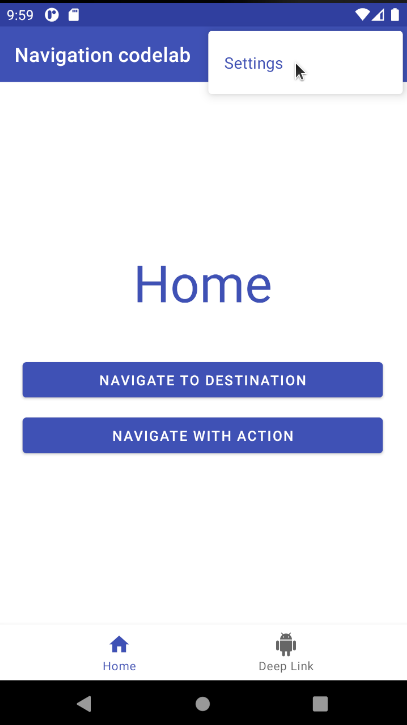
Using NavigationUI to configure Bottom Navigation
The code already contains the XML layout code for implementing bottom navigation, which is why you see the bottom navigation bar. But it doesn't navigate anywhere.
- Open
res/layout/navigation_activity/navigation_activity.xml (h470dp)and click the Code tab
Notice how the XML layout code for bottom navigation is there and refers tobottom_nav_menu.xmlnavigation_activity.xml (h470dp)<com.google.android.material.bottomnavigation.BottomNavigationView android:id="@+id/bottom_nav_view" android:layout_width="match_parent" android:layout_height="wrap_content" app:menu="@menu/bottom_nav_menu" /> - Open
res/menu/bottom_nav_menu.xml
Notice how there are two items for the bottom navigation and that their IDs match the destinations of navigation graph destinations:
bottom_nav_menu.xml
Let's make the bottom navigation actually do something using<menu xmlns:android="http://schemas.android.com/apk/res/android"> <item android:id="@id/home_dest" android:icon="@drawable/ic_home" android:title="@string/home" /> <item android:id="@id/deeplink_dest" android:icon="@drawable/ic_android" android:title="@string/deeplink" /> </menu>NavigationUI. - Open MainActivity.java
- Implement the
setupBottomNavMenumethod using setupWithNavController(bottomNavigationView: BottomNavigationView, navController: NavController)
MainActivity.javaprivate void setupBottomNavMenu(NavController navController) { BottomNavigationView bottomNav = findViewById(R.id.bottom_nav_view); NavigationUI.setupWithNavController(bottomNav, navController); } - Now run your app and check your bottom navigation works!
Using NavigationUI to configure a Navigation Drawer
Finally, let's use NavigationUI to configure the side navigation and navigation drawer, including handling the ActionBar and proper up navigation. You'll see this if you've got a large enough screen or if the screen's too short for bottom navigation.
First observe how the proper layout XML code is already in the app.
- Open both
navigation_activity.xmlandnavigation_activity.xml (w960dp)
Notice how both layouts contain aNavigationViewconnected tonav_drawer_menu. In the tablet version (w960dp) theNavigationViewis always on screen. On smaller devices theNavigationViewis nested within aDrawerLayout.
Now to start implementing the NavigationView navigation. - Open
MainActivity.java - Implement the
setupNavigationMenumethod usingsetupWithNavController(navigationView: NavigationView, navController: NavController). Notice how this version of the method takes aNavigationViewand not aBottomNavigationView.
MainActivity.java
	private void setupNavigationMenu(NavController navController) {
		NavigationView sideNavView = findViewById(R.id.nav_view);
		NavigationUI.setupWithNavController(sideNavView, navController);
	}
Now the navigation view menu will show on the screen, but it will not affect the ActionBar.
Setting up the ActionBar requires creating an instance of AppBarConfiguration. The purpose of AppBarConfiguration is to specify the configuration options you want for your toolbars, collapsing toolbars, and action bars. Configuration options include whether the bar must handle a drawer layout and which destinations are considered top-level destinations.
Top-level destinations are the root-level destinations of your app. These destinations do not display an "up" button in the app bar, and they display the drawer icon if the destination uses a drawer layout.
- Create an
AppBarConfigurationby passing in a set of top-level destination IDs and the drawer layout.
MainActivity.javaDrawerLayout drawerLayout = findViewById(R.id.drawer_layout); if (drawerLayout != null) { appBarConfiguration = new AppBarConfiguration.Builder(R.id.home_dest, R.id.deeplink_dest).setOpenableLayout(drawerLayout).build(); } else { appBarConfiguration = new AppBarConfiguration.Builder(R.id.home_dest, R.id.deeplink_dest).build(); }
Now that you have an AppBarConfiguration, you can call NavigationUI.setupActionBarWithNavController. This will do the following:
- Show a title in the ActionBar based off of the destination's label
- Display the Up button whenever you're not on a top-level destination
- Display a drawer icon (hamburger icon) when you're on a top-level destination
- Implement setupActionBarWithNavController
MainActivity.java
You should also haveprivate void setupActionBar(NavController navController, AppBarConfiguration appBarConfiguration) { NavigationUI.setupActionBarWithNavController(this, navController, appBarConfiguration); }NavigationUIhandle what happens when the Up button is pressed. - Override
onSupportNavigationUpand callNavigationUI.navigateUp, using the same AppBarConfiguration.
MainActivity.java@Override public boolean onSupportNavigateUp() { return NavigationUI.navigateUp(Navigation.findNavController(this, R.id.my_nav_host_fragment), appBarConfiguration) || super.onSupportNavigateUp(); }
- Run your code. If you open the app in split screen, you should have a working navigation drawer. The up icon and the drawer icon should display at the appropriate times and work correctly.
Adding new destinations to a NavigationView is easy. Once you have the navigation drawer working with up and back navigation, you just need to add the new menu item.
- Open
menu/nav_drawer_menu.xml - Add a new menu item for
settings_destnav_drawer_menu.xml<item android:id="@+id/settings_dest" android:icon="@drawable/ic_settings" android:title="@string/settings" />
Now your navigation drawers shows the Settings screen as a destination. Good work!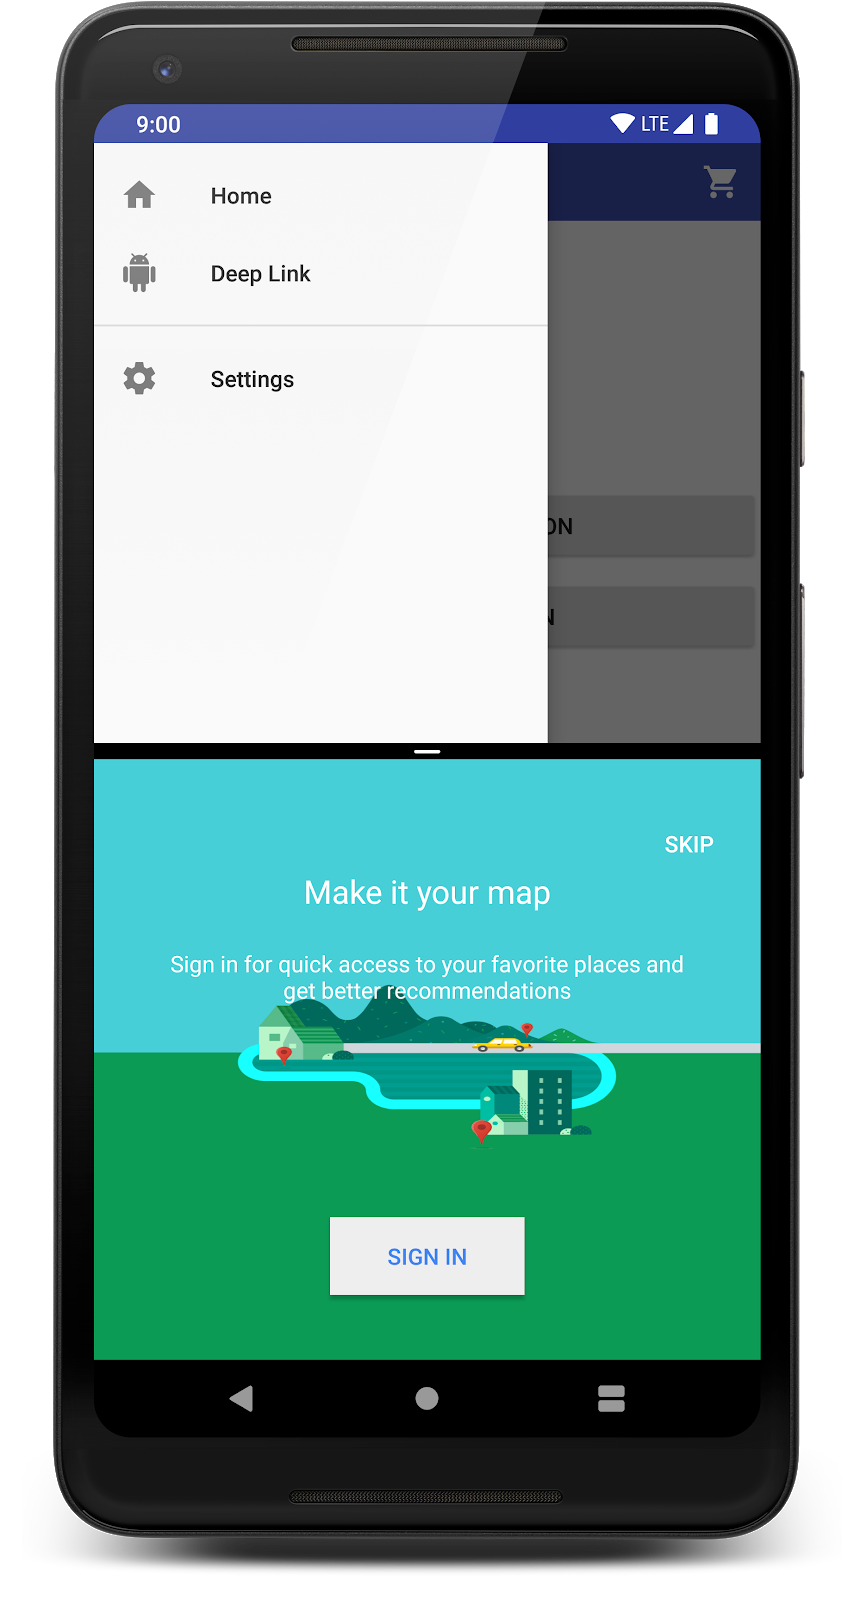
Deep Links and Navigation
Navigation components also include deep link support. Deep links are a way to jump into the middle of your app's navigation, whether that's from an actual URL link or a pending intent from a notification.
One benefit of using the navigation library to handle deep links is that it ensures users start on the right destination with the appropriate back stack from other entry points such as app widgets, notifications, or web links (covered in the next step).
Navigation provides a NavDeepLinkBuilder class to construct a PendingIntent that will take the user to a specific destination.
Add a Deep Link
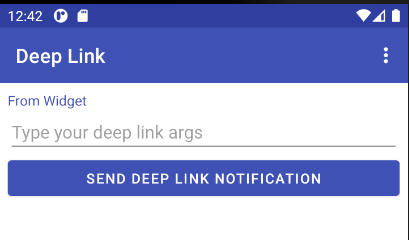
We'll use the NavDeepLinkBuilder to hook up an app widget to a destination.
- Open
DeepLinkAppWidgetProvider.java - Add a
PendingIntentconstructed withNavDeepLinkBuilder:
DeepLinkAppWidgetProviderval args = Bundle() args.putString("myarg", "From Widget"); val pendingIntent = NavDeepLinkBuilder(context) .setGraph(R.navigation.mobile_navigation) .setDestination(R.id.deeplink_dest) .setArguments(args) .createPendingIntent() remoteViews.setOnClickPendingIntent(R.id.deep_link_button, pendingIntent)
Notice:
setGraphincludes the navigation graph.setDestinationspecifies where the link goes to.setArgumentsincludes any arguments you want to pass into your deep link.
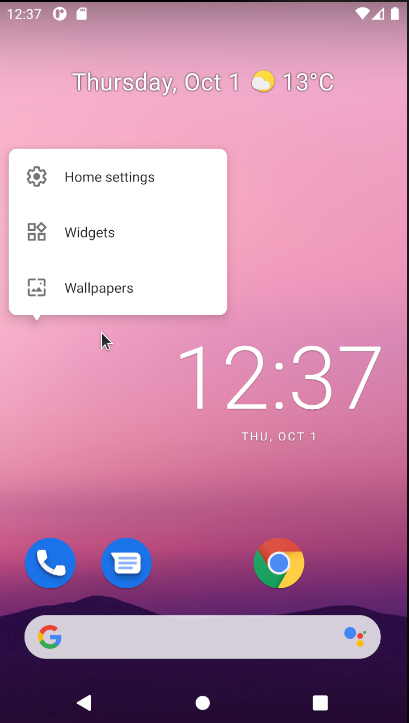
- Add the Deep Link widget to your home screen. Tap and hold on the home screen to see option to add widget.
Tap and hold
Scroll down to find widget
When you are finished you'll have a deep link widget:
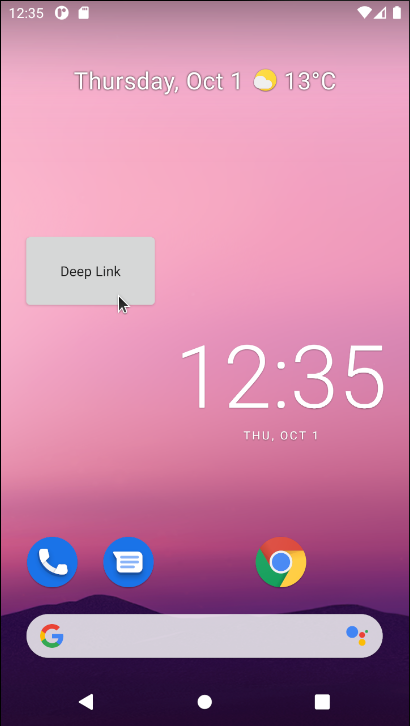
- Tap the widget, and verify that the Android destination opens with the correct argument. It should say
"From Widget"at the top since that is the argument you passed inDeepLinkAppWidgetProvider.
- Verify that hitting the back button takes you to the home_dest destination.
DeepLink Backstack
The backstack for a deep link is determined using the navigation graph you pass in. If the explicit Activity you've chosen has a parent activity, those parent Activities are also included.
The backstack is generated using the destinations specified with app:startDestination. In this app we only have one activity and one level of navigation, so the backstack will take you to the home_dest destination.
More complicated navigation can include nested navigation graphs. The app:startDestination at each level of the nested graphs determines the backstack. For more information on deep links and nested graphs, check out the Principles of Navigation.
The element
One of the most common uses of a deep link is to allow a web link to open an activity in your app. Traditionally you would use an intent-filter and associate a URL with the activity you want to open.
The navigation library makes this extremely simple and allows you to map URLs directly to destinations in your navigation graph.
<deepLink> is an element you can add to a destination in your graph. Each <deepLink> element has a single required attribute: app:uri.
In addition to a direct URI match, the following features are supported:
- URIs without a scheme are assumed to be http and https. For example,
www.example.comwill matchhttp://www.example.comandhttps://www.example.com. - You can use placeholders in the form of
{placeholder_name}to match one or more characters. The String value of the placeholder is available in the arguments Bundle which has a key of the same name. For example,http://www.example.com/users/{id}will matchhttp://www.example.com/users/4. - You can use the
.*wildcard to match zero or more characters. NavControllerwill automatically handle ACTION_VIEW intents and look for matching deep links.
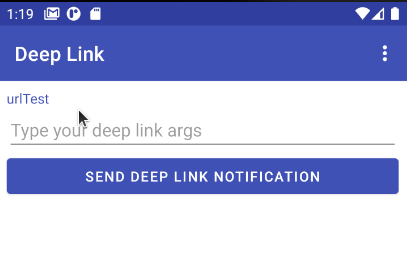
Add a URIbased Deep Link using
In this step, you'll add a deep link to www.example.com.
- Open
mobile_navigation.xml - Add a
<deepLink>element to thedeeplink_destdestination.
mobile_navigation.xml<fragment android:id="@+id/deeplink_dest" android:name="com.example.android.codelabs.navigation.DeepLinkFragment" android:label="@string/deeplink" tools:layout="@layout/deeplink_fragment"> <argument android:name="myarg" android:defaultValue="Android!"/> <deepLink app:uri="www.example.com/{myarg}" /> </fragment> - Open
AndroidManifest.xml - Add the
nav-graphtag. This will ensure the appropriate intent filter is generated
AndroidManifest.xml<activity android:name=".MainActivity"> <intent-filter> <action android:name="android.intent.action.MAIN" /> <category android:name="android.intent.category.DEFAULT" /> <category android:name="android.intent.category.LAUNCHER" /> </intent-filter> <nav-graph android:value="@navigation/mobile_navigation" /> </activity>
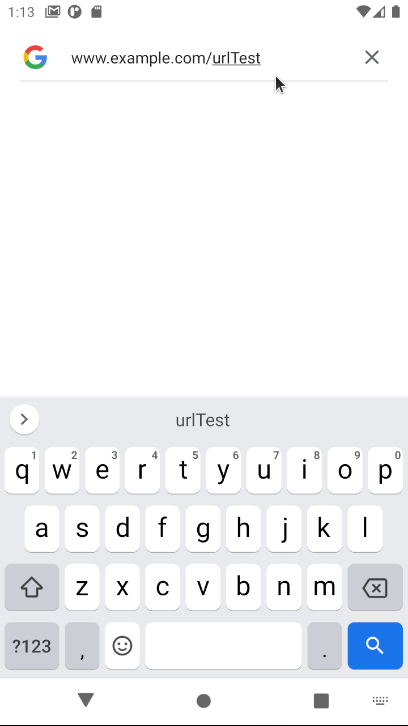
- Launch your app using a deep link. There are two ways to do this:
- Use adb from the command line:
adb shell am start -a android.intent.action.VIEW -d "http://www.example.com/urlTest" - Navigate via the Google app. You should be able to put
www.example.com/urlTestin the search bar and the disambiguation window will appear.
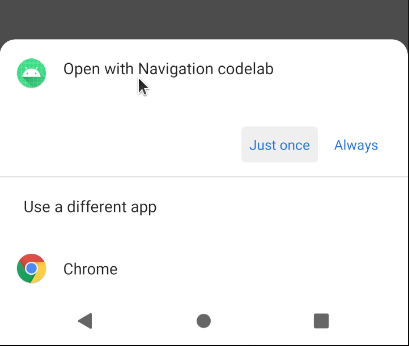
Opened using the search bar (not in Chrome)
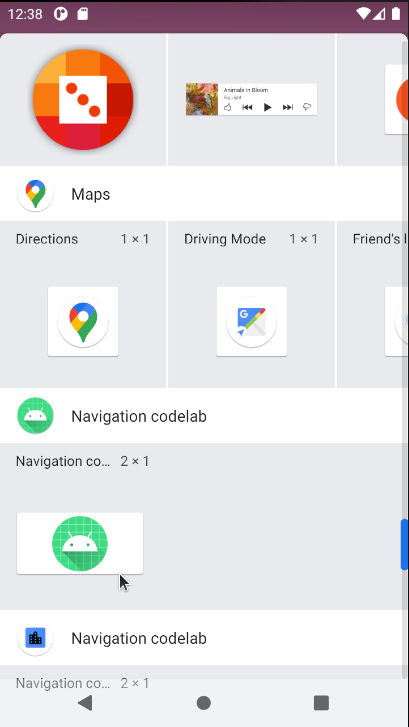
- Select
Navigation codelab
Disambiguation dialog
Either way, you should see the message "urlTest" on screen. This was passed through to the fragment, from the URL.
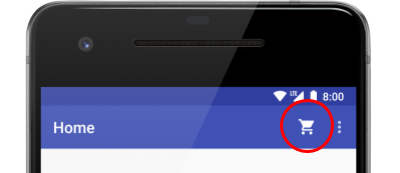
There's one more part of the codelab app for you to experiment with, and that's the shopping cart button.
This is a recap of the skills you've learned during this codelab. This step does not include comments, so try it on your own:
- Create a new fragment class
- Add the fragment as a destination to your navigation graph
- Have the shopping cart icon open up your new fragment class, using
NavigationUIto handle the menu.
You're familiar with the basic concepts behind the Navigation component! In this codelab you learned about:
- Navigation graph structure
- NavHostFragment and NavController
- How to navigate to specific destinations
- How to navigate by action
- How to pass arguments between destinations, including using the new safeargs plugin
- Navigating using menus, bottom navs, and navigation drawers
- Navigating via deep link
You can continue to explore with this app or start using navigation in your own app.
There's a lot more to try, including:
- Popping destinations off the backstack (or any backstack manipulations)
- Nested navigation graphs
- Conditional navigation
- Adding support for new destinations
For more about the Navigation Component check out the documentation.