This practical codelab is part of Unit 2: Activities and Intents for CS3040/DC3040. You will get the most value out of this course if you work through the codelabs in sequence:
Introduction
In a previous section you learned about explicit intents. In an explicit intent, you carry out an activity in your app, or in a different app, by sending an intent with the fully qualified class name of the activity. In this section you learn more about implicit intents and how to use them to carry out activities.
With an implicit intent, you initiate an activity without knowing which app or activity will handle the task. For example, if you want your app to take a photo, send email, or display a location on a map, you typically don't care which app or activity performs the task.
Conversely, your activity can declare one or more intent filters in the AndroidManifest.xml file to advertise that the activity can accept implicit intents, and to define the types of intents that the activity will accept.
To match your request with an app installed on the device, the Android system matches your implicit intent with an activity whose intent filters indicate that they can perform the action. If multiple apps match, the user is presented with an app chooser that lets them select which app they want to use to handle the intent.
In this practical you build an app that sends an implicit intent to perform each of the following tasks:
- Open a URL in a web browser.
- Open a location on a map.
- Share text.
Sharing—sending a piece of information to other people through email or social media—is a popular feature in many apps. For the sharing action you use the ShareCompat.IntentBuilder class, which makes it easy to build an implicit intent for sharing data.
Finally, you create a simple intent-receiver that accepts an implicit intent for a specific action.
What you should already know
You should be able to:
- Use the layout editor to modify a layout.
- Edit the XML code of a layout.
- Add a
Buttonand a click handler. - Create and use an
Activity. - Create and send an
Intentbetween oneActivityand another.
What you'll learn
- How to create an implicit
Intent, and use its actions and categories. - How to use the
ShareCompat.IntentBuilderhelper class to create an implicitIntentfor sharing data. - How to advertise that your app can accept an implicit
Intentby declaringIntentfilters in theAndroidManifest.xmlfile.
What you'll do
- Create a new app to experiment with implicit
Intent. - Implement an implicit
Intentthat opens a web page, and another that opens a location on a map. - Implement an action to share a snippet of text.
- Create a new app that can accept an implicit
Intentfor opening a web page.
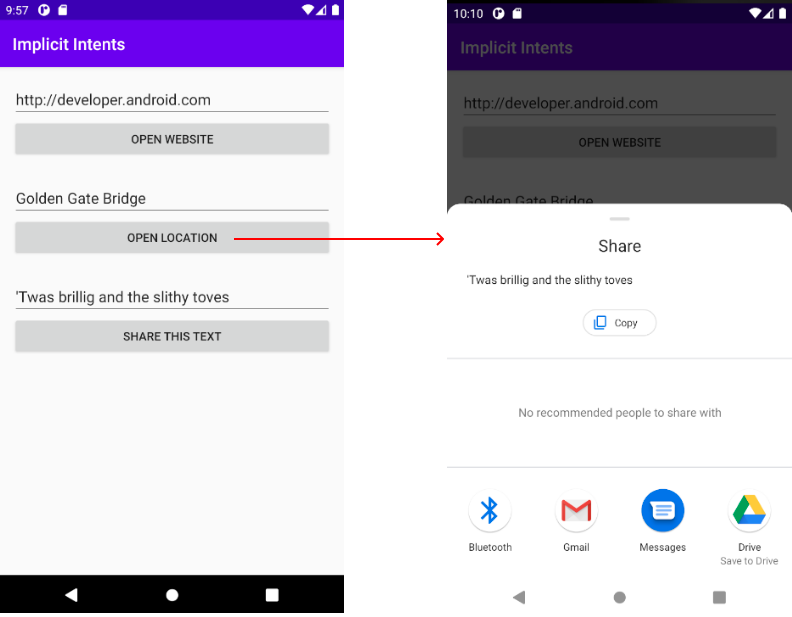
In this section you create a new app with one Activity and three options for actions: open a web site, open a location on a map, and share a snippet of text. All of the text fields are editable (EditText), but contain default values.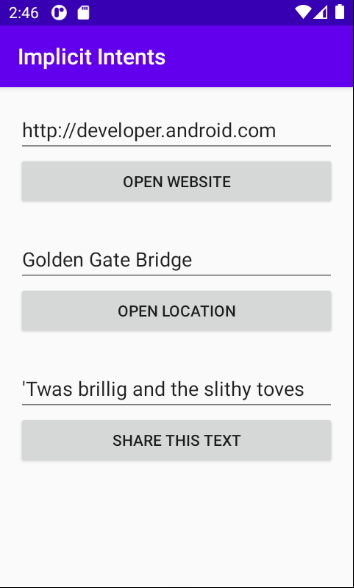
For this exercise, you create a new project and app called Implicit Intents, with a new layout.
1.1 Create the project
- Start Android Studio and create a new Android Studio project.
- Choose Empty Activity for the project template. Click Next.
- Name your app Implicit Intents.
- Ensure the language selected is Java
- The Minimum SDK should be API 18: Android 4.3 (Jelly Bean)
- Click Finish
1.2 Create the layout
In this task, create the layout for the app. Use a LinearLayout, three Button elements, and three EditText elements, like this: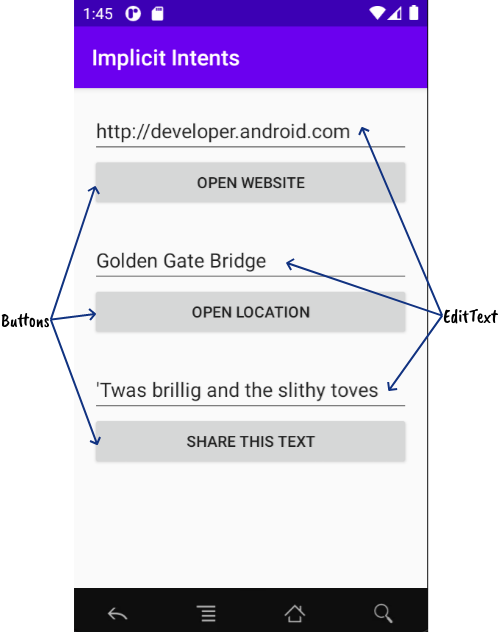
- pen app > res > values > strings.xml in the Project > Android pane, and add the following string resources:
<string name="edittext_uri">http://developer.android.com</string> <string name="button_uri">Open Website</string> <string name="edittext_loc">Golden Gate Bridge</string> <string name="button_loc">Open Location</string> <string name="edittext_share">\'Twas brillig and the slithy toves</string> <string name="button_share">Share This Text</string> - Open res > layout > activity_main.xml in the Project > Android pane. Click the Code tab to switch to XML code.
- Change
android.support.constraint.ConstraintLayouttoLinearLayout, as you learned in a previous practical. - Add the
android:orientationattribute with the value"vertical". Add theandroid:paddingattribute with the value"16dp".<Linearlayout xmlns:android="http://schemas.android.com/apk/res/android" xmlns:app="http://schemas.android.com/apk/res-auto" xmlns:tools="http://schemas.android.com/tools" android:layout_width="match_parent" android:layout_height="match_parent" android:orientation="vertical" android:padding="16dp" tools:context=".MainActivity"> - Remove the TextView that displays "Hello World".
- Add a set of UI elements to the layout for the Open Website button. You need an
EditTextelement and aButtonelement. Use these attribute values:EditText attribute
Value
android:id"@+id/website_edittext"android:layout_width"match_parent"android:layout_height"wrap_content"android:inputTypetextUriandroid:text"@string/edittext_uri"Button attribute
Value
android:id"@+id/open_website_button"android:layout_width"wrap_content"android:layout_height"wrap_content"android:layout_marginBottom"24dp"android:text"@string/button_uri"android:onClick"openWebsite"
The value for theandroid:onClickattribute will remain underlined in red until you define the callback method in a subsequent task. - Add a set of UI elements (
EditTextandButton) to the layout for the Open Location button. Use the same attributes as in the previous step, but modify them as shown below. (You can copy the values from the Open Website button and modify them).EditText attribute
Value
android:id"@+id/location_edittext"android:text"@string/edittext_loc"Button attribute
Value
android:id"@+id/open_location_button"android:text"@string/button_loc"android:onClick"openLocation"
The value for theandroid:onClickattribute will remain underlined in red until you define the callback method in a subsequent task. - Add a set of UI elements (
EditTextandButton) to the layout for the Share This button. Use the attributes shown below. (You can copy the values from the Open Website button and modify them).EditText attribute
Value
android:id"@+id/share_edittext"android:text"@string/edittext_share"Button attribute
Value
android:id"@+id/share_text_button"android:text"@string/button_share"android:onClick"shareText"
Depending on your version of Android Studio, youractivity_main.xmlcode should look something like the following. The values for theandroid:onClickattributes will remain underlined in red until you define the callback methods in a subsequent task.<?xml version="1.0" encoding="utf-8"?> <LinearLayout xmlns:android="http://schemas.android.com/apk/res/android" xmlns:tools="http://schemas.android.com/tools" android:layout_width="match_parent" android:layout_height="match_parent" android:orientation="vertical" android:padding="16dp" tools:context=".MainActivity"> <EditText android:id="@+id/website_edittext" android:layout_width="match_parent" android:layout_height="wrap_content" android:ems="10" android:autofillHints="Enter a URL" android:inputType="textUri" android:text="@string/edittext_uri" /> <Button android:id="@+id/open_website_button" android:layout_width="match_parent" android:layout_height="wrap_content" android:layout_marginBottom="24dp" android:text="@string/button_uri" android:onClick="openWebsite"/> <EditText android:id="@+id/location_edittext" android:layout_width="match_parent" android:layout_height="wrap_content" android:ems="10" android:autofillHints="Enter the name of a location/place" android:inputType="textCapWords" android:text="@string/edittext_loc" /> <Button android:id="@+id/open_location_button" android:layout_width="match_parent" android:layout_height="wrap_content" android:layout_marginBottom="24dp" android:text="@string/button_loc" android:onClick="openLocation"/> <EditText android:id="@+id/share_edittext" android:layout_width="match_parent" android:layout_height="wrap_content" android:ems="10" android:autofillHints="Enter a message to share" android:inputType="textShortMessage|text" android:text="@string/edittext_share" /> <Button android:id="@+id/share_text_button" android:layout_width="match_parent" android:layout_height="wrap_content" android:layout_marginBottom="24dp" android:text="@string/button_share" android:onClick="shareText" /> </LinearLayout>
In this task you implement the on-click handler method for the first button in the layout, Open Website. This action uses an implicit Intent to send the given URI to an Activity that can handle that implicit Intent (such as a web browser).
2.1 Define openWebsite()
- Click
"openWebsite"in theactivity_main.xmlXML code. - Press
Alt+Enter(Option+Enteron a Mac) and select Create ‘openWebsite(View)' in ‘MainActivity.
TheMainActivityfile opens, and Android Studio generates a skeleton method for theopenWebsite()handler.public void openWebsite(View view) { } - In
MainActivity, add a private variable at the top of the class to hold theEditTextobject for the web site URI.private EditText mWebsiteEditText; - In the
onCreate()method for MainActivity, usefindViewById()to get a reference to theEditTextinstance and assign it to that private variable:mWebsiteEditText = findViewById(R.id.website_edittext);
2.2 Update the Manifest
With API level 30, if you're targeting that version or higher, your app cannot see, or directly interact with, most external packages without explicitly requesting that be allowed. We need that permission here because we want to find an installed application that can view URIs, normally a web browser. In this example, we want the open website button to send the URL to a web browser via an implicit intent.
You can request permission to see external packages by including an appropriate element in your manifest.
- Add the following code to your
AndroidManifest, inside themanifestelement but before theapplicationelement:<queries> <intent> <action android:name="android.intent.action.VIEW" /> <category android:name="android.intent.category.BROWSABLE" /> <data android:scheme="http" /> </intent> </queries> - (Optional) If you also wish to allow the
httpsscheme to also be handled, you need another intent element:<queries> <intent> <action android:name="android.intent.action.VIEW" /> <category android:name="android.intent.category.BROWSABLE" /> <data android:scheme="http" /> </intent> <intent> <action android:name="android.intent.action.VIEW" /> <category android:name="android.intent.category.BROWSABLE" /> <data android:scheme="https" /> </intent> </queries>
2.3 Add code to openWebsite()
- Add a statement to the new
openWebsite()method that gets the string value of theEditText:String url = mWebsiteEditText.getText().toString(); - Encode and parse that string into a Uri object:
Uri webpage = Uri.parse(url); - Create a new
IntentwithIntent.ACTION_VIEWas the action and the URI as the data:
This Intent constructor is different from the one you used to create an explicitIntent intent = new Intent(Intent.ACTION_VIEW, webpage);Intent. In the previous constructor, you specified the current context and a specific component (Activityclass) to send theIntent. In this constructor you specify an action and the data for that action. Actions are defined by theIntentclass and can includeACTION_VIEW(to view the given data),ACTION_EDIT(to edit the given data), orACTION_DIAL(to dial a phone number). In this case the action isACTION_VIEWbecause you want to display the web page specified by the URI in the webpage variable. - Use the
resolveActivity()method and the Android package manager to find anActivitythat can handle your implicitIntent. Make sure that the request resolved successfully.
This request that matches yourif (intent.resolveActivity(getPackageManager()) != null) { }Intentaction and data with theIntentfilters for installed apps on the device. You use it to make sure there is at least oneActivitythat can handle your requests.
Note: that theresolveActivitymethod will returnnullon API 30 or above if you haven't complete task 2.2 above. For API 29 and lower, it should work without requiring the manifest to be updated. - Inside the
ifstatement, callstartActivity()to send the Intent.startActivity(intent); - Add an
elseblock to print aLogmessage if theIntentcould not be resolved.
The} else { Log.d("ImplicitIntents", "Can't handle this!"); }openWebsite()method should now look as follows. (Comments added for clarity.)public void openWebsite(View view) { // Get the URL text. String url = mWebsiteEditText.getText().toString(); // Parse the URI and create the intent. Uri webpage = Uri.parse(url); Intent intent = new Intent(Intent.ACTION_VIEW, webpage); // Find an activity to hand the intent and start that activity. if (intent.resolveActivity(getPackageManager()) != null) { startActivity(intent); } else { Log.d("ImplicitIntents", "Can't handle this intent!"); } }
In this task you implement the on-click handler method for the second button in the UI, Open Location. This method is almost identical to the openWebsite() method. The difference is the use of a geo URI to indicate a map location. You can use a geo URI with latitude and longitude, or use a query string for a general location. In this example we've used the latter.
3.1 Define openLocation()
- Click
"openLocation"in theactivity_main.xmlXML code. - Press Alt+Enter (Option+Enter on a Mac) and select Create ‘openLocation(View)' in MainActivity.
Android Studio generates a skeleton method inMainActivityfor theopenLocation()handler.public void openLocation(View view) { } - Add a private variable at the top of
MainActivityto hold theEditTextobject for the location URI.private EditText mLocationEditText; - In the
onCreate()method, usefindViewByID()to get a reference to theEditTextinstance and assign it to that private variable:mLocationEditText = findViewById(R.id.location_edittext);
3.2 Update the Manifest
- Update the
AndroidManifestto request permission to look for external packages that can view ageoURI (such as Google Maps). Add the followingintentelement to that you added in task 2:<intent> <action android:name="android.intent.action.VIEW" /> <category android:name="android.intent.category.BROWSABLE" /> <data android:scheme="geo" /> </intent>
Your manifest should now start with the following code:
<?xml version="1.0" encoding="utf-8"?>
<manifest xmlns:android="http://schemas.android.com/apk/res/android"
package="uk.aston.implicitintents">
<queries>
<intent>
<action android:name="android.intent.action.VIEW" />
<category android:name="android.intent.category.BROWSABLE" />
<data android:scheme="http" />
</intent>
<intent>
<action android:name="android.intent.action.VIEW" />
<category android:name="android.intent.category.BROWSABLE" />
<data android:scheme="https" />
</intent>
<intent>
<action android:name="android.intent.action.VIEW" />
<category android:name="android.intent.category.BROWSABLE" />
<data android:scheme="geo" />
</intent>
</queries>
...
</manifest>
3.3 Add code to openLocation()
- In the new
openLocation()method, add a statement to get the string value of theEditTextcalledmLocationEditText.String loc = mLocationEditText.getText().toString(); - Parse that string into a Uri object with a
geosearch query:Uri addressUri = Uri.parse("geo:0,0?q=" + loc); - Create a new
IntentwithIntent.ACTION_VIEWas the action andaddressUrias the data.Intent intent = new Intent(Intent.ACTION_VIEW, addressUri); - Resolve the
Intentand check to make sure that theIntentresolved successfully. If so,startActivity(), otherwise log an error message.if (intent.resolveActivity(getPackageManager()) != null) { startActivity(intent); } else { Log.d("ImplicitIntents", "Can't handle this intent!"); }
The openLocation() method should now look as follows (comments added for clarity):
public void openLocation(View view) {
// Get the string indicating a location. Input is not validated; it is
// passed to the location handler intact.
String loc = mLocationEditText.getText().toString();
// Parse the location and create the intent.
Uri addressUri = Uri.parse("geo:0,0?q=" + loc);
Intent intent = new Intent(Intent.ACTION_VIEW, addressUri);
// Find an activity to handle the intent, and start that activity.
if (intent.resolveActivity(getPackageManager()) != null) {
startActivity(intent);
} else {
Log.d("ImplicitIntents", "Can't handle this intent!");
}
}
A share action is an easy way for users to share items in your app with social networks and other apps. Although you could build a share action in your own app using an implicit Intent, Android provides the ShareCompat.IntentBuilder helper class to make implementing sharing easy. You can use ShareCompat.IntentBuilder to build an Intent and launch a chooser to let the user choose the destination app for sharing.
In this task you implement sharing a bit of text in a text edit, using the ShareCompat.IntentBuilder class.
4.1 Define shareText()
- Click
"shareText"in theactivity_main.xmlXML code. - Press Alt+Enter (Option+Enter on a Mac) and select Create ‘shareText(View)' in MainActivity.
Android Studio generates a skeleton method inMainActivityfor theshareText()handler.public void shareText(View view) { } - Add a private variable at the top of
MainActivityto hold theEditText.
Inprivate EditText mShareTextEditText;onCreate(), usefindViewById()to get a reference to theEditTextinstance and assign it to that private variable:mShareTextEditText = findViewById(R.id.share_edittext);
4.2 Add code to shareText()
In the new shareText() method, add a statement to get the string value of the EditText called mShareTextEditText.
String txt = mShareTextEditText.getText().toString();
- Define the mime type of the text to share:
Call ShareCompat.IntentBuilder with these methods:String mimeType = "text/plain";ShareCompat.IntentBuilder .from(this) .setType(mimeType) .setChooserTitle("Share this text with: ") .setText(txt) .startChooser(); - Extract the parameter value of
.setChoosterTitleto a string resource.
The call to ShareCompat.IntentBuilder uses these methods:
Method | Description |
| The |
| The MIME type of the item to be shared. |
| The title that appears on the system app chooser. |
| The actual text to be shared |
| Show the system app chooser and send the |
This format, with all the builder's setter methods strung together in one statement, is an easy shorthand way to create and launch the Intent. You can add any of the additional methods to this list.
The shareText() method should now look as follows:
public void shareText(View view) {
String txt = mShareTextEditText.getText().toString();
String mimeType = "text/plain";
ShareCompat.IntentBuilder
.from(this)
.setType(mimeType)
.setChooserTitle(R.string.share_text)
.setText(txt)
.startChooser();
}
4.3 Run the app
- Run the app.
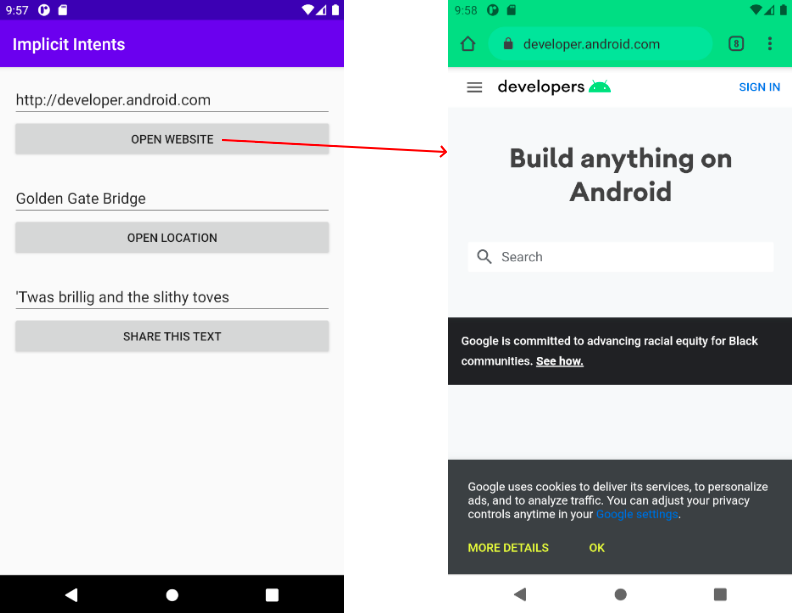
- Click the Open Website button to launch a browser with the website URL in the EditText above the Button. The browser and website should appear as shown below.
- Click the Open Location button to launch the map with the location in the
EditTextabove the Button. The map with the location should appear as shown below.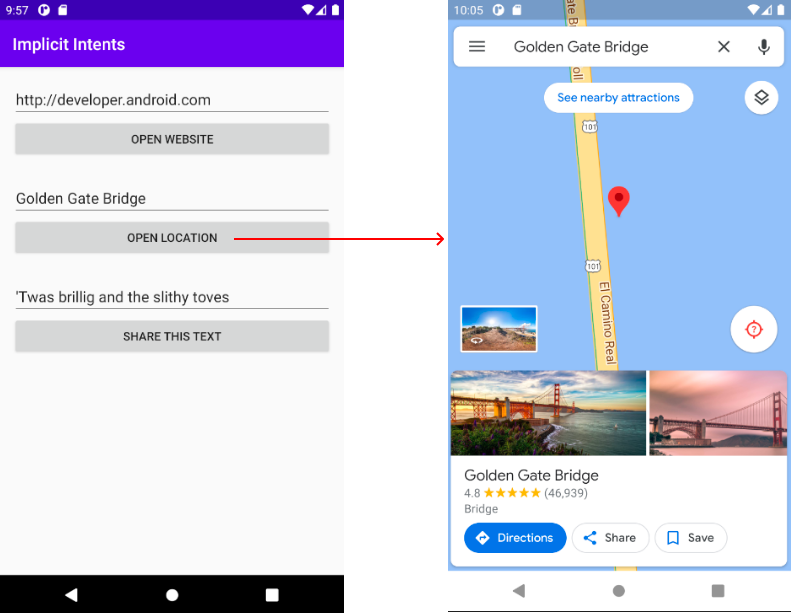
- Click the Share This Text button to launch a dialog with choices for sharing the text. The dialog with choices should appear as shown below.
Task 4 solution code for MainActivity
Your MainActivity class should look like this:
package uk.aston.implicitintents;
import androidx.appcompat.app.AppCompatActivity;
import androidx.core.app.ShareCompat;
import android.content.ComponentName;
import android.content.Intent;
import android.content.pm.PackageManager;
import android.net.Uri;
import android.os.Bundle;
import android.util.Log;
import android.view.View;
import android.widget.EditText;
public class MainActivity extends AppCompatActivity {
private EditText mWebsiteEditText;
private EditText mLocationEditText;
private EditText mShareTextEditText;
@Override
protected void onCreate(Bundle savedInstanceState) {
super.onCreate(savedInstanceState);
setContentView(R.layout.activity_main);
mWebsiteEditText = findViewById(R.id.website_edittext);
mLocationEditText = findViewById(R.id.location_edittext);
mShareTextEditText = findViewById(R.id.share_edittext);
}
public void openWebsite(View view) {
	// Get the URL text.
	String url = mWebsiteEditText.getText().toString();

	// Parse the URI and create the intent.
	Uri webpage = Uri.parse(url);
	Intent intent = new Intent(Intent.ACTION_VIEW, webpage);

	// Find an activity to hand the intent and start that activity.
	if (intent.resolveActivity(getPackageManager()) != null) {
		startActivity(intent);
	} else {
		Log.d("ImplicitIntents", "Can't handle this intent!");
	}
}
public void openLocation(View view) {
// Get the string indicating a location. Input is not validated; it is
// passed to the location handler intact.
String loc = mLocationEditText.getText().toString();
// Parse the location and create the intent.
Uri addressUri = Uri.parse("geo:0,0?q=" + loc);
Intent intent = new Intent(Intent.ACTION_VIEW, addressUri);
// Find an activity to handle the intent, and start that activity.
if (intent.resolveActivity(getPackageManager()) != null) {
startActivity(intent);
} else {
Log.d("ImplicitIntents", "Can't handle this intent!");
}
}
	public void shareText(View view) {
		String txt = mShareTextEditText.getText().toString();
		String mimeType = "text/plain";
		ShareCompat.IntentBuilder
				.from(this)
				.setType(mimeType)
				.setChooserTitle(R.string.share_text)
				.setText(txt)
				.startChooser();
	}
}
So far, you've created an app that uses an implicit Intent in order to launch some other app's Activity. In this task you look at the problem from the other way around: allowing an Activity in your app to respond to an implicit Intent sent from some other app.
An Activity in your app can always be activated from inside or outside your app with an explicit Intent. To allow an Activity to receive an implicit Intent, you define an Intent filter in your app's AndroidManifest.xml file to indicate which types of implicit Intent your Activity is interested in handling.
To match your request with a specific app installed on the device, the Android system matches your implicit Intent with an Activity whose Intent filters indicate that they can perform that action. If there are multiple apps installed that match, the user is presented with an app chooser that lets them select which app they want to use to handle that Intent.
When an app on the device sends an implicit Intent, the Android system matches the action and data of that Intent with any available Activity that includes the right Intent filters. When the Intent filters for an Activity match the Intent:
- If there is only one matching
Activity, Android lets theActivityhandle theIntentitself. - If there are multiple matches, Android displays an app chooser to allow the user to pick which app they'd prefer to execute that action.
In this task you create a very simple app that receives an implicit Intent to open the URI for a web page. When activated by an implicit Intent, that app displays the requested URI as a string in a TextView.
5.1 Create the project and layout
- Create a new Android Studio project and choose Empty Activity for the project template.
- Give your app the name Implicit Intents Receiver
- Ensure Java is selected as the Language.
- Open activity_main.xml.
- In the existing ("Hello World")
TextView, delete theandroid:textattribute. There's no text in thisTextViewby default, but you'll add the URI from theIntentinonCreate(). - Leave the
layout_constraintattributes alone, but add the following attributes:
Attribute | Value |
|
|
|
|
|
|
5.2 Modify AndroidManifest.xml to add an Intent filter
- Open the AndroidManifest.xml file.
Note thatMainActivityalready has thisIntentfilter:
This<intent-filter> <action android:name="android.intent.action.MAIN" /> <category android:name="android.intent.category.LAUNCHER" /> </intent-filter>Intentfilter, which is part of the default project manifest, indicates that thisActivityis the main entry point for your app (it has anIntentaction of"android.intent.action.MAIN"), and that thisActivityshould appear as a top-level item in the launcher (its category is"android.intent.category.LAUNCHER"). - Add a second
<intent-filter>tag inside<activity>, and include these elements:
These lines define an<action android:name="android.intent.action.VIEW" /> <category android:name="android.intent.category.DEFAULT" /> <category android:name="android.intent.category.BROWSABLE" /> <data android:scheme="http" android:host="developer.android.com" />Intentfilter for theActivity, that is, the kind ofIntentthat theActivitycan handle. ThisIntentfilter declares these elements:
Filter type | Value | Matches |
action |
| Any |
category |
| Any implicit |
category |
| Requests for browsable links from web pages, email, or other sources. |
data |
| URIs that contain a scheme of |
Note that the data filter has a restriction on both the kind of links it will accept and the hostname for those URIs. If you'd prefer your receiver to be able to accept any links, you can leave out the element.
The application section of AndroidManifest.xml should now look as follows:
<application
android:allowBackup="true"
android:icon="@mipmap/ic_launcher"
android:label="@string/app_name"
android:roundIcon="@mipmap/ic_launcher_round"
android:supportsRtl="true"
android:theme="@style/AppTheme">
<activity android:name=".MainActivity">
<intent-filter>
<action android:name="android.intent.action.MAIN" />
<category android:name="android.intent.category.LAUNCHER" />
</intent-filter>
<intent-filter>
<action android:name="android.intent.action.VIEW" />
<category android:name="android.intent.category.DEFAULT" />
<category android:name="android.intent.category.BROWSABLE" />
<data android:scheme="http" android:host="developer.android.com" />
</intent-filter>
</activity>
</application>
5.3 Process the Intent
In the onCreate() method for your Activity, process the incoming Intent for any data or extras it includes. In this case, the incoming implicit Intent has the URI stored in the Intent data.
- Open MainActivity.
- In the
onCreate()method, get the TextView for the message:TextView textView = findViewById(R.id.text_uri_message); - After that, get the incoming
Intentthat was used to activate theActivity:Intent intent = getIntent(); - Get the
Intentdata.Intentdata is always a URI object:Uri uri = intent.getData(); - Check to make sure that the
urivariable is notnull. If that check passes, create a string from that URI object:if (uri != null) { String uri_string = "URI: " + uri.toString(); } - Extract the
"URI: "portion of the above into a string resource (uri_label). - Inside that if block, set the text of that
TextViewto the URI:textView.setText(uri_string); - Add an else clause to your if block:
This will ensure that the screen contains some text if the App is started manually.else { textView.setText("No URI Found!"); } - Extract the text
"No URI Found!"to a string resource with the nameerror_message. - The
onCreate()method for MainActivity should now look like the following:@Override protected void onCreate(Bundle savedInstanceState) { super.onCreate(savedInstanceState); setContentView(R.layout.activity_main); TextView textView = findViewById(R.id.text_uri_message); Intent intent = getIntent(); Uri uri = intent.getData(); if (uri != null) { String uri_string = getString(R.string.uri_label) + uri.toString(); textView.setText(uri_string); } else { textView.setText(R.string.error_message); } }
5.4 Run both apps
To show the result of receiving an implicit Intent, you will run both the Implicit Intents Receiver and Implicit Intents apps on the emulator or your device.
- Run the Implicit Intents Receiver app.
Running the app on its own shows anActivitywith the error message"No URI Found!". This is because theActivitywas activated from the system launcher, and not with anIntentfrom another app. - Run the Implicit Intents app, and click
Open Websitewith the default URI.
An app chooser appears asking if you want to use the default browser (Chrome in the figure below) or the Implicit Intents Receiver app. Select Implicit Intents Receiver, and click Just Once. The Implicit Intents Receiver app launches and the message shows the URI from the original request.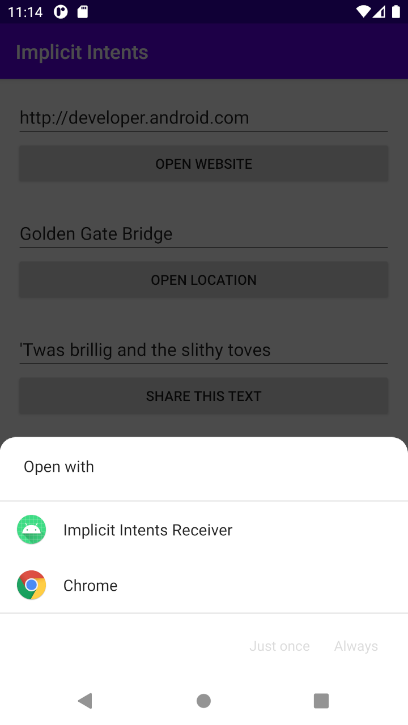
- Tap the Back button and enter a different URI. Click Open Website.
The receiver app has a very restrictiveIntentfilter that matches only exact URI protocol (http) and host (developer.android.com). Any other URI opens in the default web browser.
Task 5 solution code
The solution code can be found on Blackboard.
- An implicit
Intentallows you to activate anActivityif you know the action, but not the specific app orActivitythat will handle that action. - An
Activitythat can receive an implicitIntentmust defineIntentfilters in theAndroidManifest.xmlfile that match one or moreIntentactions and categories. - The Android system matches the content of an implicit
Intentand theIntentfilters of any availableActivityto determine whichActivityto activate. If there is more than one availableActivity, the system provides a chooser so the user can pick one. - The
ShareCompat.IntentBuilderclass makes it easy to build an implicitIntentfor sharing data to social media or email.
The related concept documentation is in 2.3: Implicit intents.
Android developer documentation: