This practical codelab is part of Unit 2: Activities and Intents for CS3040/DC3040. You will get the most value out of this course if you work through the codelabs in sequence:
Introduction
An Activity represents a single screen in your app with which your user can perform a single, focused task such as taking a photo, sending an email, or viewing a map. An activity is usually presented to the user as a full-screen window.
An app usually consists of multiple screens that are loosely bound to each other. Each screen is an activity. Typically, one activity in an app is specified as the "main" activity (MainActivity.java), which is presented to the user when the app is launched. The main activity can then start other activities to perform different actions.
Each time a new activity starts, the previous activity is stopped, but the system preserves the activity in a stack (the "back stack"). When a new activity starts, that new activity is pushed onto the back stack and takes user focus. The back stack follows basic "last in, first out" stack logic. When the user is done with the current activity and presses the Back button, that activity is popped from the stack and destroyed, and the previous activity resumes.
An activity is started or activated with an intent. An Intent is an asynchronous message that you can use in your activity to request an action from another activity, or from some other app component. You use an intent to start one activity from another activity, and to pass data between activities.
An Intent can be explicit or implicit:
- An explicit intent is one in which you know the target of that intent. That is, you already know the fully qualified class name of that specific activity.
- An implicit intent is one in which you do not have the name of the target component, but you have a general action to perform.
In this practical you create explicit intents. You find out how to use implicit intents in a later practical.
What you should already know
You should be able to:
- Create and run apps in Android Studio.
- Use the layout editor to create a layout within a
ConstraintLayout - Edit the layout XML code.
- Add
onClickfunctionality to aButton.
What you'll learn
- How to create a new
Activityin Android Studio. - How to define parent and child activities for Up navigation.
- How to start an
Activitywith an explicitIntent. - How to pass data between each
Activitywith an explicitIntent.
What you'll do
- Create a new Android app with a main
Activityand a secondActivity. - Pass some data (a string) from the main
Activityto the second using anIntent, and display that data in the secondActivity. - Send a second different bit of data back to the main
Activity, also using anIntent.
In this chapter you create and build an app called Two Activities that, unsurprisingly, contains two Activity implementations. You build the app in three stages.
In the first stage, you create an app whose main activity contains one button, Send. When the user clicks this button, your main activity uses an intent to start the second activity.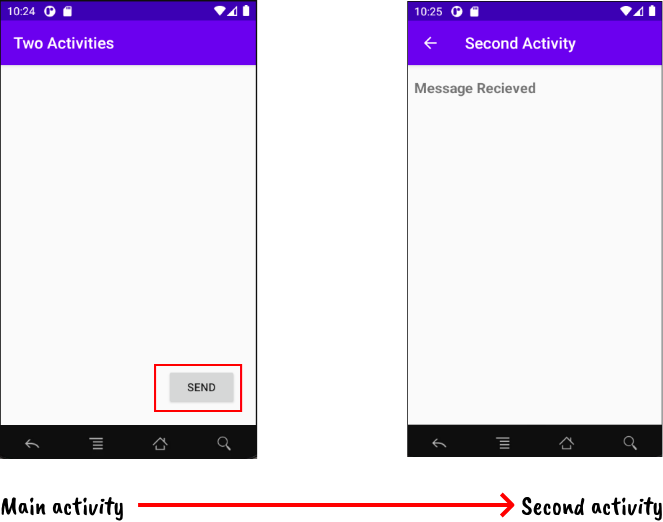
In the second stage, you add an EditText view to the main activity. The user enters a message and clicks Send. The main activity uses an intent to start the second activity and send the user's message to the second activity. The second activity displays the message it received.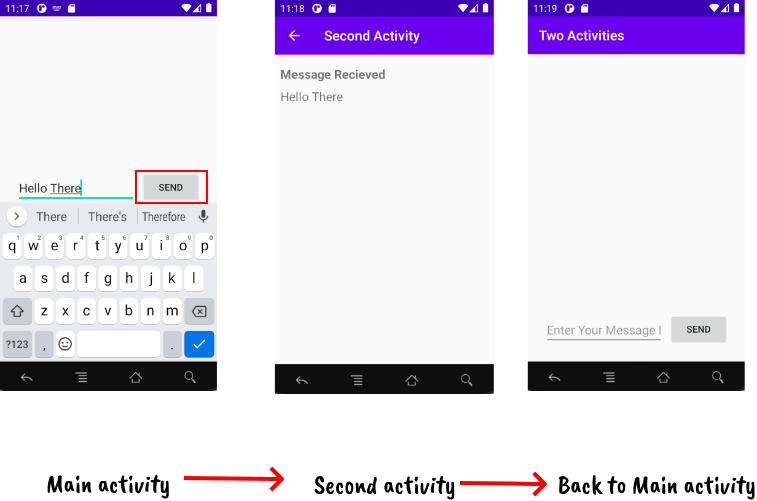
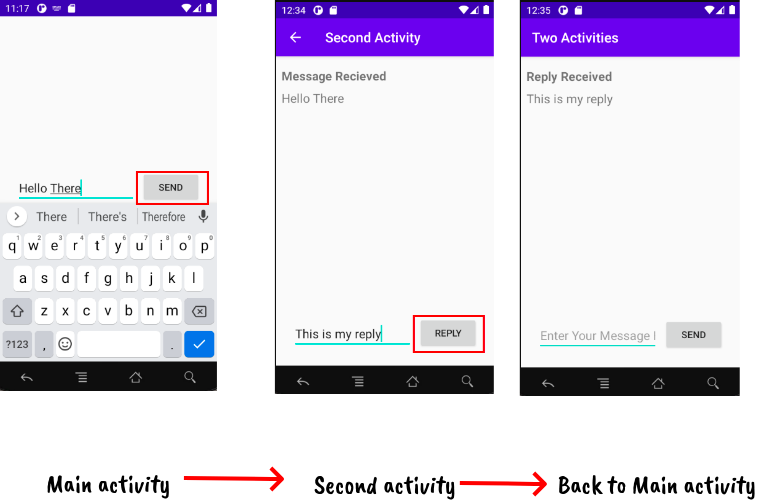
In the final stage of creating the Two Activities app, you add an EditText and a Reply button to the second activity. The user can now type a reply message and tap Reply, and the reply is displayed on the main activity. At this point, you use an intent to pass the reply back from the second activity to the main activity.
In this task you set up the initial project with a main Activity, define the layout, and define a skeleton method for the onClick button event.
1.1 Create the TwoActivities project
- Start Android Studio and create a new Android Studio project with the following properties:
Attribute
Value
Template
Empty Activity (Click Next)
Application Name
Two Activities
Package Name
uk.aston.twoactivities (or your own domain)
Language
Java
Minimum SDK
API18: Android 4.3 (Jelly Bean)
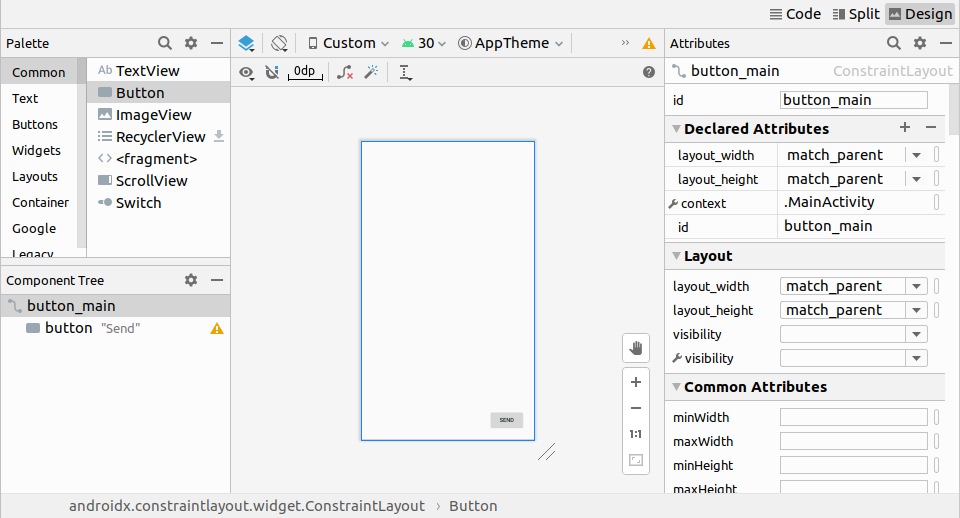
1.2 Define the layout for the main Activity
- Open res > layout > activity_main.xml in the Project > Android pane. The layout editor appears.
- Click the Design tab if it is not already selected, and delete the
TextView(the one that says "Hello World") in the Component Tree pane. - Drag a
Buttonfrom the Palette pane to the lower right corner of the layout. The layout's autoconnect creates constraints for the Button by default. Change these by connecting the right hand side of the button to the right hand edge of the layout and the bottom of the button to the bottom of the layout. - In the Attributes pane, set the right and bottom margins of the button to 24.
In the Attributes pane, set the ID to button_main, the layout_width and layout_height to wrap_content, and enter Send for the Text field. - The layout should now look like this:
- Click the Code tab to edit the XML code. Add the following attribute to the Button:
The attribute value is underlined in red because theandroid:onClick="launchSecondActivity"launchSecondActivity()method has not yet been created. Ignore this error for now; you fix it in the next task. - Extract the string resource, as described in a previous practical, for "Send" and use the name
button_sendfor the resource.
The XML code for the Button should look like the following:
<Button
	android:id="@+id/button_main"
	android:layout_width="wrap_content"
	android:layout_height="wrap_content"
	android:layout_marginEnd="24dp"
	android:layout_marginBottom="24dp"
	android:onClick="launchSecondActivity"
	android:text="@string/button_send"
	app:layout_constraintBottom_toBottomOf="parent"
	app:layout_constraintEnd_toEndOf="parent" />
1.3 Define the Button action
In this task you implement the launchSecondActivity() method you referred to in the layout for the android:onClick attribute.
- Click on "launchSecondActivity" in the
activity_main.xmlXML code. - Press Alt+Enter (Option+Enter on a Mac) and select Create ‘launchSecondActivity(View)' in ‘MainActivity'.
TheMainActivityfile opens, and Android Studio generates a skeleton method for thelaunchSecondActivity()handler. - Inside
launchSecondActivity(), add aLogstatement that says "Button Clicked!"Log.d(LOG_TAG, "Button clicked!");LOG_TAGwill show as red. You add the definition for that variable in the next step. - At the top of the
MainActivityclass, add a constant for theLOG_TAGvariable:
This constant uses the name of the class itself as the tag.private static final String LOG_TAG = MainActivity.class.getSimpleName(); - Run your app. When you click the Send button you see the "Button Clicked!" message in the Logcat pane. If there's too much output in the monitor, type MainActivity into the search box, and the Logcat pane will only show lines that match that tag.
The code forMainActivityshould look as follows:package uk.aston.twoactivities; import androidx.appcompat.app.AppCompatActivity; import android.os.Bundle; import android.util.Log; import android.view.View; public class MainActivity extends AppCompatActivity { private static final String LOG_TAG = MainActivity.class.getSimpleName(); @Override protected void onCreate(Bundle savedInstanceState) { super.onCreate(savedInstanceState); setContentView(R.layout.activity_main); } public void launchSecondActivity(View view) { Log.d(LOG_TAG, "Button clicked!"); } }
The output in the Logcat pane should look something like this after you click the button in the app:
Each new activity you add to your project has its own layout and Java files, separate from those of the main activity. They also have their own <activity> elements in the AndroidManifest.xml file. As with the main activity, new activity implementations that you create in Android Studio also extend from the AppCompatActivity class.
Each activity in your app is only loosely connected with other activities. However, you can define an activity as a parent of another activity in the AndroidManifest.xml file. This parent-child relationship enables Android to add navigation hints such as left-facing arrows in the title bar for each activity.
An activity communicates with other activities (in the same app and across different apps) with an intent. An Intent can be explicit or implicit:
- An explicit intent is one in which you know the target of that intent; that is, you already know the fully qualified class name of that specific activity.
- An implicit intent is one in which you do not have the name of the target component, but have a general action to perform.
In this task you add a second activity to our app, with its own layout. You modify the AndroidManifest.xml file to define the main activity as the parent of the second activity. Then you modify the launchSecondActivity() method in MainActivity to include an intent that launches the second activity when you click the button.
2.1 Create the second Activity
- Click the app folder for your project and choose File > New > Activity > Empty Activity.
- Name the new
ActivitySecondActivity. The layout name is filled in asactivity_second. Do not check the Launcher Activity option. - Click Finish. Android Studio adds both a new
Activitylayout (activity_second.xml) and a new Java file (SecondActivity.java) to your project for the newActivity. It also updates theAndroidManifest.xmlfile to include the newActivity.
2.2 Modify the AndroidManifest.xml file
- Open manifests > AndroidManifest.xml.
- Find the
<activity>element that Android Studio created for the secondActivity. It should look like this:<activity android:name=".SecondActivity"></activity> - Replace the entire
<activity>element with the following:
The<activity android:name=".SecondActivity" android:label = "Second Activity" android:parentActivityName=".MainActivity"> <meta-data android:name="android.support.PARENT_ACTIVITY" android:value=".MainActivity" /> </activity>labelattribute adds the title of theActivityto the app bar.
With theparentActivityNameattribute, you indicate that the main activity is the parent of the second activity. This relationship is used for Up navigation in your app: the app bar for the second activity will have a left-facing arrow so the user can navigate "upward" to the main activity.
With the<meta-data>element, you provide additional arbitrary information about the activity in the form of key-value pairs. In this case the metadata attributes do the same thing as theandroid:parentActivityNameattribute—they define a relationship between two activities for upward navigation. These metadata attributes are required for older versions of Android, because theandroid:parentActivityNameattribute is only available for API levels 16 and higher. - Extract a string resource for "Second Activity" in the code above, and use
activity2_nameas the resource name.
2.3 Define the layout for the second Activity
- Open
activity_second.xmland click the Design tab if it is not already selected. - Drag a
TextViewfrom the Palette pane to the top left corner of the layout, and add constraints to the top and left sides of the layout. Set its attributes in the Attributes pane as follows:Attribute
Value
idtext_headerTop Margin
16Left margin
8layout-widthwrap_contentlayout_heightwrap_contenttextMessage ReceivedtextAppearanceAppCompat.MediumtextStyleB(bold)
The value of textAppearance is a special Android theme attribute that defines basic font styles. You learn more about themes in a later lesson.
The layout should now look like this: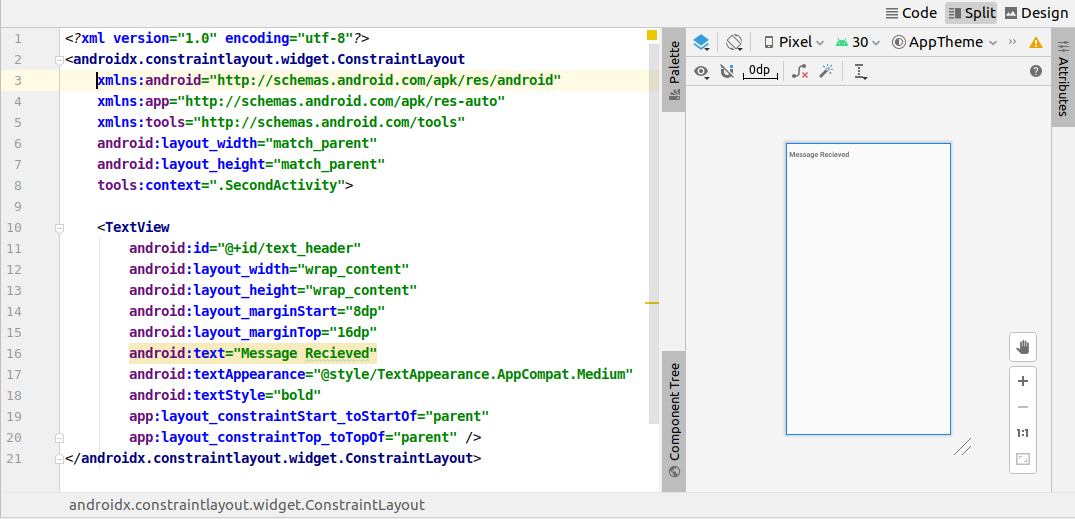
- Click the Code tab to edit the XML code, and extract the
"Message Received"string into a resource namedtext_header. - Add the
android:layout_marginLeft="8dp"attribute to theTextViewto complement thelayout_marginStartattribute for older versions of Android.
The XML code for the TextView should be as follows:
<TextView
	android:id="@+id/text_header"
	android:layout_width="wrap_content"
	android:layout_height="wrap_content"
	android:layout_marginStart="8dp"
	android:layout_marginTop="16dp"
	android:layout_marginLeft="8dp"
	android:text="@string/text_header"
	android:textAppearance="@style/TextAppearance.AppCompat.Medium"
	android:textStyle="bold"
	app:layout_constraintStart_toStartOf="parent"
	app:layout_constraintTop_toTopOf="parent" />
2.4 Add an Intent to the main Activity
In this task you add an explicit Intent to the main Activity. This Intent is used to activate the second Activity when the Send button is clicked.
- Open
MainActivity. - Create a new
Intentin thelaunchSecondActivity()method.
The Intent constructor takes two arguments for an explicitIntent: an application Context and the specific component that will receive thatIntent. Here you should usethisas theContext, andSecondActivity.classas the specific class:Intent intent = new Intent(this, SecondActivity.class); - Call the
startActivity()method with the newIntentas the argument.startActivity(intent); - Run the app.
When you click the Send button, MainActivity sends the Intent and the Android system launches SecondActivity, which appears on the screen. To return to MainActivity, click the Up button (the left arrow in the app bar) or the Back button at the bottom of the screen.
In the last task, you added an explicit intent to MainActivity that launched SecondActivity. You can also use an intent to send data from one activity to another while launching it.
Your intent object can pass data to the target activity in two ways: in the data field, or in the intent extras. The intent data is a URI indicating the specific data to be acted on. If the information you want to pass to an activity through an intent is not a URI, or you have more than one piece of information you want to send, you can put that additional information into the extras instead.
The intent extras are key/value pairs in a Bundle. A Bundle is a collection of data, stored as key/value pairs. To pass information from one activity to another, you put keys and values into the intent extra Bundle from the sending activity, and then get them back out again in the receiving activity.
In this task, you modify the explicit intent in MainActivity to include additional data (in this case, a user-entered string) in the intent extra Bundle. You then modify SecondActivity to get that data back out of the intent extra Bundle and display it on the screen.
3.1 Add an EditText to the MainActivity layout
- Open activity_main.xml.
- Drag a Plain Text (
EditText) element from the Palette pane to the bottom of the layout, and add constraints to the left side of the layout, the bottom of the layout, and the left side of the Send Button. Set its attributes in the Attributes pane as follows:Attribute
Value
ideditText_mainRight Margin
8Left margin
24Bottom margin
24layout-widthmatch_constraintlayout_heightwrap_contentinputTypetextLongMessagehintEnter Your Message Heretext(Delete any text in this field)
The layout in the Design view should look like this: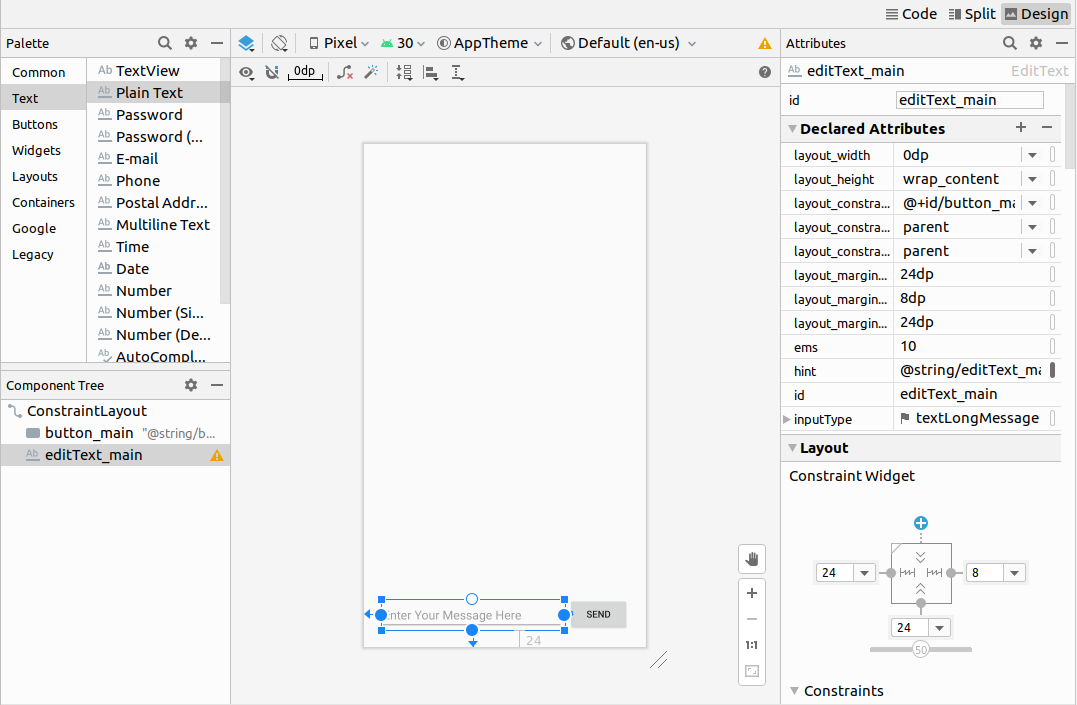
- Click the Code tab to edit the XML code, and extract the "Enter Your Message Here" string into a resource named
editText_main.
The XML code for the layout should look something like the following:<?xml version="1.0" encoding="utf-8"?> <androidx.constraintlayout.widget.ConstraintLayout xmlns:android="http://schemas.android.com/apk/res/android" xmlns:app="http://schemas.android.com/apk/res-auto" xmlns:tools="http://schemas.android.com/tools" android:layout_width="match_parent" android:layout_height="match_parent" tools:context=".MainActivity"> <Button android:id="@+id/button_main" android:layout_width="wrap_content" android:layout_height="wrap_content" android:layout_marginEnd="24dp" android:layout_marginBottom="24dp" android:onClick="launchSecondActivity" android:text="@string/button_send" app:layout_constraintBottom_toBottomOf="parent" app:layout_constraintEnd_toEndOf="parent" /> <EditText android:id="@+id/editText_main" android:layout_width="0dp" android:layout_height="wrap_content" android:layout_marginStart="24dp" android:layout_marginEnd="8dp" android:layout_marginBottom="24dp" android:ems="10" android:hint="@string/editText_main" android:inputType="textLongMessage" app:layout_constraintBottom_toBottomOf="parent" app:layout_constraintEnd_toStartOf="@+id/button_main" app:layout_constraintStart_toStartOf="parent" /> </androidx.constraintlayout.widget.ConstraintLayout>
3.2 Add a string to the Intent extras
The Intent extras are key/value pairs in a Bundle. A Bundle is a collection of data, stored as key/value pairs. To pass information from one Activity to another, you put keys and values into the Intent extra Bundle from the sending Activity, and then get them back out again in the receiving Activity.
- Open
MainActivity. - Add a
publicconstant at the top of the class to define the key for theIntentextra:public static final String EXTRA_MESSAGE = "com.example.android.twoactivities.extra.MESSAGE"; - Add a private variable at the top of the class to hold the EditText:
private EditText mMessageEditText; - In the
onCreate()method, usefindViewById()to get a reference to theEditTextand assign it to that private variable:mMessageEditText = findViewById(R.id.editText_main); - In the
launchSecondActivity()method, just under the newIntent, get the text from theEditTextas a string:String message = mMessageEditText.getText().toString(); - Add that string to the
Intentas an extra with theEXTRA_MESSAGEconstant as the key and the string as the value:
Theintent.putExtra(EXTRA_MESSAGE, message);onCreate()method inMainActivityshould now look like the following:
The@Override protected void onCreate(Bundle savedInstanceState) { super.onCreate(savedInstanceState); setContentView(R.layout.activity_main); mMessageEditText = findViewById(R.id.editText_main); }launchSecondActivity()method inMainActivityshould now look like the following:public void launchSecondActivity(View view) { Log.d(LOG_TAG, "Button clicked!"); Intent intent = new Intent(this, SecondActivity.class); String message = mMessageEditText.getText().toString(); intent.putExtra(EXTRA_MESSAGE, message); startActivity(intent); }
3.3 Add a TextView to SecondActivity for the message
- Open
activity_second.xml. - Drag another
TextViewto the layout underneathTextViewcalledtext_header, and add constraints to the left side of the layout and to the bottom oftext_header. - Set the new
TextViewattributes in the Attributes pane as follows:Attribute
Value
idtext_messageTop Margin
8Left margin
8layout-widthwrap_contentlayout_heightwrap_contenttext(Delete any text in this field)
textAppearanceAppCompat.Medium
The new layout looks the same as it did in the previous task, because the newTextViewdoes not (yet) contain any text, and thus does not appear on the screen.
The XML code for theactivity_second.xmllayout should look something like the following:<?xml version="1.0" encoding="utf-8"?> <androidx.constraintlayout.widget.ConstraintLayout xmlns:android="http://schemas.android.com/apk/res/android" xmlns:app="http://schemas.android.com/apk/res-auto" xmlns:tools="http://schemas.android.com/tools" android:layout_width="match_parent" android:layout_height="match_parent" tools:context=".SecondActivity"> <TextView android:id="@+id/text_header" android:layout_width="wrap_content" android:layout_height="wrap_content" android:layout_marginStart="8dp" android:layout_marginTop="16dp" android:layout_marginLeft="8dp" android:text="@string/text_header" android:textAppearance="@style/TextAppearance.AppCompat.Medium" android:textStyle="bold" app:layout_constraintStart_toStartOf="parent" app:layout_constraintTop_toTopOf="parent" /> <TextView android:id="@+id/text_message" android:layout_width="wrap_content" android:layout_height="wrap_content" android:layout_marginStart="8dp" android:layout_marginTop="8dp" android:textAppearance="@style/TextAppearance.AppCompat.Medium" app:layout_constraintStart_toStartOf="parent" app:layout_constraintTop_toBottomOf="@+id/text_header" /> </androidx.constraintlayout.widget.ConstraintLayout>
3.4 Modify SecondActivity to get the extras and display the message
- Open SecondActivity, you are going to add code to the
onCreate()method. - Get the
Intentthat activated thisActivity:Intent intent = getIntent(); - Get the string containing the message from the
Intentextras using theMainActivity.EXTRA_MESSAGEstatic variable as the key:String message = intent.getStringExtra(MainActivity.EXTRA_MESSAGE); - Use
findViewByID()to get a reference to theTextViewfor the message from the layout:TextView textView = findViewById(R.id.text_message); - Set the text of the
TextViewto the string from theIntentextra:
ThetextView.setText(message);onCreate()method ofSecondActivityshould look like this:@Override protected void onCreate(Bundle savedInstanceState) { super.onCreate(savedInstanceState); setContentView(R.layout.activity_second); Intent intent = getIntent(); String message = intent.getStringExtra(MainActivity.EXTRA_MESSAGE); TextView textView = findViewById(R.id.text_message); textView.setText(message); } - Run the app. When you type a message in
MainActivityand click Send,SecondActivitylaunches and displays the message.
Now that you have an app that launches a new activity and sends data to it, the final step is to return data from the second activity back to the main activity. You also use an intent and intent extras for this task.
4.1 Add an EditText and a Button to the SecondActivity layout
- Open
strings.xmland add string resources for theButtontext and the hint for theEditTextthat you will add toSecondActivity:<string name="button_second">Reply</string> <string name="editText_second">Enter Your Reply Here</string> - Open
activity_main.xmlandactivity_second.xmland select the Code view for each.
Copy XML theEditTextandButtonfrom theactivity_main.xmllayout file and Paste them into theactivity_second.xmllayout. - In
activity_second.xml, modify the attribute values for theButtonas follows:Old attribute value
New attribute value
android:id="@+id/button_main"android:id="@+id/button_second"android:onClick="launchSecondActivity"android:onClick="returnReply"android:text="@string/button_main"android:text="@string/button_second" - In
activity_second.xml, modify the attribute values for theEditTextas follows:Old attribute value
New attribute value
android:id="@+id/editText_main"android:id="@+id/editText_second"app:layout_constraintEnd_toStartOf=
"@+id/button"app:layout_constraintEnd_toStartOf=
"@+id/button_second"android:hint="@string/editText_main"android:hint="@string/editText_second" - In the XML layout editor, click on
returnReply, press Alt+Enter (Option+Return on a Mac), and select Create ‘returnReply(View)' in ‘SecondActivity'.
Android Studio generates a skeleton method for thereturnReply()handler. You implement this method in the next task.
The new layout for activity_second.xml looks like this:
The XML code for the activity_second.xml layout file is as follows:
<?xml version="1.0" encoding="utf-8"?>
<androidx.constraintlayout.widget.ConstraintLayout
	xmlns:android="http://schemas.android.com/apk/res/android"
	xmlns:app="http://schemas.android.com/apk/res-auto"
	xmlns:tools="http://schemas.android.com/tools"
	android:layout_width="match_parent"
	android:layout_height="match_parent"
	tools:context=".SecondActivity">

	<TextView
		android:id="@+id/text_header"
		android:layout_width="wrap_content"
		android:layout_height="wrap_content"
		android:layout_marginStart="8dp"
		android:layout_marginTop="16dp"
		android:layout_marginLeft="8dp"
		android:text="@string/text_header"
		android:textAppearance="@style/TextAppearance.AppCompat.Medium"
		android:textStyle="bold"
		app:layout_constraintStart_toStartOf="parent"
		app:layout_constraintTop_toTopOf="parent" />

	<TextView
		android:id="@+id/text_message"
		android:layout_width="wrap_content"
		android:layout_height="wrap_content"
		android:layout_marginStart="8dp"
		android:layout_marginTop="8dp"
		android:textAppearance="@style/TextAppearance.AppCompat.Medium"
		app:layout_constraintStart_toStartOf="parent"
		app:layout_constraintTop_toBottomOf="@+id/text_header" />

	<Button
		android:id="@+id/button_second"
		android:layout_width="wrap_content"
		android:layout_height="wrap_content"
		android:layout_marginEnd="24dp"
		android:layout_marginBottom="24dp"
		android:onClick="returnReply"
		android:text="@string/button_second"
		app:layout_constraintBottom_toBottomOf="parent"
		app:layout_constraintEnd_toEndOf="parent" />

	<EditText
		android:id="@+id/editText_second"
		android:layout_width="0dp"
		android:layout_height="wrap_content"
		android:layout_marginStart="24dp"
		android:layout_marginEnd="8dp"
		android:layout_marginBottom="24dp"
		android:ems="10"
		android:hint="@string/editText_second"
		android:inputType="textLongMessage"
		app:layout_constraintBottom_toBottomOf="parent"
		app:layout_constraintEnd_toStartOf="@+id/button_second"
		app:layout_constraintStart_toStartOf="parent" />

</androidx.constraintlayout.widget.ConstraintLayout>
4.2 Create a response Intent in the second Activity
The response data from the second Activity back to the main Activity is sent in an Intent extra. You construct this return Intent and put the data into it in much the same way you do for the sending Intent.
- Open
SecondActivity. - At the top of the class, add a
publicconstant to define the key for theIntentextra:public static final String EXTRA_REPLY = "com.example.android.twoactivities.extra.REPLY"; - Add a
privatevariable at the top of the class to hold theEditText.private EditText mReply; - In the
onCreate()method, before theIntentcode, usefindViewByID()to get a reference to theEditTextand assign it to thatprivatevariable:mReply = findViewById(R.id.editText_second); - In the
returnReply()method, get the text of theEditTextas a string:String reply = mReply.getText().toString(); - In the
returnReply()method, create a new intent for the response - don't reuse theIntentobject that you received from the original request.Intent replyIntent = new Intent(); - Add the reply string from the
EditTextto the new intent as anIntentextra. Because extras are key/value pairs, here the key isEXTRA_REPLY, and the value is the reply:replyIntent.putExtra(EXTRA_REPLY, reply); - Set the result to
RESULT_OKto indicate that the response was successful. TheActivityclass defines the result codes, includingRESULT_OKandRESULT_CANCELLED.setResult(RESULT_OK,replyIntent); - Call
finish()to close theActivityand return toMainActivity.finish();
The code for SecondActivity should now be as follows:
package uk.aston.twoactivities;
import androidx.appcompat.app.AppCompatActivity;
import android.content.Intent;
import android.os.Bundle;
import android.view.View;
import android.widget.EditText;
import android.widget.TextView;
public class SecondActivity extends AppCompatActivity {
public static final String EXTRA_REPLY =
                 "com.example.android.twoactivities.extra.REPLY";
private EditText mReply;
@Override
protected void onCreate(Bundle savedInstanceState) {
super.onCreate(savedInstanceState);
setContentView(R.layout.activity_second);
Intent intent = getIntent();
String message = intent.getStringExtra(MainActivity.EXTRA_MESSAGE);
TextView textView = findViewById(R.id.text_message);
textView.setText(message);
mReply = findViewById(R.id.editText_second);
}
public void returnReply(View view) {
String reply = mReply.getText().toString();
Intent replyIntent = new Intent();
replyIntent.putExtra(EXTRA_REPLY, reply);
setResult(RESULT_OK,replyIntent);
finish();
}
}
Add TextView elements to display the reply
MainActivity needs a way to display the reply that SecondActivity sends. In this task you add TextView elements to the activity_main.xml layout to display the reply in MainActivity.
To make this task easier, you copy the TextView elements you used in SecondActivity.
- Open strings.xml and add a string resource for the reply header:
<string name="text_header_reply">Reply Received</string> - Open activity_main.xml and activity_second.xml and select the Code view for each.
- Copy the two
TextViewelements from theactivity_second.xmllayout file and paste them into theactivity_main.xmllayout above theButton. - In
activity_main.xml, modify the attribute values for the firstTextViewas follows:Old attribute value
New attribute value
android:id="@+id/text_header"android:id="@+id/text_header_reply"android:text="@string/text_header"android:text="@string/text_header_reply" - In
activity_main.xml, modify the attribute values for the secondTextViewa follows:Old attribute value
New attribute value
android:id="@+id/text_message"android:id="@+id/text_message_reply"app:layout_constraintTop_toBottomOf=
"@+id/text_header"app:layout_constraintTop_toBottomOf=
"@+id/text_header_reply" - Add the
android:visibilityattribute to eachTextViewto make them initially invisible. Having them visible on the screen, but without any content, can be confusing to the user.
You will make theseandroid:visibility="invisible"TextViewelements visible after the response data is passed back from the secondActivity.
Theactivity_main.xmllayout in the Design view looks the same as it did in the previous task - although you have added two newTextViewelements to the layout. Because you set these elements to invisible, they do not appear on the Design screen.
The following is the XML code for the activity_main.xml file:<?xml version="1.0" encoding="utf-8"?> <androidx.constraintlayout.widget.ConstraintLayout xmlns:android="http://schemas.android.com/apk/res/android" xmlns:app="http://schemas.android.com/apk/res-auto" xmlns:tools="http://schemas.android.com/tools" android:layout_width="match_parent" android:layout_height="match_parent" tools:context=".MainActivity"> <TextView android:id="@+id/text_header_reply" android:layout_width="wrap_content" android:layout_height="wrap_content" android:layout_marginStart="8dp" android:layout_marginLeft="8dp" android:layout_marginTop="16dp" android:text="@string/text_header_reply" android:textAppearance="@style/TextAppearance.AppCompat.Medium" android:textStyle="bold" android:visibility="invisible" app:layout_constraintStart_toStartOf="parent" app:layout_constraintTop_toTopOf="parent" /> <TextView android:id="@+id/text_message_reply" android:layout_width="wrap_content" android:layout_height="wrap_content" android:layout_marginStart="8dp" android:layout_marginTop="8dp" android:textAppearance="@style/TextAppearance.AppCompat.Medium" android:visibility="invisible" app:layout_constraintStart_toStartOf="parent" app:layout_constraintTop_toBottomOf="@+id/text_header_reply" /> <Button android:id="@+id/button_main" android:layout_width="wrap_content" android:layout_height="wrap_content" android:layout_marginEnd="24dp" android:layout_marginBottom="24dp" android:onClick="launchSecondActivity" android:text="@string/button_send" app:layout_constraintBottom_toBottomOf="parent" app:layout_constraintEnd_toEndOf="parent" /> <EditText android:id="@+id/editText_main" android:layout_width="0dp" android:layout_height="wrap_content" android:layout_marginStart="24dp" android:layout_marginEnd="8dp" android:layout_marginBottom="24dp" android:ems="10" android:hint="@string/editText_main" android:inputType="textLongMessage" app:layout_constraintBottom_toBottomOf="parent" app:layout_constraintEnd_toStartOf="@+id/button_main" app:layout_constraintStart_toStartOf="parent" /> </androidx.constraintlayout.widget.ConstraintLayout>
4.4 Get the reply from the Intent extra and display it
When you use an explicit Intent to start another Activity, you may not expect to get any data back - you're just activating that Activity. In that case, you use startActivity() to start the new Activity, as you did earlier in this practical. Now you want to get data back from the activated Activity, so you need to start it with startActivityForResult() instead.
In this task you modify the MainActivity to start SecondActivity expecting a result, and then extract that return data from the Intent, and display that returned data in the TextView elements you created in the last task.
- Open
MainActivity. - Add a public constant at the top of the class to define the key for a particular type of response you're interested in:
public static final int TEXT_REQUEST = 1; - Add two
privatevariables to hold the reply header and replyTextViewelements:private TextView mReplyHeadTextView; private TextView mReplyTextView; - In the
onCreate()method, usefindViewByID()to get references from the layout to the reply header and replyTextViewelements. Assign those view instances to theprivatevariables:
The full onCreate() method should now look like this:mReplyHeadTextView = findViewById(R.id.text_header_reply); mReplyTextView = findViewById(R.id.text_message_reply);@Override protected void onCreate(Bundle savedInstanceState) { super.onCreate(savedInstanceState); setContentView(R.layout.activity_main); mMessageEditText = findViewById(R.id.editText_main); mReplyHeadTextView = findViewById(R.id.text_header_reply); mReplyTextView = findViewById(R.id.text_message_reply); } - In the
launchSecondActivity()method, change the call tostartActivity()to bestartActivityForResult(), and include theTEXT_REQUESTkey as an argument:startActivityForResult(intent, TEXT_REQUEST); - Override the
onActivityResult()callback method with this signature:
The three arguments to@Override public void onActivityResult(int requestCode, int resultCode, Intent data) { }onActivityResult()contain all the information you need to handle the return data: therequestCodeyou set when you launched theActivitywithstartActivityForResult(), theresultCodeset in the launchedActivity(usually one ofRESULT_OKorRESULT_CANCELED), and theIntentdata that contains the data returned from the launchActivity. - Inside
onActivityResult(), callsuper.onActivityResult()(the editor should prompt you to do this anyway and you can click on the red lightbulb and select Add super call):super.onActivityResult(requestCode, resultCode, data); - Add code to test for
TEXT_REQUESTto make sure you process the rightIntentresult, in case there are several. Also test forRESULT_OK, to make sure that the request was successful:
Theif (requestCode == TEXT_REQUEST) { if (resultCode == RESULT_OK) { } }Activityclass defines the result codes. The code can beRESULT_OK(the request was successful),RESULT_CANCELED(the user cancelled the operation), orRESULT_FIRST_USER(for defining your own result codes). - Inside the inner
ifblock, get theIntentextra from the responseIntent(data). Here the key for the extra is theEXTRA_REPLYconstant fromSecondActivity:String reply = data.getStringExtra(SecondActivity.EXTRA_REPLY); - Set the visibility of the reply header to true:
mReplyHeadTextView.setVisibility(View.VISIBLE); - Set the reply
TextViewtext to the reply, and set its visibility to true:mReplyTextView.setText(reply); mReplyTextView.setVisibility(View.VISIBLE); - Optionally, you can add a line to clear the original message text from the EditText:
The fullmMessageEditText.setText("");onActivityResult()method should now look like this:@Override public void onActivityResult(int requestCode, int resultCode, Intent data) { super.onActivityResult(requestCode, resultCode, data); if (requestCode == TEXT_REQUEST) { if (resultCode == RESULT_OK) { String reply = data.getStringExtra(SecondActivity.EXTRA_REPLY); mReplyHeadTextView.setVisibility(View.VISIBLE); mReplyTextView.setText(reply); mReplyTextView.setVisibility(View.VISIBLE); mMessageEditText.setText(""); } } } - Run the app.
Now, when you send a message to the secondActivityand get a reply, the mainActivityupdates to display the reply.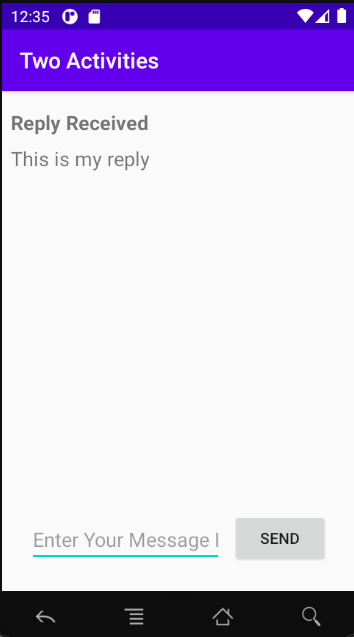
An Android Studio project containing the solution code can be found on Blackboard.
Challenge: Create an app with three Button elements labeled Text One, Text Two, and Text Three. When any of these Button elements are clicked, launch a second Activity. That second Activity should contain a ScrollView that displays one of three text passages (you can include your choice of passages). Use an Intent to launch the second Activity with extras to indicate which of the three passages to display.
Overview:
- An
Activityis an app component that provides a single screen focused on a single user task. - Each
Activityhas its own user interface layout file. - You can assign your
Activityimplementations a parent/child relationship to enable Up navigation within your app. - A
Viewcan be made visible or invisible with theandroid:visibilityattribute.
To implement an Activity:
- Choose File > New > Activity to start from a template and do the following steps automatically.
- If not starting from a template, create an
ActivityJava class, implement a basic UI for theActivityin an associated XML layout file, and declare the newActivityinAndroidManifest.xml.
Intent:
- An
Intentlets you request an action from another component in your app, for example, to start oneActivityfrom another. AnIntentcan be explicit or implicit. - With an explicit
Intentyou indicate the specific target component to receive the data. - With an implicit
Intentyou specify the functionality you want but not the target component. - An
Intentcan include data on which to perform an action (as a URI) or additional information as Intent extras. Intentextras are key/value pairs in aBundlethat are sent along with theIntent.
The related concept documentation is in 2.1: Activities and intents.
Android Studio documentation:
Android developer documentation: