This practical codelab is part of Unit 1: Getting started for CS3040/DC3040. You will get the most value out of this course if you work through the codelabs in sequence:
What you should already know
- The basic workflow of Android Studio.
- How to create an app in Android Studio using the Empty Activity template.
- How to use the Layout Editor in Android Studio.
What you'll learn
- Where to find Android developer information and resources.
- How to add a launcher icon to an app.
- How to look for help when you're developing Android apps.
What you'll do
- Explore some of the many resources available to Android developers of all levels.
- Add a launcher icon for an app.
In this codelab, you change the launcher icon for the HelloToast app that you created in a previous codelab. You replace the default icon with an image asset that's available within Android Studio.
Each app you create with Android Studio starts with a default launcher icon that represents the app. Launcher icons are sometimes called app icons or product icons.
If you publish an app on Google Play, the app's launcher icon appears in the app's listing and search results in the Google Play store.
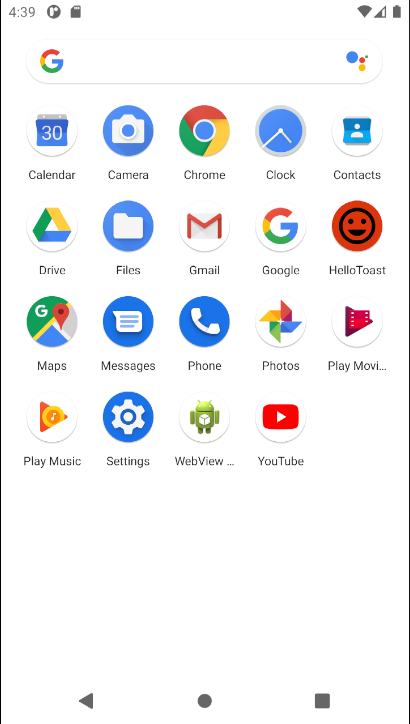
After an app is installed on an Android-powered device, the app's launcher icon appears on the device's home screen and elsewhere on the device. For example, launcher icons appear in the device's Search Apps window, as shown in the screenshot below. The HelloToast icon shown below is the default launcher icon used for all app projects that you create in Android Studio.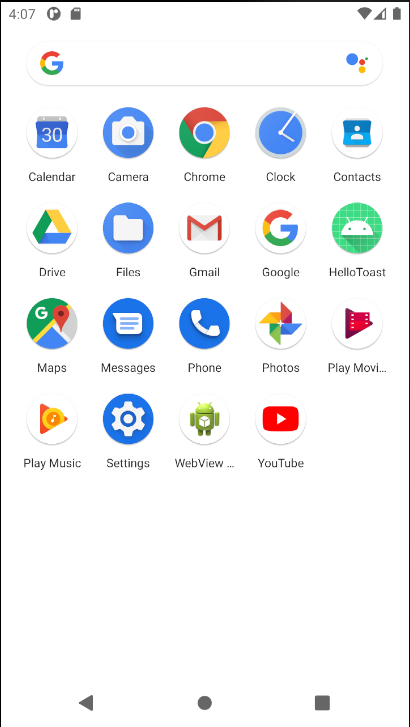
Going through the process of changing the launcher icon introduces you to Android Studio's image asset features. In this task, you also learn more about finding help within Android documentation.
1.1 Explore the official Android documentation
Explore a few of the most useful Android documentation sites and become familiar with what's available:
- Go to developer.android.com. This official Android developer documentation is kept current by Google.
- Go to developer.android.com/design/. This site offers guidelines for designing the look and functionality of high-quality Android apps.
- Go to material.io, which is a site about Material Design. Material Design is a conceptual design philosophy that outlines how all apps, not just Android apps, should look and function on mobile devices. Navigate the links to learn more about Material Design. For example, to learn about the use of color, click the Design tab, then select Color.
- Go to developer.android.com/docs/ to find API information, reference documentation, tutorials, tool guides, and code samples.
- Go to developer.android.com/distribute/ to find information about publishing an app on Google Play. Google Play is Google's digital distribution system for apps developed with the Android SDK. Use the Google Play Console to grow your user base and start earning money.
1.2 Add an image asset for the launcher icon
In this step, you add a clip-art image as the launcher icon for the HelloToast app.
- Open the HelloToast app project from the previous codelab on using the layout editor, or create a new app project.
- In the Project > Android pane, right-click (or Control-click) the res folder. Select New > Image Asset. The Configure Image Asset dialog appears.

- In the Icon Type field, select Launcher Icons (Adaptive & Legacy) if it's not already selected.
- Click the Foreground Layer tab. For the Asset Type, select Clip Art, shown as 1 in the screenshot below.
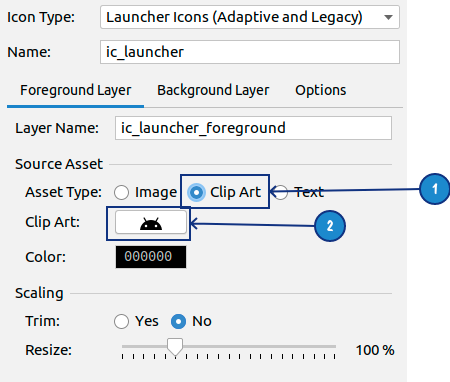
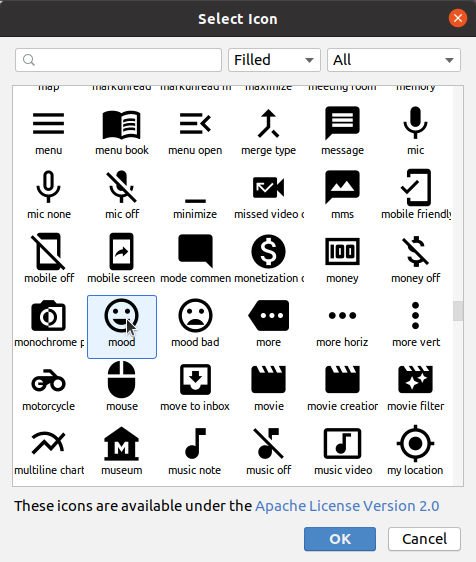
- Click the robot icon in the Clip Art field, shown as 2 in the screenshot above. The Select Icon dialog appears, showing the Material Design icon set.
- Browse the Select Icon dialog, or search for an icon by name. Select an icon, such as the mood icon to suggest a good mood. Click OK.
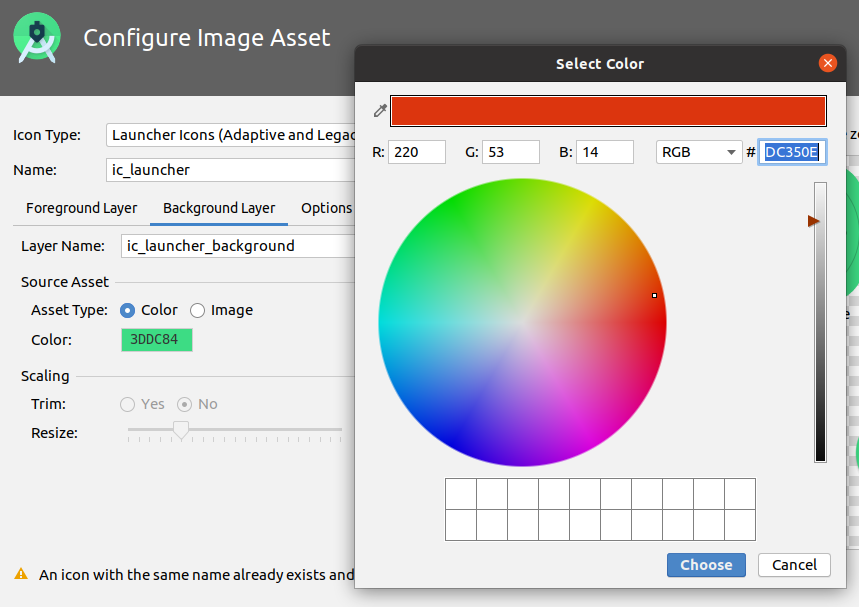
- In the Configure Image Asset dialog, click the Background Layer tab. For the Asset Type, select Color. Click the color chip and select a color to use as the background layer for the icon as shown in the image below:
- Click the Options tab and review the default settings. Confirm that you want to generate legacy, round, and Google Play Store icons as shown below. Click Next and then click Finish.

- Run the app on an AVD emulator or Android-powered device.
Android Studio automatically adds the launcher images to the mipmap directories for the different screen densities. The app now uses the new icon as its launch icon.
Android Studio provides templates for common and recommended app and activity designs. Using built-in templates saves time, and helps you follow design best practices.
Each template incorporates a skeleton activity and user interface. You've already used the Empty Activity template. The Basic Activity template has more features and incorporates recommended app features, such as the options menu that appears in the app bar on Android-powered devices.
2.1 Explore the Basic Activity architecture
The Basic Activity template is a versatile template that Android Studio provides to help you jump-start your app development.
- In Android Studio, create a project that uses the Basic Activity template. Select Java as the language.
- Build and run the app.
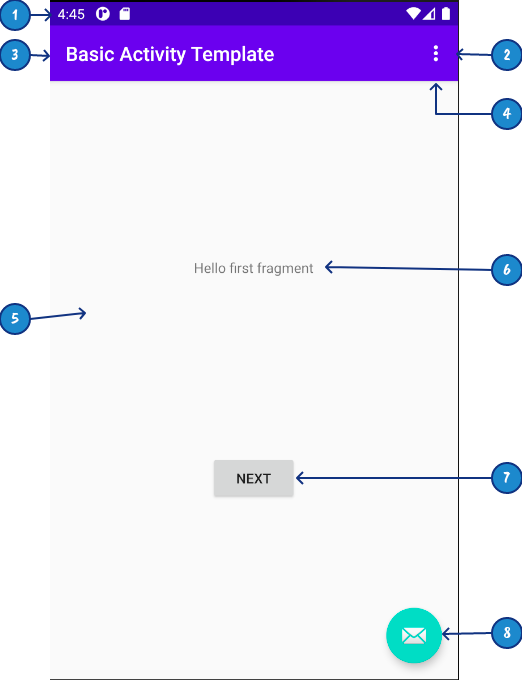
- Identify the labeled parts in the figure and table below. Find their equivalents on your device or emulator screen. Inspect the corresponding Java code and XML files described in the table.
Being familiar with the Java source code and XML files will help you extend and customize this template for your own needs.
Architecture of the Basic Activity template
# | UI Description | Code reference |
1 | Status bar, which the Android system provides and controls. | Not visible in the template code, but you can access the status-bar from your activity. For example, you can add code in |
2 | The app bar, also called the action bar, provides visual structure, standardized visual elements, and navigation. | In |
3 | The app name is initially derived from your package name, but you can change it to anything you want. | In |
4 | The options-menu overflow button holds menu items for the activity. The overflow button also holds global menu options such as Search and Settings for the app. Your app menu items go into this menu. | In |
5 | The CoordinatorLayout | In |
6 | The template uses a TextView to display "Hello World". You can replace this | The "Hello World" text view is in the |
7 | Button linked to Fragment Navigation | The basic activity template includes an sample implementation of Android Navigation. In older versions of Android Studio the Basic Activity template contained only one screen and its layout was defined in |
8 | Floating action button (FAB) | In |
2.2 Customizing the app that the template produces
Change the appearance of the app produced by the Basic Activity template. For example, you can change the color of the app bar to match the status bar. (On some devices, the status bar is a darker shade of the same primary color that the app bar uses.) You may also want to remove the floating action button (FAB) if you aren't going to use it.
- Change the name of the app that the app bar displays. To do this, change the
app_namestring resource in thestrings.xmlfile to the following:<string name="app_name">My Basic Template Application</string> - Change the color of the app bar (
Toolbar) inactivity_main.xmlby changing the value of theandroid:backgroundattribute to"?attr/colorPrimaryDark". This value sets the app bar color to a darker primary color that matches the status bar:android:background="?attr/colorPrimaryDark" - To remove the FAB, start by removing the stub code in
onCreate()that sets anonClick()listener for the button. OpenMainActivity.javaand remove the following block of code:FloatingActionButton fab = findViewById(R.id.fab); fab.setOnClickListener(new View.OnClickListener() { @Override public void onClick(View view) { Snackbar.make(view, "Replace with your own action", Snackbar.LENGTH_LONG) .setAction("Action", null).show(); } }); - To remove the FAB from the layout, remove the following block of XML code from
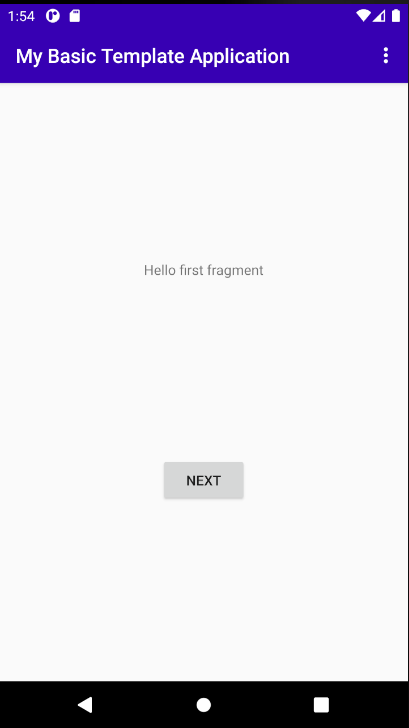
activity_main.xml:<android.support.design.widget.FloatingActionButton android:id="@+id/fab" android:layout_width="wrap_content" android:layout_height="wrap_content" android:layout_gravity="bottom|end" android:layout_margin="@dimen/fab_margin" app:srcCompat="@android:drawable/ic_dialog_email" /> - Run the app. The FAB no longer appears, the name has changed, and the app bar background color is darker and matches the color of the status bar.
Android Navigation
As mentioned above, res/layout/content_main.xml contains only a navigation fragment. This fragment works with the Navigation Graph which you will find in /res/navigation/nav_graph.xml.
- Double click
/res/navigation/nav_graph.xmlto open the navigation graph and click the Design tab. You should see the following layout: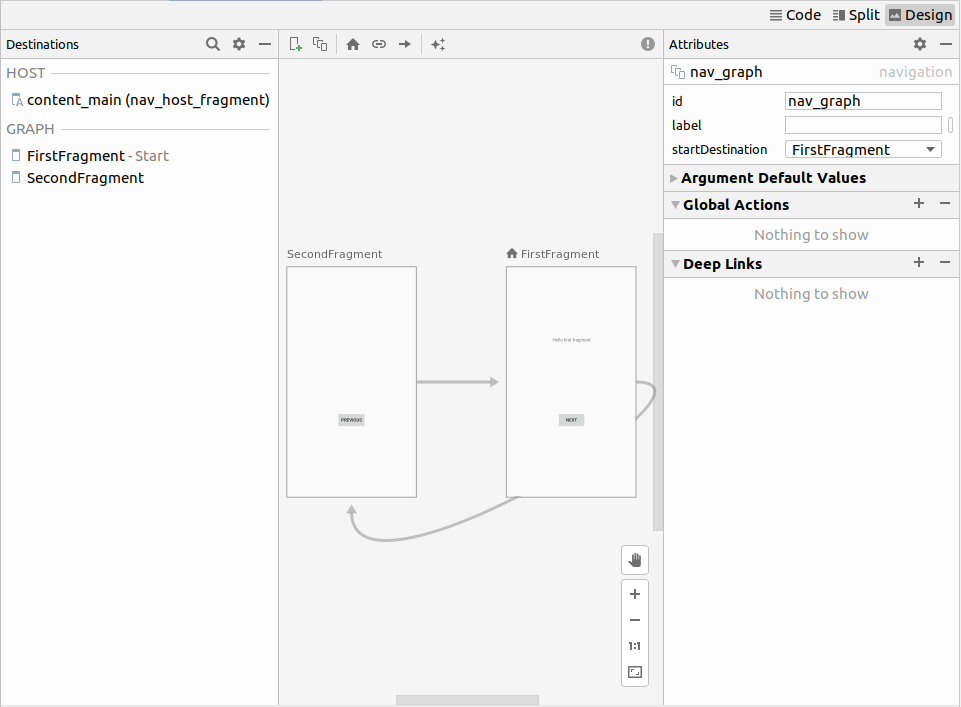
- Click to select FirstFragment, either by clicking on the fragment layout in the graph or by clicking on
FirstFragment - Startin the list of fragments in the left hand pane.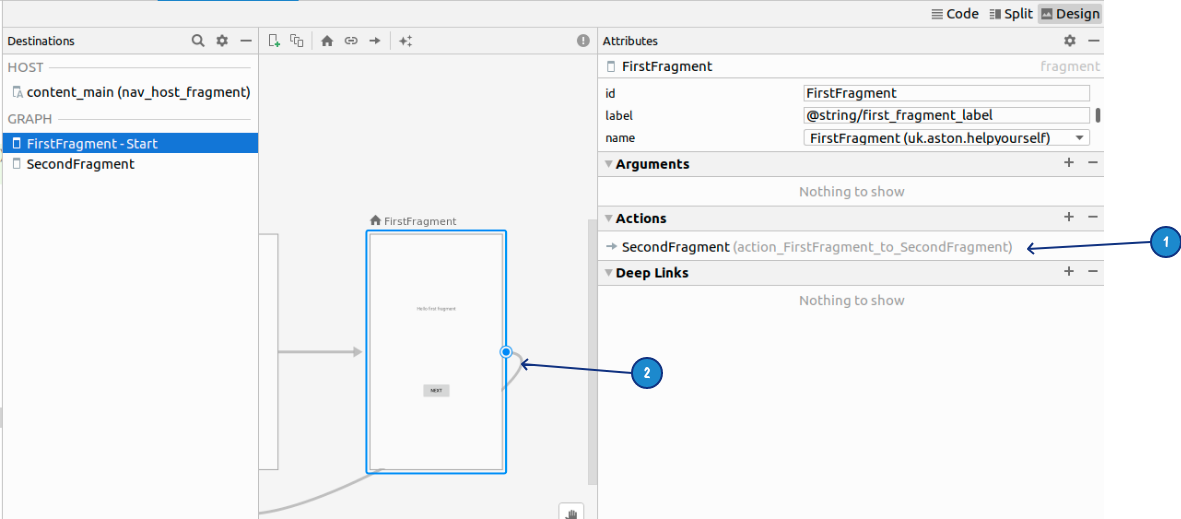
The display now shows the details of the navigation action associated withFirstFragment.- The action itself is defined to link to
SecondFragment. That means thatSecondFragmentwill replaceFirstFragmentin the layout ofMainActivity. The action has the IDaction_FirstFragment_to_SecondFragment. - The same action is shown in the graph by the highlighted link.
The interface allows you to add newFragmentdestinations and to add navigation actions between the fragments in the graph. - The action itself is defined to link to
- Open the file FirstFragment.java and look for the following block of code:
This block of code adds anview.findViewById(R.id.button_first).setOnClickListener(new View.OnClickListener() { @Override public void onClick(View view) { NavHostFragment.findNavController(FirstFragment.this) .navigate(R.id.action_FirstFragment_to_SecondFragment); } });onClick()method tobutton_firstin the layout ofFirstFragment. It uses the NavController to navigate using the ID of the defined action. - Open nav_graph.xml again and click on
SecondFragmentand look at its action. The action has the IDaction_SecondFragment_to_FirstFragment - Open SecondFragment.java and look for this block of code that implements the navigation agtion back to the first fragment.
view.findViewById(R.id.button_second).setOnClickListener(new View.OnClickListener() { @Override public void onClick(View view) { NavHostFragment.findNavController(SecondFragment.this) .navigate(R.id.action_SecondFragment_to_FirstFragment); } }); - Run the app and click the buttons to navigate between the two fragments.
2.3 Explore how to add activities and fragments using templates
For the codelabs in this course so far, you've used the Empty Activity and Basic Activity templates to start new projects. (You learn more about the Activity and Fragment classes in other lessons.) You can also use activity and fragment templates when creating activities after your project has been created.
- Create an app project or choose an existing project.
- In the Project > Android pane, right-click the java folder.
- Select New > Fragment > Gallery to see the list of fragment templates or select New > Activity > Gallery to see the list of activity templates.
- Add a Fragment to the app by selecting one of the Fragment templates. For example, select Settings Fragment to add a fragment to allow the user to customise their settings.
- We will now add your new fragment into the navigation graph, open res > navigation > nav_graph.xml and click on the new destination icon
 , select the new fragment from the list displayed and the new fragment appears on the graph.
 - To link this into the navigation, you need a way to navigate from an existing fragment to your new fragment. We will add a button to FirstFragment that will open the new settings fragment. Open res > layout > fragment-first.xml and add a new button, the code below will constrain the button to be below the text field and above the existing button:
<Button android:id="@+id/button_settings" android:layout_width="wrap_content" android:layout_height="wrap_content" android:text="Settings" app:layout_constraintBottom_toTopOf="@+id/button_first" app:layout_constraintEnd_toEndOf="parent" app:layout_constraintStart_toStartOf="parent" app:layout_constraintTop_toBottomOf="@+id/textview_first" /> - In
nav_graph.xml, click on FirstFragment and drag a new navigation action to settingsFragment. Your FirstFragment should now have a second action in its list of actions. The action ID highlighted in the image below isaction_FirstFragment_to_settingsFragment2(make a note of this ID you will need it in the next step):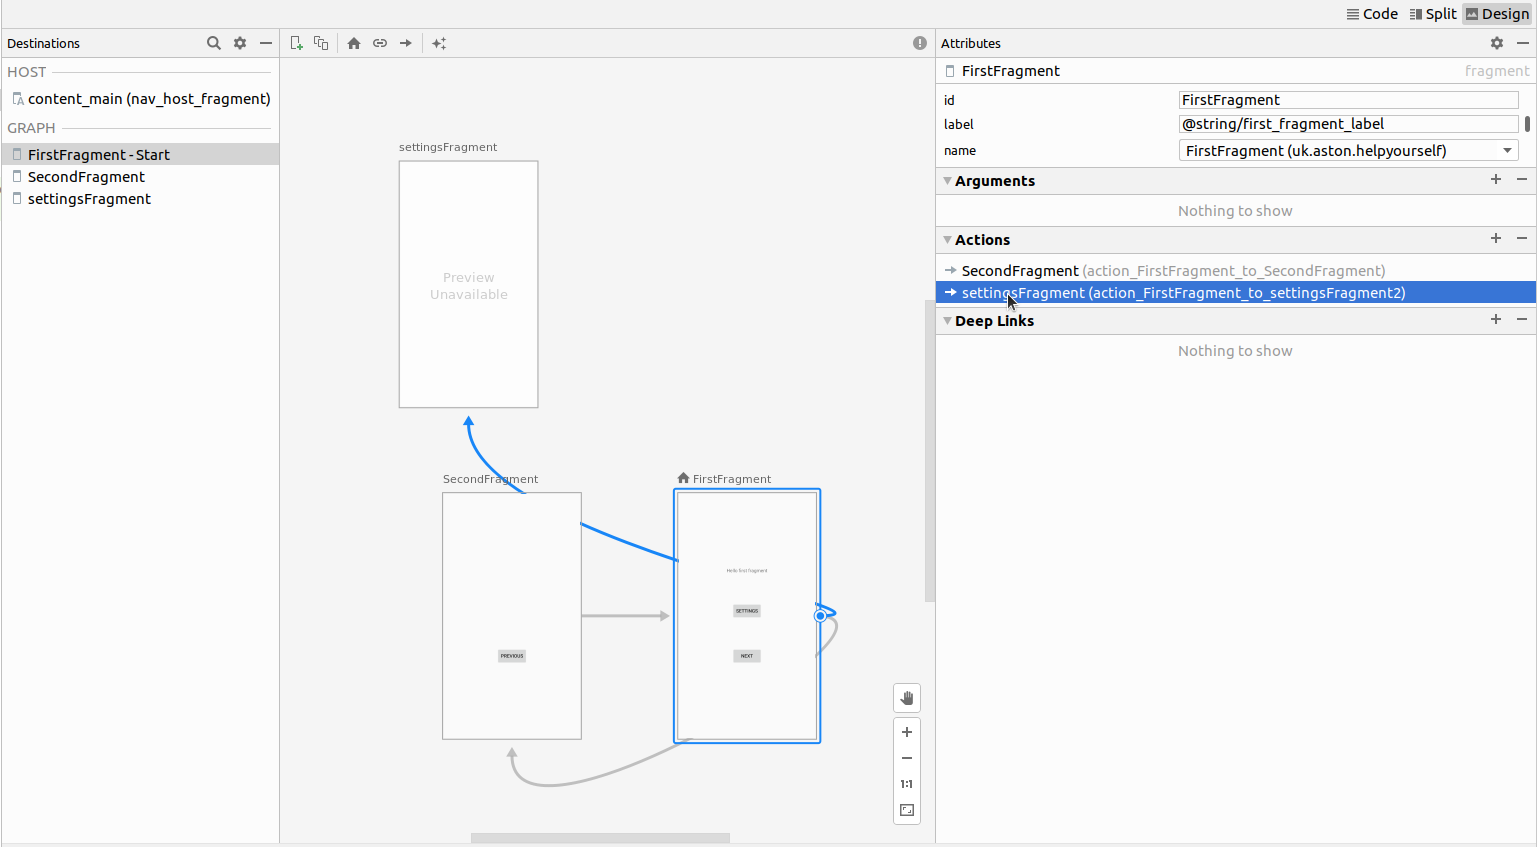
- Open SettingsFragment.java and locate the code in the
onViewCreatedmethod that navigates from the existingbutton_firsttoSecondFragmentand add the following code to make your new button_settings initiate a navigation to the settings fragment:view.findViewById(R.id.button_settings).setOnClickListener(new View.OnClickListener() { @Override public void onClick(View view) { NavHostFragment.findNavController(FirstFragment.this) .navigate(R.id.action_FirstFragment_to_settingsFragment2); } }); - Run your app and verify that clicking the Settings button takes you to the new settings fragment. Clicking the back button should take you back to the FirstFragment.
The Google Samples repositories on GitHub provide Android code samples that you can study, copy, and incorporate into your projects.
3.1 Android code samples
You can explore code samples directly from within Android Studio.
- In Android Studio, choose File > New > Import Sample.
- Browse the samples.
- Choose a sample and click Next.
- Accept the defaults and click Finish.
3.2 Use the Android Developer Resources
The Android Developer Documentation contains a lot of resources to help Android Developers. This includes, sample code, the API reference, the Design Guidelines, Codelab tutorials (which these codelabs are based on) and training courses. Using other resources can be problematic and you need to check what version of Android the resource is addressing to know whether or not it will work for you.
- The sample code in Java contains 120 example projects you can use.
- The Android API Reference contains the full documentation for classes and libraries that you will use. This is the definitive guide and you should always refer to it.
- The Design Guidelines are one set of guidelines that you can follow in designing your apps, but you do not have to follow these guidelines.
- The Codelabs and training courses provide a means of working through and learning individual topics.
Be aware that no all resources and tutorials on Android development are kept up to date and you might find that what you see in Android Studio doesn't always tally with what you find in online tutorials.
*The Android Developer YouTube channel is a great source of tutorials and tips.
- The Android team posts news and tips in the official Android blog.
- Stack Overflow is a community of programmers helping each other. If you run into a problem, chances are high that someone has already posted an answer. Try posting a question such as "How do I set up and use ADB over WiFi?" or "What are the most common memory leaks in Android development?"
- And last but not least, type your questions into Google search, and the Google search engine will collect relevant results from all of these resources. For example, "What is the most popular Android OS version in India?"
4.1 Search on Stack Overflow using tags
Go to Stack Overflow and type[android]in the search box. The[]brackets indicate that you want to search for posts that have been tagged as being about Android.
You can combine tags and search terms to make your search more specific. Try these searches:
[android]and[layout][android] "hello world"
To learn more about the many ways in which you can search on Stack Overflow, see the Stack Overflow help center.
- Official Android Developer Documentation: developer.android.com
- Material Design is a conceptual design philosophy that outlines how apps should look and work on mobile devices.
- The Google Play store is Google's digital distribution system for apps developed with the Android SDK.
- Android Studio provides templates for common and recommended app and activity designs. These templates offer working code for common use cases.
- When you create a project, you can choose a template for your first activity.
- While you are further developing your app, activities and other app components can be created from built-in templates.
- Android Studio contains many code samples that you can study, copy, and incorporate with your projects.
The related concept documentation is in 1.4: Resources to help you learn.
Android Studio documentation:
Android developer documentation:
- Android developer site
- Google Developers Training
- Layouts
- App resources overview
- Layouts
- Menus
- TextView
- String resources
- App Manifest
Code samples:
Videos:
Other: