This practical codelab is part of Unit 1: Get started in CS3040/DC3040. You will get the most value out of this course if you work through the codelabs in sequence:
- These codelabs are an updated version of Codelabs for Android Developer Fundamentals (V2).
- For details about the course, including links to all the concept chapters, apps, and slides, see Android Developer Fundamentals (Version 2).
Introduction
The TextView class is a subclass of the View class that displays text on the screen. You can control how the text appears with TextView attributes in the XML layout file. This practical shows how to work with multiple TextView elements, including one in which the user can scroll its contents vertically.
If you have more information than fits on the device's display, you can create a scrolling view so that the user can scroll vertically by swiping up or down, or horizontally by swiping right or left.
You would typically use a scrolling view for news stories, articles, or any lengthy text that doesn't completely fit on the display. You can also use a scrolling view to enable users to enter multiple lines of text, or to combine UI elements (such as a text field and a button) within a scrolling view.
The ScrollView class provides the layout for the scrolling view. ScrollView is a subclass of FrameLayout. Place only one view as a child within it - a child view contains the entire contents to scroll. This child view may itself be a ViewGroup (such as LinearLayout) containing UI elements.
Complex layouts may suffer performance issues with child views such as images. A good choice for a View within a ScrollView is a LinearLayout that is arranged in a vertical orientation, presenting items that the user can scroll through (such as TextView elements).
With a ScrollView, all of the UI elements are in memory and in the view hierarchy even if they aren't displayed on screen. This makes ScrollView ideal for scrolling pages of free-form text smoothly, because the text is already in memory. However, ScrollView can use up a lot of memory, which can affect the performance of the rest of your app. To display long lists of items that users can add to, delete from, or edit, consider using a RecyclerView, which is described in a separate lesson.
What you should already know
You should be able to:
- Create a Hello World app with Android Studio.
- Run an app on an emulator or a device.
- Implement a
TextViewin a layout for an app. - Create and use string resources.
What you'll learn
- How to use XML code to add multiple
TextViewelements. - How to use XML code to define a scrolling
View. - How to display free-form text with some HTML formatting tags.
- How to style the
TextViewbackground color and text color. - How to include a web link in the text.
What you'll do
- Create the ScrollingText app.
- Change the
ConstraintLayoutfromViewGrouptoRelativeLayout. - Add two
TextViewelements for the article heading and subheading. - Use
TextAppearancestyles and colors for the article heading and subheading. - Use HTML tags in the text string to control formatting.
- Use the
lineSpacingExtraattribute to add line spacing for readability. - Add a
ScrollViewto the layout to enable scrolling aTextViewelement. - Add the
autoLinkattribute to enable URLs in the text to be active and clickable.
The Scrolling Text app demonstrates the ScrollView UI component. ScrollView is a ViewGroup that in this example contains a TextView. It shows a lengthy page of text—in this case, a music album review—that the user can scroll vertically to read by swiping up and down. A scroll bar appears in the right margin. The app shows how you can use text formatted with minimal HTML tags for setting text to bold or italic, and with new-line characters to separate paragraphs. You can also include active web links in the text.

In the above figure, the following appear:
- An active web link embedded in free-form text
- The scroll bar that appears when scrolling the text
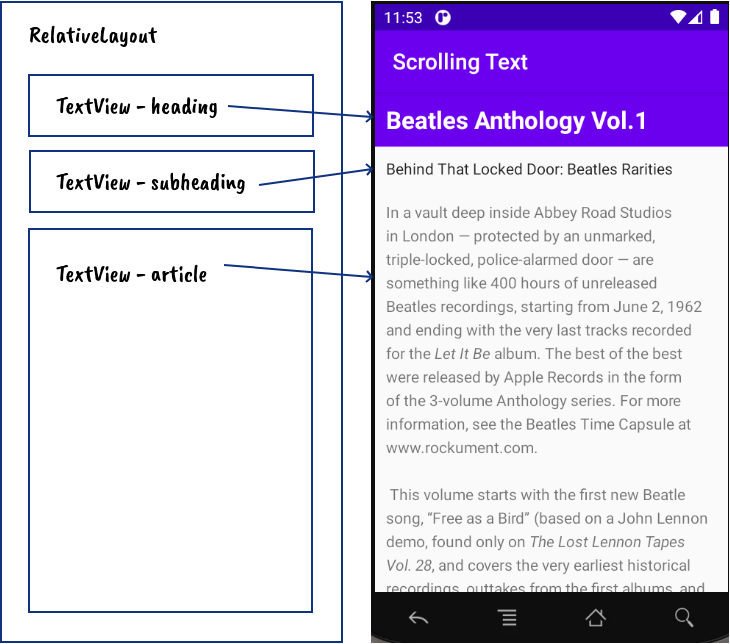
In this practical, you will create an Android project for the ScrollingText app, add TextView elements to the layout for an article title and subtitle, and change the existing "Hello World" TextView element to show a lengthy article. The figure below is a diagram of the layout.
You will make all these changes in the XML code and in the strings.xml file. You will edit the XML code for the layout in the Code pane, which you show by clicking the Code tab, rather than clicking the Design tab for the Design pane. Some changes to UI elements and attributes are easier to make directly in the Code pane using XML source code.
1.1 Create the project and TextView elements
In this task you will create the project and the TextView elements, and use TextView attributes for styling the text and background.
Tip: To learn more about these attributes, see the TextView reference.
- In Android Studio create a new project with the following parameters:
Attribute
Value
Template
Empty Activity
Application Name
Scrolling Text
Package name
uk.aston.scrollingtextSave location
appropriate folder on your computer
Language
Java
Minimum SDK
API 18: Android 4.3 (Jelly Bean)
Use legacy android.support libraries
Not selected
- In the app > res > layout folder in the Project > Android pane, open the
activity_main.xmlfile, and click the Code tab to see the XML code.
At the top, or root, of theViewhierarchy is theConstraintLayoutViewGroup:<androidx.constraintlayout.widget.ConstraintLayout xmlns:android="http://schemas.android.com/apk/res/android" xmlns:app="http://schemas.android.com/apk/res-auto" xmlns:tools="http://schemas.android.com/tools" android:layout_width="match_parent" android:layout_height="match_parent" tools:context=".MainActivity"> - Change this
ViewGrouptoRelativeLayout. The first line of code now looks something like this:<RelativeLayoutRelativeLayoutlets you place UI elements relative to each other, or relative to the parentRelativeLayoutitself.
The default "Hello World"TextViewelement created by the Empty Layout template still has constraint attributes (such asapp:layout_constraintBottom_toBottomOf="parent"). Don't worry—you will remove them in a subsequent step. - Delete the following line of XML code, which is related to ConstraintLayout:
The block of XML code at the top now looks like this:xmlns:app="http://schemas.android.com/apk/res-auto"<RelativeLayout xmlns:android="http://schemas.android.com/apk/res/android" xmlns:app="http://schemas.android.com/apk/res-auto" xmlns:tools="http://schemas.android.com/tools" android:layout_width="match_parent" android:layout_height="match_parent" tools:context=".MainActivity"> - Add a
TextViewelement above the "Hello World"TextViewby entering <TextView. ATextViewblock appears that ends with/>and shows thelayout_widthandlayout_heightattributes, which are required for theTextView. - Enter the following attributes for the TextView. As you enter each attribute and value, suggestions appear to complete the attribute name or value.
TextView #1 attribute
Value
android:layout_width"match_parent"android:layout_height"wrap_content"android:id"@+id/article_heading"android:background"@color/colorPrimary"android:textColor"@android:color/white"android:padding"10dp"android:textAppearance"@android:style/TextAppearance.DeviceDefault.Large"android:textStyle"bold"android:text"Article Title" - Extract the string resource for the
android:textattribute's hardcoded string"Article Title"in theTextViewto create an entry for it instrings.xml.
To do this, place the cursor on the hardcoded string, press Alt-Enter (Option-Enter on the Mac), and select Extract string resource. Make sure that the Create the resource in directories option is selected, and then edit the resource name for the string value toarticle_title.
String resources are described in detail in the String Resources. - Extract the dimension resource for the
android:paddingattribute's hardcoded string"10dp"in theTextViewto createdimens.xmland add an entry to it.
To do this, place the cursor on the hardcoded string, press Alt-Enter (Option-Enter on the Mac), and select Extract dimension resource. Make sure that the Create the resource in directories option is selected, and then edit the Resource name topadding_regular. - Add another
TextViewelement above the "Hello World"TextViewand below theTextViewyou created in the previous steps. Add the following attributes to theTextView:TextView #2 Attribute
Value
android:layout_width"match_parent"android:layout_height"wrap_content"android:id"@+id/article_subheading"android:layout_below"@id/article_heading"android:padding"@dimen/padding_regular"android:textAppearance"@android:style/TextAppearance.DeviceDefault"android:text"Article Subtitle"
Because you extracted the dimension resource for the"10dp"string topadding_regularin the previously createdTextView, you can use"@dimen/padding_regular"for theandroid:paddingattribute in thisTextView. - Extract the string resource for the
android:textattribute's hardcoded string"Article Subtitle"in theTextViewtoarticle_subtitle. - In the "Hello World"
TextViewelement, delete thelayout_constraintattributes:app:layout_constraintBottom_toBottomOf="parent" app:layout_constraintLeft_toLeftOf="parent" app:layout_constraintRight_toRightOf="parent" app:layout_constraintTop_toTopOf="parent" - Add the following
TextViewattributes to the "Hello World"TextViewelement, and change theandroid:textattribute:TextView Attribute
Value
android:id"@+id/article"android:layout_below"@id/article_subheading"android:lineSpacingExtra"5sp"android:padding"@dimen/padding_regular"android:textChange to
"Article text" - Extract the string resource for
"Article text"toarticle_text, and extract thedimensionresource for"5sp"toline_spacing. - Reformat and align the code by choosing Code > Reformat Code. It is a good practice to reformat and align your code so that it is easier for you and others to understand.
1.2 Add the text of the article
In a real app that accesses magazine or newspaper articles, the articles that appear would probably come from an online source through a content provider, or might be saved in advance in a database on the device.
For this practical, you will create the article as a single long string in the strings.xml resource.
- In the app > res > values folder, open
strings.xml. - Open any text file with a large amount of text, or copy and paste the text I include below.
- Enter the values for the strings
article_titleandarticle_subtitlewith either a made-up title and subtitle, or use the values"Beatles Anthology Vol.1"and"Behind That Locked Door: Beatles Rarities"respectively. Make the string values single-line text without HTML tags or multiple lines. - Enter or copy and paste text for the
article_textstring.
You can use the text in a text file, or use the text provided for thearticle_textstring below. The only requirement for this task is that the text must be long enough so that it doesn't fit on the screen.In a vault deep inside Abbey Road Studios in London — protected by an unmarked, triple-locked, police-alarmed door — are something like 400 hours of unreleased Beatles recordings, starting from June 2, 1962 and ending with the very last tracks recorded for the <i>Let It Be</i> album. The best of the best were released by Apple Records in the form of the 3-volume Anthology series. For more information, see the Beatles Time Capsule at www.rockument.com. \n\n This volume starts with the first new Beatle song, "Free as a Bird" (based on a John Lennon demo, found only on <i>The Lost Lennon Tapes Vol. 28</i>, and covers the very earliest historical recordings, outtakes from the first albums, and live recordings from early concerts and BBC Radio sessions. \n\n <b>Highlights include:</b> \n\n <b><i>Cry for a Shadow</i></b> - Many a Beatle fanatic started down the outtake road, like I did, with a first listen to this song. Originally titled "Beatle Bop" and recorded in a single session that yielded four songs (the other three featured Tony Sheridan with the Beatles as a backing band), "Cry for a Shadow" is an instrumental written by Lennon and Harrison, which makes it unique to this day. John Lennon plays rhythm guitar, George Harrison plays lead guitar, Paul McCartney plays bass, and Pete Best plays drums. The sessions were produced by Bert Kaempfert in Hamburg, Germany, during the Beatles' second visit from April through July of 1961 to play in the Reeperbahn-section clubs. \n\n <b><i>My Bonnie</i></b> and <b><i>Ain't She Sweet</i></b> — At the same session, the Beatles played on "My Bonnie" (the first-ever single with Beatles playing), as the backing band for English singer Tony Sheridan, originally a member of the Jets. The popularity of this single in Liverpool brought the Beatles to the attention of Brian Epstein, who worked in the NEMS record store and tried to meet demand for the disc. John Lennon then sings a fine "Ain't She Sweet" (his first-ever released vocal). \n\n <b><i>Searchin</i></b> — A Jerry Leiber - Mike Stoller comedy song that was a hit for the Coasters in 1957, and a popular live favorite of the Beatles. The Coasters also had a hit with "Besame Mucho" and the Beatles covered that song as well. Ringo Starr had by now replaced Pete Best on drums. The high falsetto is George, who also plays a hesitant lead guitar. This is from their first audition for Decca Records in London on Jan 1., 1962, live in the studio. The Grateful Dead would later cover "Searchin" with a similar arrangement, Pigpen doing the Paul vocals. A live version is available on outtake records featuring the Dead joined by the Beach Boys! \n\n <b><i>Love Me Do</i></b> — An early version of the song, played a bit slower and with more of a blues feeling, and a cool bossa-nova beat in middle. Paul had to sing while John played harmonica — a first for the group. Pete Best played drums on this version. \n\n <b><i>She Loves You – Till There Was You – Twist and Shout</i></b> — Live at the Princess Wales Theatre by Leicester Square in London, attended by the Queen. "Till There Was You" (by Meredith Wilson) is from the musical The Music Man and a hit for Peggy Lee in 1961. Before playing it, Paul said it was recorded by his favorite American group, "Sophie Tucker" (which got some laughs). At the end, John tells the people in the cheaper seats to clap their hands, and the rest to "rattle your jewelry" and then announces "Twist and Shout" (a song by Bert Russell and Phil Medley that was first recorded in 1962 by the Isley Brothers). A film of the performance shows the Queen smiling at John's remark. \n\n <b><i>Leave My Kitten Alone</i></b> — One of the lost Beatle songs recorded during the "Beatles For Sale" sessions but never released. This song, written by Little Willie John, Titus Turner, and James McDougal, was a 1959 R&B hit for Little Willie John and covered by Johnny Preston before the Beatles tried it and shelved it. A reference to a "big fat bulldog" may have influenced John's "Hey Bulldog" (Yellow Submarine album), which is a similar rocker. \n\n <b><i>One After 909</i></b> — A song recorded for the <i>Let It Be</i> album was actually worked on way back in the beginning, six years earlier. This take shows how they did it much more slowly, with an R&B feel to it.
Keep in mind the following (refer to the figure below for an example):
- As you enter or paste text in the
strings.xmlfile, the text lines don't wrap around to the next line - they extend beyond the right margin. This is the correct behavior - each new line of text starting at the left margin represents an entire paragraph. If you want the text instrings.xmlto be wrapped, you can press Return to enter hard line endings, or format the text first in a text editor with hard line endings. - Enter \n to represent the end of a line, and another \n to represent a blank line. You need to add end-of-line characters to keep paragraphs from running into each other.
- If you have an apostrophe (
') in your text, you must escape it by preceding it with a backslash (\'). If you have a double-quote in your text, you must also escape it (\"). You must also escape any other non-ASCII characters. See the Formatting and styling section of String resources for more details. - Enter the HTML and tags around words that should be in bold.
- Enter the HTML and tags around words that should be in italics. If you use curled apostrophes within an italic phrase, replace them with straight apostrophes.
- You can combine bold and italics by combining the tags, as in
<b><i>... words ...</i></b>. Other HTML tags are ignored. - Enclose The entire text within
<string name="article_text"> </string>in thestrings.xmlfile. - Include a web link to test, such as www.google.com. (The example text above uses www.rockument.com.) Don't use an HTML tag, because any HTML tags except the bold and italic tags are ignored and presented as text, which is not what you want.
1.3 Run the app
Run the app. The article appears, but the user can't scroll the article because you haven't yet included a ScrollView (which you will do in the next task). Note also that tapping a web link does not currently do anything. You will also fix that in the next task.
Task 1 solution code
The activity_main.xml layout file looks like the following:
<?xml version="1.0" encoding="utf-8"?>
<RelativeLayout
	xmlns:android="http://schemas.android.com/apk/res/android"
	xmlns:app="http://schemas.android.com/apk/res-auto"
	xmlns:tools="http://schemas.android.com/tools"
	android:layout_width="match_parent"
	android:layout_height="match_parent"
	tools:context=".MainActivity">
<TextView
android:id="@+id/article_heading"
android:layout_width="match_parent"
android:layout_height="wrap_content"
android:background="@color/colorPrimary"
android:padding="@dimen/padding_regular"
android:text="@string/article_title"
android:textAppearance="@android:style/TextAppearance.DeviceDefault.Large"
android:textColor="@android:color/white"
android:textStyle="bold" />
<TextView
android:id="@+id/article_subheading"
android:layout_width="match_parent"
android:layout_height="wrap_content"
android:layout_below="@id/article_heading"
android:padding="@dimen/padding_regular"
android:text="@string/article_heading"
android:textAppearance="@android:style/TextAppearance.DeviceDefault" />
	<TextView
		android:id="@+id/article"
		android:layout_width="wrap_content"
		android:layout_height="wrap_content"
		android:layout_below="@id/article_subheading"
		android:autoLink="web"
		android:lineSpacingExtra="@dimen/line_spacing"
		android:padding="@dimen/padding_regular"
		android:text="@string/article_text" />
</RelativeLayout>
In the previous task you created the ScrollingText app with TextView elements for an article title, subtitle, and lengthy article text. You also included a web link, but the link is not yet active. You will add the code to make it active.
Also, the TextView by itself can't enable users to scroll the article text to see all of it. You will add a new ViewGroup called ScrollView to the XML layout that will make the TextView scrollable.
2.1 Add the autoLink attribute for active web links
Add the android:autoLink="web" attribute to the article TextView. The XML code for this TextView now looks like this:
<TextView
android:id="@+id/article"
android:layout_width="wrap_content"
android:layout_height="wrap_content"
android:layout_below="@id/article_subheading"
android:autoLink="web"
android:lineSpacingExtra="@dimen/line_spacing"
android:padding="@dimen/padding_regular"
android:text="@string/article_text" />
2.2 Add a ScrollView to the layout
To make a View (such as a TextView) scrollable, embed the View inside a ScrollView.
- Add a
ScrollViewbetween thearticle_subheadingTextView and thearticleTextView. As you enter <ScrollView, Android Studio automatically presents theandroid:layout_widthandandroid:layout_heightattributes with suggestions. Choosewrap_contentfrom the suggestions for both attributes.
When you type > to close the opening tag, Android Studio automatically adds the closing tag</ScrollView> - The code for the two
TextViewelements and theScrollViewnow looks like this:<TextView android:id="@+id/article_subheading" android:layout_width="match_parent" android:layout_height="wrap_content" android:layout_below="@id/article_heading" android:padding="@dimen/padding_regular" android:text="@string/article_heading" android:textAppearance="@android:style/TextAppearance.DeviceDefault" /> <ScrollView android:layout_width="wrap_content" android:layout_height="wrap_content"></ScrollView> <TextView android:id="@+id/article" android:layout_width="wrap_content" android:layout_height="wrap_content" android:layout_below="@id/article_subheading" android:autoLink="web" android:lineSpacingExtra="@dimen/line_spacing" android:padding="@dimen/padding_regular" android:text="@string/article_text" /> - Move the ending
</ScrollView>code after thearticleTextViewso that the articleTextViewattributes are entirely inside theScrollView. - Remove the following attribute from the article
TextViewand add it to theScrollView:
With the above attribute, theandroid:layout_below="@id/article_subheading"ScrollViewelement will appear below the article subheading. The article is inside theScrollViewelement. - Choose Code > Reformat Code to reformat the XML code so that the article
TextViewnow appears indented inside the<ScrollView>element. - Click the Split tab in the top-right corner of the layout editor to see a preview of the layout.
The preview that you see should look like this: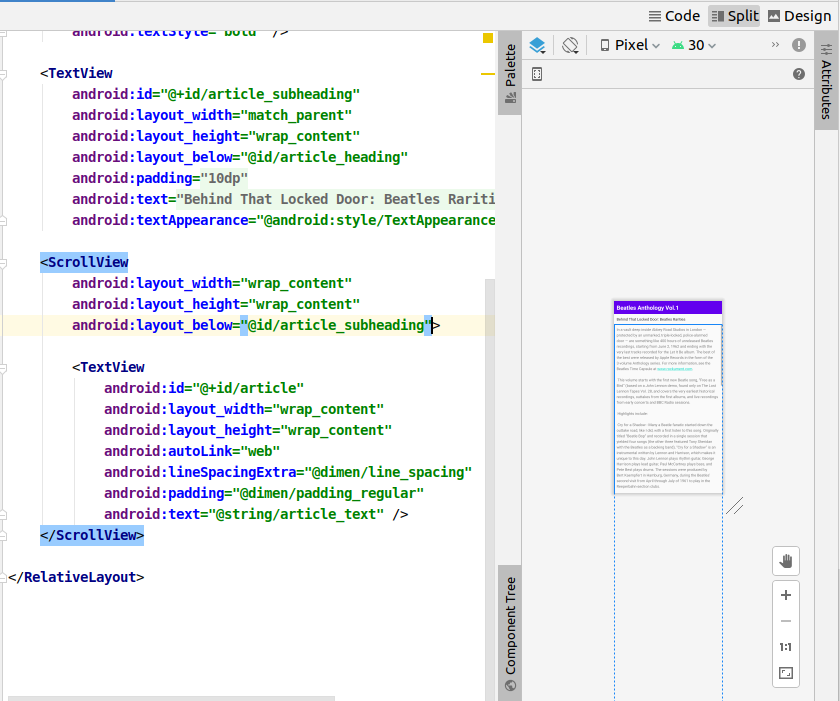
The layout components are now nested in this arrangement:
2.3 Run the app
To examine how the text scrolls:
- Run the app on a device or emulator.
Swipe up and down to scroll the article. The scroll bar appears in the right margin as you scroll.
Tap the web link to go to the web page. Theandroid:autoLinkattribute turns any recognizable URL in theTextView(such aswww.rockument.com) into a web link. - Rotate your device or emulator while running the app. Notice how the scrolling view widens to use the full display and still scrolls properly.
- Run the app on a tablet or tablet emulator. Notice how the scrolling view widens to use the full display and still scrolls properly.
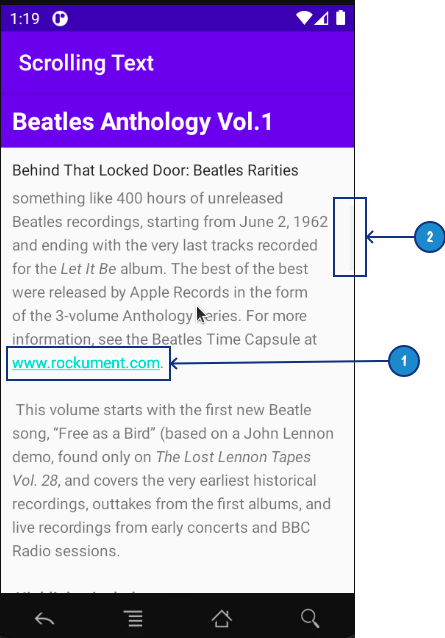
In the above figure, the following appear:
- An active web link embedded in free-form text
- The scroll bar that appears when scrolling the text
Task 2 solution code
The XML code for the layout with the scroll view is as follows:
<?xml version="1.0" encoding="utf-8"?>
<RelativeLayout xmlns:android="http://schemas.android.com/apk/res/android"
	xmlns:app="http://schemas.android.com/apk/res-auto"
	xmlns:tools="http://schemas.android.com/tools"
	android:layout_width="match_parent"
	android:layout_height="match_parent"
	tools:context=".MainActivity">

	<TextView
		android:id="@+id/article_heading"
		android:layout_width="match_parent"
		android:layout_height="wrap_content"
		android:background="@color/colorPrimary"
		android:padding="@dimen/padding_regular"
		android:text="@string/article_title"
		android:textAppearance="@android:style/TextAppearance.DeviceDefault.Large"
		android:textColor="@android:color/white"
		android:textStyle="bold" />

	<TextView
		android:id="@+id/article_subheading"
		android:layout_width="match_parent"
		android:layout_height="wrap_content"
		android:layout_below="@id/article_heading"
		android:padding="@dimen/padding_regular"
		android:text="@string/article_heading"
		android:textAppearance="@android:style/TextAppearance.DeviceDefault" />

	<ScrollView
		android:layout_width="wrap_content"
		android:layout_height="wrap_content"
		android:layout_below="@id/article_subheading">

		<TextView
			android:id="@+id/article"
			android:layout_width="wrap_content"
			android:layout_height="wrap_content"
			android:autoLink="web"
			android:lineSpacingExtra="@dimen/line_spacing"
			android:padding="@dimen/padding_regular"
			android:text="@string/article_text" />

	</ScrollView>

</RelativeLayout>
As noted before, a ScrollView can contain only one child View (such as the article TextView you created). However, that View can be another ViewGroup that contains View elements, such as LinearLayout. You can nest a ViewGroup such as LinearLayout within the ScrollView, thereby scrolling everything that is inside the LinearLayout.
For example, if you want the subheading of the article to scroll along with the article, add a LinearLayout within the ScrollView, and move the subheading and article into the LinearLayout. The LinearLayout becomes the single child View in the ScrollView as shown in the figure below, and the user can scroll the entire LinearLayout: the subheading and the article.
3.1 Add a LinearLayout to the ScrollView
- Open the
activity_main.xmlfile of the ScrollingText app project, and select the Code tab to edit the XML code (if it is not already selected). - Add a
LinearLayoutabove the articleTextViewwithin theScrollView. As you enter <LinearLayout, Android Studio automatically presents theandroid:layout_widthand android:layout_heightattributes with suggestions. Choosematch_parentandwrap_contentfrom the suggestions for its width and height, respectively. When you close the opening tag, Android Studio automatically adds</LinearLayout>to the end.
The code at the beginning of the ScrollView now looks like this:<ScrollView android:layout_width="wrap_content" android:layout_height="wrap_content" android:layout_below="@id/article_subheading"> <LinearLayout android:layout_width="match_parent" android:layout_height="wrap_content"></LinearLayout> <TextView android:id="@+id/article"
You use match_parent to match the width of the parent ViewGroup. You use wrap_content to resize the LinearLayout so it is just big enough to enclose its contents.
- Move the ending
</LinearLayout>code after the articleTextViewbut before the closing</ScrollView>.
TheLinearLayoutnow includes the articleTextView, and is completely inside theScrollView. - Add the attribute
android:orientation="vertical"to theLinearLayoutto set its orientation to vertical. - Choose Code > Reformat Code to indent the code correctly.
The LinearLayout now looks like this:<ScrollView android:layout_width="wrap_content" android:layout_height="wrap_content" android:layout_below="@id/article_subheading"> <LinearLayout android:layout_width="match_parent" android:layout_height="wrap_content" android:orientation="vertical"> <TextView android:id="@+id/article" android:layout_width="wrap_content" android:layout_height="wrap_content" android:autoLink="web" android:lineSpacingExtra="@dimen/line_spacing" android:padding="@dimen/padding_regular" android:text="@string/article_text" /> </LinearLayout> </ScrollView>
3.2 Move UI elements within the LinearLayout
The LinearLayout now has only one UI element—the article TextView. You want to include the article_subheading TextView in the LinearLayout so that both will scroll.
- To move the
article_subheadingTextView, select the code, choose Edit > Cut, click above thearticleTextViewinside theLinearLayout, and choose Edit > Paste. - Remove the
android:layout_below="@id/article_heading"attribute from thearticle_subheadingTextView. ThisTextViewis now within theLinearLayout, so this attribute would conflict with theLinearLayoutattributes. - Change the ScrollView layout attribute from
android:layout_below="@id/article_subheading"toandroid:layout_below="@id/article_heading". Now that the subheading is part of theLinearLayout, theScrollViewmust be placed below the heading, not the subheading.
The XML code for the ScrollView is now as follows:<ScrollView android:layout_width="wrap_content" android:layout_height="wrap_content" android:layout_below="@id/article_heading"> <LinearLayout android:layout_width="match_parent" android:layout_height="wrap_content" android:orientation="vertical"> <TextView android:id="@+id/article_subheading" android:layout_width="match_parent" android:layout_height="wrap_content" android:padding="@dimen/padding_regular" android:text="@string/article_heading" android:textAppearance="@android:style/TextAppearance.DeviceDefault" /> <TextView android:id="@+id/article" android:layout_width="wrap_content" android:layout_height="wrap_content" android:autoLink="web" android:lineSpacingExtra="@dimen/line_spacing" android:padding="@dimen/padding_regular" android:text="@string/article_text" /> </LinearLayout> </ScrollView> - Run the app.
Swipe up and down to scroll the article, and notice that the subheading now scrolls along with the article while the heading stays in place.
You will be able to find the solution code for the scrolling text app on Blackboard.
Challenge: Add another UI element - a Button - to the LinearLayout inside the ScrollView so that it scrolls with the text.
- Make the
Buttonappear below the article. The user scrolls to the end of the article to see theButton. - Use the text Add Comment for the Button. For this challenge, there is no need to create a button-handling method; all you have to do is put the
Buttonelement in the proper place in the layout.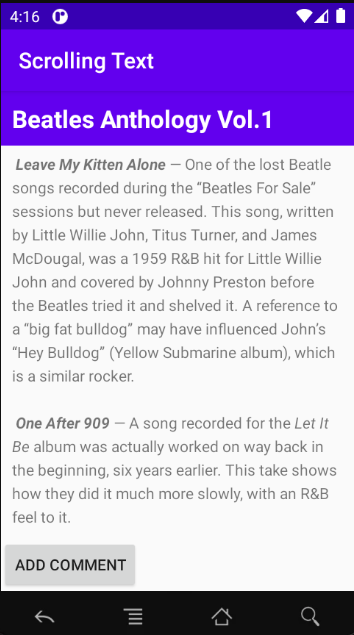
- Use a
ScrollViewto scroll a single childView(such as aTextView). AScrollViewcan hold only one child View or ViewGroup. - Use a
ViewGroupsuch asLinearLayoutas a childViewwithin aScrollViewto scroll more than oneViewelement. Enclose the elements within theLinearLayout. - Display free-form text in a
TextViewwith HTML formatting tags for bold and italics. - Use
\nas an end-of-line character in free-form text to keep a paragraph from running into the next paragraph. - Use the
android:autoLink="web"attribute to make web links in the text clickable.
The related concept documentation is in 1.3 Text and scrolling views.
Android Studio documentation:
Android developer documentation:
- ScrollView
- LinearLayout
- RelativeLayout
- View
- Button
- TextView
- String resources
- Guide to Relative Layout
Other:
Android Developers Blog: Linkify your Text!
Codepath: Working with a TextView